Crispy Prawn Toast

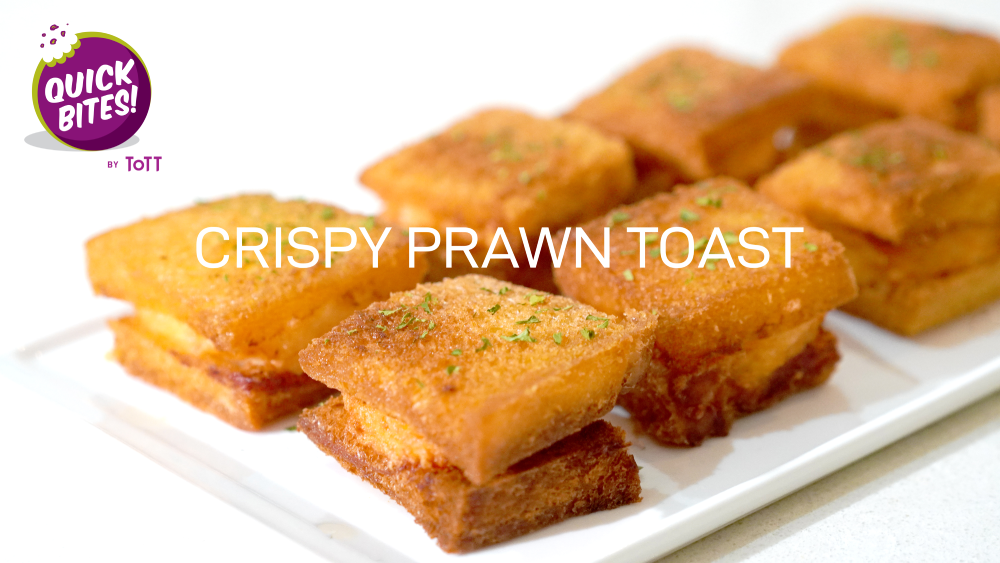
Top slices of bread with a simple whizzed up prawn mixture and fry to golden perfection. You can have these ready in less than 15 minutes!

#QuickBites

Cuisine: Chinese Course: Appetiser/Snack

Skill Level: Novice

Prep: 15 mins Cook: 15mins

Ready in: 30 mins Serves: 4

INGREDIENTS

  • 6 slices white bread
  • 250g shrimp (peeled)
  • 1-2 tbsp lemon juice
  • 1/2 tsp chicken powder
  • 2-3 tbsp potato starch
  • 1 tbps butter (room temp)
  • 1/2 tsp pepper
  • 1 egg white
  • Parsley for garnishing
  • Thai sweet chilli sauce for dipping

DIRECTIONS:

  1. Cut the edge of white breads, divide them into 4 small pieces.
  2. Pulse shrimp in food processor until smooth.
  3. In a mixing bowl, mix shrimp with lemon, egg white, pepper, butter, chicken bouillon powder, potato starch, ½ egg white.
  4. Scoop the shrimp mixture onto the bread with a spoon. Place another bread on top.
  5. Heat up frying oil to 140C/280F then add in the shrimp toast. Cook until both side are golden brown.
  6. Serve with sweet Thai chili sauce for dipping.

Linzer Cookies

Buttery, melt-in-your-mouth shortbread cookies filled with pecans and rolled in powdered sugar. Serve them with coffee, tea, hot chocolate or homemade eggnog for a perfect pairing! A perfect easy dessert for the holidays!

#QuickBites

Cuisine: Austria Course: Dessert/Snack

Skill Level: Novice

Prep: 30 mins Cook: 20mins

Ready in: 40 mins Serves: 16pcs

INGREDIENTS

  • 60g Unsalted Butter (Room Temperature)
  • 40g Powdered Sugar
  • 1 Egg Yolk
  • ¼ Vanilla Extract
  • 100g Cake Flour
  • 20g Ground Almond
  • 1g Salt
  • 1g Cinnamon Powder (optional)
  • Powdered Sugar for Rolling and Dusting
  • Strawberry Jam
  • 200g fresh or frozen strawberries
  • 50g sugar
  • ½ tbsp water
  • ½ tbsp lemon juice

DIRECTIONS:

  1. In a medium bowl combine flour with baking powder, ground almonds and salt.
  2. In a large bowl mix butter and sugar at medium-high speed until light and creamy. Add eggs, and beat until smooth. Beat in vanilla extract. Add flour mixture and stir to incorporate.
  3. Separate dough in half and pound into 6 inch disks. Wrap each disk in plastic wrap and refrigerate for at least 30 minutes.
  4. Preheat oven to 350F (180C) and line two baking sheets with parchment paper.
  5. On a well floured surface roll the first disk 1/8 inch (3 mm) thick. Cut the dough for the bottoms with a 2 inch (5 cm) linzer cutter. Transfer the cookies to the prepared baking sheet. Re-roll scraps and repeat.
  6. Bake for 10 minutes until the cookies are lightly browned on the edges. Remove and let them cool on baking sheet for 2 minutes; remove from sheet and cool completely on wire rack.
  7. Invert the bottom cookies and add strawberry jam. Lightly dust with powdered sugar the top cookies.
  8. Gently sandwich cookies together and let stand for several hours before serving.For the Strawberry Jam
  1. Add strawberries, sugar, lemon juice and water into a small saucepan.
  2. Bring to a simmer, stirring occasionally. Simmer until the mixture is thick, for about 25-30 minutes.
  3. Remove from heat and let cool completely before using.

Snowball Cookies

Buttery, melt-in-your-mouth shortbread cookies filled with pecans and rolled in powdered sugar. Serve them with coffee, tea, hot chocolate or homemade eggnog for a perfect pairing! A perfect easy dessert for the holidays!

#QuickBites

Cuisine: American Course: Dessert

Skill Level: Novice

Prep: 20 mins Cook: 20mins

Ready in: 40 mins Serves: 16-18pcs

INGREDIENTS

  • 50g Unsalted Butter
  • 60g Cake Flour
  • 25g Almond Flour
  • 15g Powered Sugar
  • 15g Walnut
  • Powdered Sugar for Rolling and Dusting

DIRECTIONS:

  • Place walnuts on the cutting board, then finely chopped.
  • Heat a pan over medium low heat, add chopped walnuts and stir frequently for 1 minute. Transfer to bowl.
  • In a mixing bowl, cream butter and sugar until creamy.
  • Add cake flour and almond flour, mix until well blended.
  • Pour chopped walnuts into the bowl with the dough, mix to incorporate.
  • Scrape the dough onto a plastic wrap and place in the refrigerator for at least 30 minutes.
  • Cut the dough into 16~18 pieces, each weights 8~9g, roll the dough into a ball-sized.
  • Preheat the oven to 160˚C, bake for 16-18 minutes, until the bottom of the cookies is slightly brown.
  • When they’re still warm but cool enough to touch, roll cookies in powdered sugar.
  • Set aside on a rack to cool completely. When cool, dust again in powdered sugar.
  • Store cookies in an airtight container.

Halloween Chicken Pot Pie

Be creative this Halloween by baking this homemade chicken pot pie with flaky pie crust and creamy chicken pot pie filling.  These mini chicken pot pies have strips of puff pastry on top to look like mummy wrappings and a few stuffed green olives slices make the perfect “eyes.”

#QuickBites

Cuisine: American Course: Main

Skill Level: Novice

Prep: 20 mins Cook: 50mins

Ready in: 1 Hour Serves: 4 servings

INGREDIENTS

  • 1 tablespoon olive oil
  • 1 ½ lb boneless, skinless chicken breast(680 g), cubed
  • salt, to taste
  • pepper, to taste
  • ½ white onion, chopped
  • 2 cloves garlic, minced
  • 1 cup potatoes (225 g), cubed
  • 2 cups frozen pea and carrot(300 g)
  • 4 tablespoons butter
  • 4 tablespoons all-purpose flour
  • 2 cups chicken broth(480 mL)
  • 1 frozen puff pastry, thawed
  • 1 egg, beaten
  • Sliced black olives

DIRECTIONS:

  • Preheat the oven to 400˚F (200˚C)
  • Heat the oil in a cast-iron skillet or saucepan. Add the chicken, season with salt and pepper, and cook until the meat is golden brown on the outside. Remove chicken from the pan and set aside.
  • Sauté the onion and garlic until translucent. Add the potato cubes and sauté for about 5 minutes. Add the peas and carrots and stir. Add the butter and allow it to melt. Sprinkle the flour on top, covering the vegetables, and quickly stir to avoid lumps.
  • Pour in the chicken broth and bring to a boil to thicken the sauce. Season with salt and pepper and remove from the heat.
  • Spoon the stew into ramekin.
  • Uncover pastry and cut it in half, then slice the pastry into 1/2-inch strips and place them on top of the filling.
  •  Press the strips to the edges of the baking dish so they stick. Brush the pastry with the egg.
  • Bake for 25-30 minutes, or until golden brown. Put the olives on the pastry for the eyes and serve.

Korean Fried Chicken

< Back to Recipe Listings

Korean Fried Chicken

by ToTT

You can now recreate the most juiciest sweet and spicy Korean Fried Chicken recipe that will make your friends and family ask for more. We can’t emphasize that the sauce is so delicious , you can literally dip anything in it. The perfect side dish that you can serve with this amazing plate of Korean Fried Chicken recipe would be a bowl of vinegary pickle that will just make every bite a little more delicious.

#QuickBites

Cuisine: Korean Course: Appetizer

Skill Level: Novice

Prep: 25 mins Marinate: 30mins Cook: 20mins

Ready in: 45 min Serves: 4 servings


INGREDIENTS 

For the chicken:

  • 12 drumettes and wingettes
  • 1 teaspoon salt
  • pinch black pepper
  • 1/2 teaspoon grated ginger
  • 1/2 cup potato starch or corn starch
  • 5-6 cups oil for frying

For the sauce:

  • 2 tablespoons grated onion
  • 1 tablespoon minced garlic
  • 1 teaspoon finely grated ginger
  • 1 tablespoon soy sauce
  • 4 tablespoons rice wine or mirin
  • 2 – 3 tablespoons hot sauce
  • 4 tablespoons chili sauce or ketchup
  • 2 tablespoons gochujang Korean red chili pepper paste
  • 2 tablespoons corn syrup or honey
  • 1 tablespoon sugar or more to taste
  • 1 teaspoon sesame oil

For the garnish:

  • 1/2 teaspoon sesame seeds

DIRECTIONS:

  • Wash chicken wings, and drain thoroughly. Mix with salt, pepper and ginger. Marinate for 20 to 30 minutes.
  • Heat a pan over medium-low heat. Add 1 tablespoon of cooking oil and then the onion, garlic, and ginger. Stir for a minute until fragrant. Add all other sauce ingredients, and stir well. Simmer until it thickens slightly, about 4 to 5 minutes. Turn the heat off.
  • Remove any excess water from the marinated chicken. Add the potato (or corn) starch to the chicken, and toss well to coat evenly.
  • Add the oil to a deep fryer, wok, or large pot. Heat the oil to 160°C. Using tongs or chopsticks, drop the chicken in the oil, one piece at a time. Fry them in two batches. Cook until lightly golden, about 5 to 7 minutes, depending on the size of the chicken wings. Drain on a wire rack or in a large mesh strainer set on a bowl.
  • Reheat the oil to 160°C. Add the chicken (you can do this in one batch for the second frying), and deep fry again, for 2 to 3 minutes, until lightly golden brown. Drain on a wire rack or in a large mesh strainer set on a bowl.
  • Heat the sauce over medium-low heat. Add the chicken, and stir well until the chicken wings are evenly coated. Sprinkle with sesame seeds to serve.

Basque Burnt Cheesecake

< Back to Recipe Listings

Basque Burnt Cheesecake

by ToTT

Originated from Spain, this rustic cheesecake is the alter ego to the classic New York–style cheesecake with a press-in cookie crust. Inspired by a Basque version, this is the cheesecake that wants to get burnt, cracked, and cooked at high heat. Which also means this is the cheesecake that’s impossible to mess up.

#QuickBites

Cuisine: Spanish Course: Dessert

Skill Level: Novice

Prep: 10 mins Cook: 35 mins

Ready in: 45 min Serves: 6 servings


INGREDIENTS:

  • 430g cream cheese, room temperature
  • 100g caster sugar
  • 3 large eggs, room temp (approx 150g of eggs without shell)
  • 270g heavy cream/thickened cream (35% min fat content)
  • 20g cake flour
  • 1 tsp vanilla extract
  • 1 tsp lemon juice

DIRECTIONS:

  • Line 6” circle cake tin with 2 layers of baking paper and trimmed to have an overhanging amount of 1.5″-2″.
  • Beat sugar and cream cheese together on medium until smooth. Scrape the bowl.
  • Add eggs one at a time and beat on medium until smooth. Scrape the bowl again to ensure that nothing sticks to the sides for even mixing.
  • Add the vanilla and lemon juice and beat until just mixed.
  • In a separate bowl, mix flour and 1/4 of the cream and mix until smooth. Add another 1/4 more cream, mix, and then add the rest and mix until smooth. (Adding the flour a small amount at the time allows you to mix out any lumps that may form by creating a paste at the start.)
  • Slowly pour the cream/flour mixture into the cheese mixture whilst the mixer is beating on low until mixed through. Increase speed to medium and mix for 15 seconds just to ensure it’s all combined.
  • Preheat your oven on convection mode at 240C for at least 30mins and bake at 240C for 30-35mins until top is dark amber and almost charred at parts but the middles still has a wobble to them when you give the pan a jiggle.
  • Let cool in the tin fully on a wire rack at room temperature to allow the cheesecake to set.
  • Remove from the baking tin and enjoy at room temperature.
  • For a less “gooey” center, place into the fridge after cooled to allow it to chill and set and serve cold.
  • For a Caramel version, drizzle with caramel sauce and sprinkle crushed Biscoff biscuit over and serve.

RECOMMENDED PRODUCTS:

KitchenAid Stand Mixer
 
Nordic Ware Springform Pan

Warabi Mochi

< Back to Recipe Listings

Warabi Mochi

by ToTT

Make your own traditional Japanese dessert with this easy warabi mochi recipe. Warabi mochi is made by dissolving sugar and the starch from warabi bracken (a type of edible fern) in water, letting it set into a jelly-like mixture and dusting it with kinako soy bean flour.

#QuickBites

Cuisine: Japanese Course: Dessert

Skill Level: Novice

Prep: 10 mins Cook: 20 mins

Ready in: 30 min Serves: 20pcs


INGREDIENTS:

  • 50g Warabiko
  • 50g Brown Sugar
  • 220ml Water
  • 20g Roast Soy Bean Powder (Kinako)
  • 20g Matcha Green Powder
  • 5g Icing Sugar

DIRECTIONS:

  • Combine the Warabi Mochiko, sugar, and water in a medium saucepan.
  • Heat the mixture over low heat until it starts to boil and form a dough
  • When the mixture starts to boil, reduce the heat, stir constantly and vigorously for 10 minutes, or until the mixture is thick and evenly translucent.
  • Remove the mochi from the heat and transfer to a baking sheet.
  • Let it cool down for 20 minutes.
  • Sprinkle kinako evenly to cover a silicone baking mat or a baking dish.
  • For Matcha version, sprinkle matcha green powder.
  • Coat and cover the mochi well with the kinako.
  • Slice/cut into ¾ inch cubes. If you like, pour the Kuromitsu (brown sugar syrup) over the Warabi mochi and enjoy.

RECOMMENDED PRODUCTS:

Nordic Ware Large Silicone Spatula
Jamie Oliver Non-Stick Baking Tray

Caramel Rose Apple Tart

< Back to Recipe Listings

Caramel Rose Apple Tart

by ToTT

You don’t need to be a pastry chef to bake this deliciously tempting rose-shaped dessert. It tastes just like apple pie and it looks a lot like a beautiful red rose.  Made with naturally sweet apple slices, sprinkled with cinnamon and rolled up in a perfectly crispy puff pastry.

#QuickBites

Cuisine: Western Course: Dessert

Skill Level: Novice

Prep: 20 mins Cook: 40 mins

Ready in: 60 min Serves: 6 serving


INGREDIENTS:

  • 2 apples
  • 1 egg, beaten
  • 2 tablespoon brown sugar
  • 1/2 teaspoon cinnamon
  • 1 sheet of puff pastry, thawed
  • 1/2 lemon, juiced

DIRECTIONS:

  • Preheat your oven to 375°F (190°C), grease your muffin tin with some butter or non-stick spray and set aside.
  •  Fill a small bowl with some water, squeeze in the juice of 1/2 of a small lemon and set aside.
  • Cut the apple in half lengthwise, core it and then slice each half into very thin half moon shapes, add the slices of apples in the lemon water immediately to stop them from turning brown. Drain the apples then place them in a shallow bowl and pop them in the microwave for 45 seconds.
  • On a lightly floured surface, roll out the puff pastry about one inch size with a rolling and then cut into 6 equal size strips.
  •  Brush the egg over the surface of each strip of puff pastry, then sprinkle a little cinnamon sugar on each one.
  • Lay the apple slices along the top half of each piece of puff pastry and fold the bottom half over the base of the apple slices.
  • Roll each one carefully and put each one in the muffin tin. Bake them on the middle rack of your oven for about 40 minutes then allow them to cool a bit and serve them with some caramel sauce.

RECOMMENDED PRODUCTS:

Nordic ware Compact ovenware muffin pan
jamie oliver acacia rolling pin

Marshmallow Choc Bark

< Back to Recipe Listings

Marshmallow Choc Bark

by ToTT

Valentine’s Marshmallow Chocolate Bark is a simple, festive dessert that everyone loves! Made in minutes with just a few ingredients, these chocolate squares are perfect for Valentine’s Day!

#QuickBites

Cuisine: Western Course: Dessert

Skill Level: Novice

Prep: 10 mins Cook: 20 mins

Ready in: 30 min Serves: 4 serving


INGREDIENTS:

  • 12oz bag semi-sweet chocolate chips
  • 3 cups mini marshmallows
  • ½ tbsp shortening (optional)
  • 5-6 pieces of strawberries
  • 20g walnuts
  • Valentine’s sprinkles

DIRECTIONS:

  • Pour semi-sweet chocolate chips in the top pan of a double boiler. Heat over hot but not boiling water, stirring constantly, until chocolate is fully melted.
  • Or you can microwave semi-sweet chocolate chips in a bowl, in 30 second increments, until melted, stirring each time until the chocolate is smooth.
  • Chop walnuts into smaller pieces.
  • Pour the melted chocolate over the marshmallows, spreading evenly with a spatula.
  • Add the chopped walnuts and shake on any sprinkles you’d like to decorate the bark with. Place strawberries into top of bark.
  • Freeze for at least 20-30 minutes.
  • Remove from the freezer and break it into pieces.

RECOMMENDED PRODUCTS:

Epicurean Kitchen Series Wood Fibre Cutting Board Brown
Safico Silicone Baking Mat Black

Oreo Strawberry Dessert Cups

< Back to Recipe Listings

OREO STRAWBERRY DESSERT CUPS

by ToTT

These delicious Oreo Strawberry Dessert Cups are perfect on any dessert table! Fresh strawberries with cream cheese frosting and crunchy Oreo crumbs make this a delicious delight – best of all, it’s really simple and quick to make!

#QuickBites

Cuisine: Western Course: Appetiser

Skill Level: Novice

Prep: 15 mins Cook: 10 mins

Ready in: 15 min Serves: 2 serving


INGREDIENTS:

  • ½ Cup Chopped Strawberries
  • 8pc Oreo Cookies
  • Sugar
  • 2 Tbsp Melted Butter
  • ¼ Cup Whipped Cream
  • 2 Tbsp Cream Cheese
  • Strawberry Puree

DIRECTIONS:

  • Mix chopped strawberries and 1 Tbsp of Sugar together. Keep aside.
  • Crush Oreo cookies in a food processor.
  • Put crushed Oreos into a bowl and add 2 Tbsp Melted Butter. Mix well.
  • Add Oreo mixture as the first layer on the cup and keep in the fridge for 10 mins.
  • In the meantime, prepare a bowl with ¼ cup whipped cream, 1 Tbsp sugar and 2 Tbsp Cream Cheese.
  • Beat with a whisk or mixer until stiff peaks.
  • Take Oreo cups out of the fridge and add sugar-coated strawberries as the 2nd layer, and the cream cheese frosting as the 3rd
  • Finish off the final layer with some Strawberry puree, oreo crumbs and strawberries!