Mac & Cheese Waffles

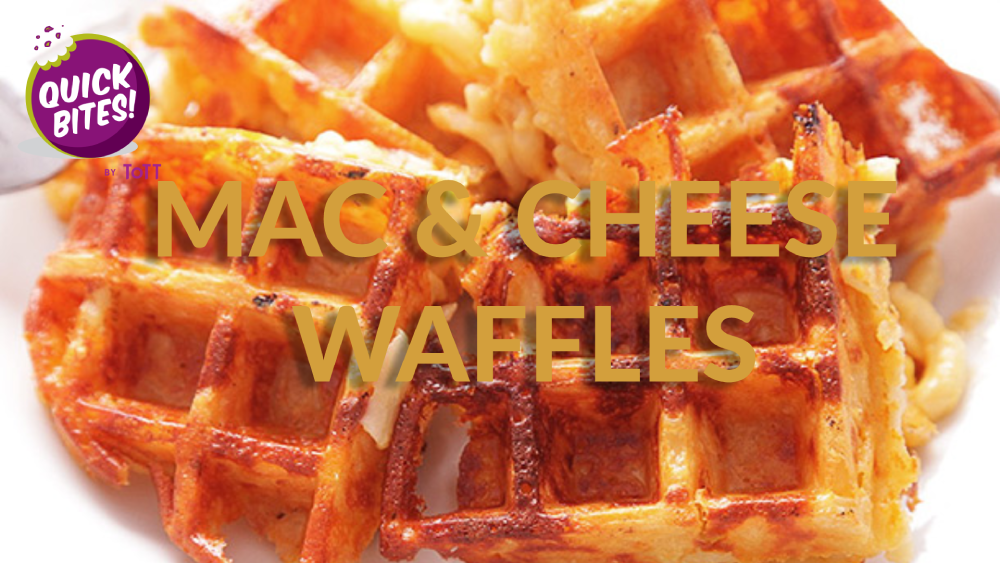
Two ingredients and you get crisp on the outside, and soft cheesy Mac and cheese on the inside of these divine waffles!

#QuickBites

Cuisine: American Course: Appetizer / Snack

Skill Level: Novice

Prep: 10 mins Cook: 15 mins

Serves: 4

INGREDIENTS

  • 5 cups milk(1 ¼ L)
  • 1 lb elbow macaroni(455g), dry
  • 2 cups shredded cheddar cheese(200g)

DIRECTIONS:

  1. In a large pot, bring the milk to a boil.
  2. Add the pasta and stir constantly until the pasta is cooked, about 10 minutes.
  3. Turn off the heat, then add the cheddar. Stir until the cheese is melted and the pasta is evenly coated.
  4. Preheat the waffle iron
  5. Spray with cooking spay
  6. Scoop ½ cup of max & cheese into the center of the grate
  7. Close the iron and cook until golden and crispy, about 5 minutes
  8. Use forks to carefully remove the waffles from the iron
  9. Serve warm and enjoy!

Crème Brülée Easter Egg

Get Cracking! Make Easter Sunday extra special with these yummy Crème Brülée Easter Eggs. A cute festive treat for kids with a fun surprise inside!

#QuickBites

Cuisine: French Course: Dessert

Skill Level: Novice

Prep: 30 mins Cook: 45 mins

Chilling: 2hrs  Serves: 6

INGREDIENTS

  • 2 Cups Heavy Cream
  • 6 Egg Yolks
  • 1 Teaspoon Vanilla Extract
  • 1/3 Cup Sugar
  • Sugar for finishing

DIRECTIONS:

  1. Preheat oven to 300°C.
  2. In a medium saucepan, combine heavy cream and half of the sugar. Cook over medium heat, until it begins to simmer.
  3. Whisk & mix the other half of the sugar, egg yolks and vanilla bean syrup into a mixing bowl.
  4. Slowly add the heavy cream mixture into the yolks.
  5. Strain the mixture through a fine mesh sieve into a mixing bowl.
  6. Pour the mixture into eggshells, filling to top.
  7. Place in a hot water bath and bake for 30 minutes at 180°C till the custard is set.
  8. Chill in fridge for 2 hours.
  9. Sprinkle sugar over the top of creme brulee in the eggling.
  10. Caramelize sugar with a blowtorch to give the dessert its signature crunchy top.

Bak Kwa Gougères

Originating in Burgundy, these delicate gougères will wow any guest. These little French cheese puffs are made with Gruyère or Parmesan cheese and can be served before dinner, with wine, or set out at a party. We made a little local twist here by adding bits of Bak Kwa, the savoury sweet taste of BBQ pork will elevate these treats to the next level!

#QuickBites

Cuisine: French Course: Appetiser

Skill Level: Novice

Prep: 20 mins Cook: 20 mins

Ready in: 40mins  Serves: 30pcs

INGREDIENTS

  • 60g Unsalted Butter (Room Temperature)
  • 8 tablespoons unsalted butter
  • 1/2 cup milk
  • 1/2 cup water
  • 1/2 teaspoon salt
  • 1/4 teaspoon black pepper
  • 1 cup all-purpose flour
  • 4 eggs (room temperature)
  • 6 ounces Gruyere cheese (grated)
  • 2-3 pcs Bak Kwa (BBQ Pork Jerky)

DIRECTIONS:

  1. Preheat oven to 220°C. Line two baking sheets with silicone baking mats or parchment paper.
  2. Place the butter, milk, water, salt, and pepper in a medium saucepan and bring to a boil over medium-high heat. Add all of the flour at once, reduce heat to medium-low and stir with a wooden spoon until the mixture forms a ball and appears to dry out (a film or “crust” will develop on the sides and bottom of the pan), another 2 to 3 minutes.
  3. Immediately place the dough into a mixing bowl and beat on low until it stops steaming and is just warm to the touch, approximately 1 minute.
  4. Increase mixer speed to medium and add the eggs, one at a time, beating well after each until fully incorporated and scraping the sides and bottom of the bowl as needed. Add the cheese and bak kwa and mix until thoroughly combined, about 1 minute. The final dough will appear smooth, creamy, and shiny.
  5. Transfer the dough to a pastry bag fitted with a large round piping, and pipe 1-2 tablespoons of dough onto the prepared sheets. Alternately, use a medium cookie scoop, drop the dough onto the prepared baking sheets, leaving 2 inches between them. You can wet your hands and gently smooth out the scoops, if you’d like.
  6. Bake for 10 minutes, reduce oven temperature to 200°C, and continue to bake until puffed and golden brown, an additional 5 to 10 minutes. Allow to cool for at least 5 minutes, then serve warm or at room temperature.

Crispy Prawn Toast

Top slices of bread with a simple whizzed up prawn mixture and fry to golden perfection. You can have these ready in less than 15 minutes!

#QuickBites

Cuisine: Chinese Course: Appetiser/Snack

Skill Level: Novice

Prep: 15 mins Cook: 15mins

Ready in: 30 mins Serves: 4

INGREDIENTS

  • 6 slices white bread
  • 250g shrimp (peeled)
  • 1-2 tbsp lemon juice
  • 1/2 tsp chicken powder
  • 2-3 tbsp potato starch
  • 1 tbps butter (room temp)
  • 1/2 tsp pepper
  • 1 egg white
  • Parsley for garnishing
  • Thai sweet chilli sauce for dipping

DIRECTIONS:

  1. Cut the edge of white breads, divide them into 4 small pieces.
  2. Pulse shrimp in food processor until smooth.
  3. In a mixing bowl, mix shrimp with lemon, egg white, pepper, butter, chicken bouillon powder, potato starch, ½ egg white.
  4. Scoop the shrimp mixture onto the bread with a spoon. Place another bread on top.
  5. Heat up frying oil to 140C/280F then add in the shrimp toast. Cook until both side are golden brown.
  6. Serve with sweet Thai chili sauce for dipping.

Linzer Cookies

Buttery, melt-in-your-mouth shortbread cookies filled with pecans and rolled in powdered sugar. Serve them with coffee, tea, hot chocolate or homemade eggnog for a perfect pairing! A perfect easy dessert for the holidays!

#QuickBites

Cuisine: Austria Course: Dessert/Snack

Skill Level: Novice

Prep: 30 mins Cook: 20mins

Ready in: 40 mins Serves: 16pcs

INGREDIENTS

  • 60g Unsalted Butter (Room Temperature)
  • 40g Powdered Sugar
  • 1 Egg Yolk
  • ¼ Vanilla Extract
  • 100g Cake Flour
  • 20g Ground Almond
  • 1g Salt
  • 1g Cinnamon Powder (optional)
  • Powdered Sugar for Rolling and Dusting
  • Strawberry Jam
  • 200g fresh or frozen strawberries
  • 50g sugar
  • ½ tbsp water
  • ½ tbsp lemon juice

DIRECTIONS:

  1. In a medium bowl combine flour with baking powder, ground almonds and salt.
  2. In a large bowl mix butter and sugar at medium-high speed until light and creamy. Add eggs, and beat until smooth. Beat in vanilla extract. Add flour mixture and stir to incorporate.
  3. Separate dough in half and pound into 6 inch disks. Wrap each disk in plastic wrap and refrigerate for at least 30 minutes.
  4. Preheat oven to 350F (180C) and line two baking sheets with parchment paper.
  5. On a well floured surface roll the first disk 1/8 inch (3 mm) thick. Cut the dough for the bottoms with a 2 inch (5 cm) linzer cutter. Transfer the cookies to the prepared baking sheet. Re-roll scraps and repeat.
  6. Bake for 10 minutes until the cookies are lightly browned on the edges. Remove and let them cool on baking sheet for 2 minutes; remove from sheet and cool completely on wire rack.
  7. Invert the bottom cookies and add strawberry jam. Lightly dust with powdered sugar the top cookies.
  8. Gently sandwich cookies together and let stand for several hours before serving.For the Strawberry Jam
  1. Add strawberries, sugar, lemon juice and water into a small saucepan.
  2. Bring to a simmer, stirring occasionally. Simmer until the mixture is thick, for about 25-30 minutes.
  3. Remove from heat and let cool completely before using.

Snowball Cookies

Buttery, melt-in-your-mouth shortbread cookies filled with pecans and rolled in powdered sugar. Serve them with coffee, tea, hot chocolate or homemade eggnog for a perfect pairing! A perfect easy dessert for the holidays!

#QuickBites

Cuisine: American Course: Dessert

Skill Level: Novice

Prep: 20 mins Cook: 20mins

Ready in: 40 mins Serves: 16-18pcs

INGREDIENTS

  • 50g Unsalted Butter
  • 60g Cake Flour
  • 25g Almond Flour
  • 15g Powered Sugar
  • 15g Walnut
  • Powdered Sugar for Rolling and Dusting

DIRECTIONS:

  • Place walnuts on the cutting board, then finely chopped.
  • Heat a pan over medium low heat, add chopped walnuts and stir frequently for 1 minute. Transfer to bowl.
  • In a mixing bowl, cream butter and sugar until creamy.
  • Add cake flour and almond flour, mix until well blended.
  • Pour chopped walnuts into the bowl with the dough, mix to incorporate.
  • Scrape the dough onto a plastic wrap and place in the refrigerator for at least 30 minutes.
  • Cut the dough into 16~18 pieces, each weights 8~9g, roll the dough into a ball-sized.
  • Preheat the oven to 160˚C, bake for 16-18 minutes, until the bottom of the cookies is slightly brown.
  • When they’re still warm but cool enough to touch, roll cookies in powdered sugar.
  • Set aside on a rack to cool completely. When cool, dust again in powdered sugar.
  • Store cookies in an airtight container.

Basque Burnt Cheesecake

< Back to Recipe Listings

Basque Burnt Cheesecake

by ToTT

Originated from Spain, this rustic cheesecake is the alter ego to the classic New York–style cheesecake with a press-in cookie crust. Inspired by a Basque version, this is the cheesecake that wants to get burnt, cracked, and cooked at high heat. Which also means this is the cheesecake that’s impossible to mess up.

#QuickBites

Cuisine: Spanish Course: Dessert

Skill Level: Novice

Prep: 10 mins Cook: 35 mins

Ready in: 45 min Serves: 6 servings


INGREDIENTS:

  • 430g cream cheese, room temperature
  • 100g caster sugar
  • 3 large eggs, room temp (approx 150g of eggs without shell)
  • 270g heavy cream/thickened cream (35% min fat content)
  • 20g cake flour
  • 1 tsp vanilla extract
  • 1 tsp lemon juice

DIRECTIONS:

  • Line 6” circle cake tin with 2 layers of baking paper and trimmed to have an overhanging amount of 1.5″-2″.
  • Beat sugar and cream cheese together on medium until smooth. Scrape the bowl.
  • Add eggs one at a time and beat on medium until smooth. Scrape the bowl again to ensure that nothing sticks to the sides for even mixing.
  • Add the vanilla and lemon juice and beat until just mixed.
  • In a separate bowl, mix flour and 1/4 of the cream and mix until smooth. Add another 1/4 more cream, mix, and then add the rest and mix until smooth. (Adding the flour a small amount at the time allows you to mix out any lumps that may form by creating a paste at the start.)
  • Slowly pour the cream/flour mixture into the cheese mixture whilst the mixer is beating on low until mixed through. Increase speed to medium and mix for 15 seconds just to ensure it’s all combined.
  • Preheat your oven on convection mode at 240C for at least 30mins and bake at 240C for 30-35mins until top is dark amber and almost charred at parts but the middles still has a wobble to them when you give the pan a jiggle.
  • Let cool in the tin fully on a wire rack at room temperature to allow the cheesecake to set.
  • Remove from the baking tin and enjoy at room temperature.
  • For a less “gooey” center, place into the fridge after cooled to allow it to chill and set and serve cold.
  • For a Caramel version, drizzle with caramel sauce and sprinkle crushed Biscoff biscuit over and serve.

RECOMMENDED PRODUCTS:

KitchenAid Stand Mixer
 
Nordic Ware Springform Pan

Warabi Mochi

< Back to Recipe Listings

Warabi Mochi

by ToTT

Make your own traditional Japanese dessert with this easy warabi mochi recipe. Warabi mochi is made by dissolving sugar and the starch from warabi bracken (a type of edible fern) in water, letting it set into a jelly-like mixture and dusting it with kinako soy bean flour.

#QuickBites

Cuisine: Japanese Course: Dessert

Skill Level: Novice

Prep: 10 mins Cook: 20 mins

Ready in: 30 min Serves: 20pcs


INGREDIENTS:

  • 50g Warabiko
  • 50g Brown Sugar
  • 220ml Water
  • 20g Roast Soy Bean Powder (Kinako)
  • 20g Matcha Green Powder
  • 5g Icing Sugar

DIRECTIONS:

  • Combine the Warabi Mochiko, sugar, and water in a medium saucepan.
  • Heat the mixture over low heat until it starts to boil and form a dough
  • When the mixture starts to boil, reduce the heat, stir constantly and vigorously for 10 minutes, or until the mixture is thick and evenly translucent.
  • Remove the mochi from the heat and transfer to a baking sheet.
  • Let it cool down for 20 minutes.
  • Sprinkle kinako evenly to cover a silicone baking mat or a baking dish.
  • For Matcha version, sprinkle matcha green powder.
  • Coat and cover the mochi well with the kinako.
  • Slice/cut into ¾ inch cubes. If you like, pour the Kuromitsu (brown sugar syrup) over the Warabi mochi and enjoy.

RECOMMENDED PRODUCTS:

Nordic Ware Large Silicone Spatula
Jamie Oliver Non-Stick Baking Tray

Caramel Rose Apple Tart

< Back to Recipe Listings

Caramel Rose Apple Tart

by ToTT

You don’t need to be a pastry chef to bake this deliciously tempting rose-shaped dessert. It tastes just like apple pie and it looks a lot like a beautiful red rose.  Made with naturally sweet apple slices, sprinkled with cinnamon and rolled up in a perfectly crispy puff pastry.

#QuickBites

Cuisine: Western Course: Dessert

Skill Level: Novice

Prep: 20 mins Cook: 40 mins

Ready in: 60 min Serves: 6 serving


INGREDIENTS:

  • 2 apples
  • 1 egg, beaten
  • 2 tablespoon brown sugar
  • 1/2 teaspoon cinnamon
  • 1 sheet of puff pastry, thawed
  • 1/2 lemon, juiced

DIRECTIONS:

  • Preheat your oven to 375°F (190°C), grease your muffin tin with some butter or non-stick spray and set aside.
  •  Fill a small bowl with some water, squeeze in the juice of 1/2 of a small lemon and set aside.
  • Cut the apple in half lengthwise, core it and then slice each half into very thin half moon shapes, add the slices of apples in the lemon water immediately to stop them from turning brown. Drain the apples then place them in a shallow bowl and pop them in the microwave for 45 seconds.
  • On a lightly floured surface, roll out the puff pastry about one inch size with a rolling and then cut into 6 equal size strips.
  •  Brush the egg over the surface of each strip of puff pastry, then sprinkle a little cinnamon sugar on each one.
  • Lay the apple slices along the top half of each piece of puff pastry and fold the bottom half over the base of the apple slices.
  • Roll each one carefully and put each one in the muffin tin. Bake them on the middle rack of your oven for about 40 minutes then allow them to cool a bit and serve them with some caramel sauce.

RECOMMENDED PRODUCTS:

Nordic ware Compact ovenware muffin pan
jamie oliver acacia rolling pin

Marshmallow Choc Bark

< Back to Recipe Listings

Marshmallow Choc Bark

by ToTT

Valentine’s Marshmallow Chocolate Bark is a simple, festive dessert that everyone loves! Made in minutes with just a few ingredients, these chocolate squares are perfect for Valentine’s Day!

#QuickBites

Cuisine: Western Course: Dessert

Skill Level: Novice

Prep: 10 mins Cook: 20 mins

Ready in: 30 min Serves: 4 serving


INGREDIENTS:

  • 12oz bag semi-sweet chocolate chips
  • 3 cups mini marshmallows
  • ½ tbsp shortening (optional)
  • 5-6 pieces of strawberries
  • 20g walnuts
  • Valentine’s sprinkles

DIRECTIONS:

  • Pour semi-sweet chocolate chips in the top pan of a double boiler. Heat over hot but not boiling water, stirring constantly, until chocolate is fully melted.
  • Or you can microwave semi-sweet chocolate chips in a bowl, in 30 second increments, until melted, stirring each time until the chocolate is smooth.
  • Chop walnuts into smaller pieces.
  • Pour the melted chocolate over the marshmallows, spreading evenly with a spatula.
  • Add the chopped walnuts and shake on any sprinkles you’d like to decorate the bark with. Place strawberries into top of bark.
  • Freeze for at least 20-30 minutes.
  • Remove from the freezer and break it into pieces.

RECOMMENDED PRODUCTS:

Epicurean Kitchen Series Wood Fibre Cutting Board Brown
Safico Silicone Baking Mat Black