Salted Caramel Mousse

< Back to Recipe Listings

Salted Caramel Mousse

by Susanne Despature

Enjoy a luscious Salted Caramel Mousse that is creamy, fluffy, salty and sweet; simply perfect for any occasion!

Cuisine : European Course : Dessert Skill Level : Novice
Prep : 10 mins Cook : 140 mins Ready in : 150 mins Serves : 6-8 Servings


INGREDIENTS:

  • Mousse
    • 100g Cream 35% fat
    • 200g Whole Milk
    • 5g Salt
    • 4 Egg Yolk
    • 20g Sugar
    • 10g Cornstarch (2 ½ tsp)
    • 2g Gelatine (1 leave)
    • 250g Whipped Cream
  • Crunchy Almonds
    • 100g Almond Flakes
    • 2 tbsp Icing Sugar
    • 2 tbsp Egg White

DIRECTIONS FOR MOUSSE

  1. Rehydrate gelatine in cold water.
  2. In a large pan, melt sugar on medium heat until caramelized. Don’t use a spatula or spoon; just move the pan from time to time in order to melt it.
  3. Heat cream in a small jug in microwave or in a small pan.
  4. Out of Heat! Add in hot cream to the caramel and wait until the temperature choc passes, then add milk (room temperature) – put back on fire and using a wooden spoon, bring to a boil until all the caramel has dissolved – add an extra pinch of salt if you wish.
  5. In a separate bowl whisk egg yolk and sugar until white and foamy, using a whisk. Add corn-starch and mix again. Pour hot caramel milk on the egg mixture and whisk well.
  6. Out of the fire pour everything back into the pan, then put back on the fire and never stop stirring with the whisk until the cream-egg mixture comes to a boil. It will thicken and all the foam will disappear. Pout into a bowl, add soft gelatine, mix and place bowl on ice water, in order to cool the cream down – stir from time to time.
  7. Add half of the whipped cream and fold into the caramel cream, using a whisk.
  8. Divide into 6-8 small bowls (100ml), cover and refrigerate.
  9. When the mousse has set (about 2 hours later), garnish with whipped cream and crunchy almonds.

DIRECTIONS FOR CRUNCHY ALMONDS

  1. In a bowl, combine egg white and sugar, add almond flakes and milk until almonds are coated with sugar-egg white mixture.
  2. Spread on a baking tray covered with a baking paper.
  3. Bake for 10 minutes at 180C in preheated oven until golden.
Posted in

Traditional Baked Mooncake

< Back to Recipe Listings

Traditional Baked Mooncake

by Charlynn Gwee

Bake your own Traditional Baked Mooncake this Mid-Autumn Festival with Chef Charlynn’s recipe!

Cuisine : Asian Course : Dessert Skill Level : Novice
Prep : 60 mins Cook : 10 mins Ready in : 70 mins Serves : 12 pieces of Mooncakes


INGREDIENTS:

  • Pastry
    • 100g Plain Flour
    • 60g Golden Syrup
    • ½ tsp Alkaline Water
    • 28g Vegetable Oil
  • Fillings
    • 420g Lotus paste
  • Egg Wash
    • 1 Egg, lightly whisk & sieve

DIRECTIONS:

  1. Use a large bowl; mix the golden syrup, alkaline water and oil well. Sift in the flour. Knead into dough. Cover with film wrap and rest for 40 minutes.
  2. Roll lotus paste into a long tube. Cut into 12 equal portions, each 35g.
  3. Preheat oven to 180C.
  4. Divide the dough into 12 equal portions (15g each). Wrap and seal the lotus paste ball with the dough disc.
  5. Dust the mooncake mould and place the stuffed mooncake into the mould.
  6. Bake in the preheated oven for about 10 minutes.
  7. Brush the mooncakes with egg wash & continue to bake until the pastry turns golden brown.
Posted in

Rocky Road Peanut Clusters

< Back to Recipe Listings

Rocky Road Peanut Clusters

by ToTT

These addictive morsels of Rocky Road Peanut Clusters only require FIVE ingredients and are made in the microwave! A delicious sweet treat for everyone to enjoy! 

Cuisine : Baking Course : Dessert Skill Level : Novice
Prep : 5 mins Cook : 5 mins Ready in : 10 mins Serves : 24 pieces


INGREDIENTS:

  • 1 cup semi-sweet chocolate chips
  • 1 cup butterscotch chips
  • 1 tbsp vegetable oil or shortening
  • 1 1/2 cups roasted, lightly salted peanuts
  • 1 1/2 cups miniature marshmallows

DIRECTIONS:

  1. Melt chocolate chips, butterscotch chips and a tbsp of vegetable oil in a bowl until smooth.
  2. Quickly stir in the peanuts and marshmallows.
  3. Drop spoonfuls of the mixture onto a baking sheet.
  4. Freeze it for 20 minutes before enjoying it!
Posted in

No Bake Mini Matcha Oreo Cheesecakes

< Back to Recipe Listings

No Bake Mini Matcha Oreo Cheesecakes

by ToTT

Gaga over matcha? Try these No Bake Mini Matcha Oreo Cheesecakes – creamy and sweet, mini Matcha cheesecakes with an Oreo cookie base! #QuickBites

Cuisine : Baking Course : Dessert Skill Level : Novice
Prep : 15 mins Cook : 0 mins Ready in : 255 mins Serves : 8-10


INGREDIENTS:

  • Crust 
    • 1 cup Oreos, crushed
    • 1 tbsp Sugar
    • 3 tbsp Unsalted butter, melted

    Matcha Cheesecake

    • 1 package (8oz) Cream cheese, room temperature
    • 1/3 cup Powdered sugar
    • 1 tsp Vanilla extract
    • 2 tbsp Granulated sugar
    • 3 tsp Matcha powder (adjust to your preferred matcha flavour)
    • 1 cup Heavy cream
    • Green food colouring (optional)

DIRECTIONS:

         Crust

  1. In a large bowl, add sugar to crushed Oreo cookies.

  2. Add in melted butter and mix till mixture resembles wet crumbs.

  3. Add 1 tbsp of mixture to the bottom of each cupcake liner. Pat down till flat and firm. Refrigerate.

    Matcha Cheesecake

  4. In a large bowl, beat together cream cheese, powdered sugar & vanilla extract.

  5. Add Matcha powder and granulated sugar, beat till smooth.

  6. Lightly whip heavy cream till soft peaks and fold into cream cheese mixture. Add food coloring if desired.

  7. Pour mixture into cupcake liner till full.

  8. Chill in freezer till hardened. (3-4 hours or overnight)

Posted in

Dutch Baby Pancakes

< Back to Recipe Listings

Dutch Baby Pancakes

by ToTT

Forget regular pancakes! This super fluffy, super moist Dutch Baby Pancake is perfect for those lazy Sunday mornings when you want to do something extra special for breakfast!

Cuisine : Baking Course : Dessert Skill Level : Novice
Prep : 10 mins Cook : 15 mins Ready in : 25 mins Serves : 1


INGREDIENTS:

  • 4 Eggs
  • 2/3 cup While Milk
  • 3 tbsp Sugar
  • ½ cup All Purpose Flour
  • 1 tsp Vanilla Extract
  • 1 tbsp Butter
  • ½ tsp Salt
  • Icing Sugar to garnish
  • Blueberries to garnish
  • Lemon/Lime wedges to garnish

DIRECTIONS:

  1. Heat a cast iron skillet/pan (oven-safe) in a 200°C pre-heated oven.
  2. Combine eggs and whisk till frothy.
  3. Add in milk, sugar, salt and vanilla extract. Whisk till combined.
  4. Whisk in flour.
  5. Remove hot pan from oven, add in butter to coat.
  6. Pour in the batter.
  7. Bake for 15 minutes till golden brown and puffy.
  8. Sprinkle with icing sugar and top with blueberries.
  9. Serve warm!
Posted in

Nutella Skillet Cookie

< Back to Recipe Listings

Nutella Skillet Cookie

by ToTT

Buttery chocolate chip cookie dough, baked in a skillet, with a thick layer of Nutella hidden in the middle. Once baked, you’ll end up with a golden brown cookie with crisp edges, a slightly under cooked middle.

Cuisine : Baking Course : Dessert Skill Level : Novice
Prep : 20 mins Cook : 30 mins Ready in : 50 mins Serves : 8


INGREDIENTS:

  • 1/2 cup (115 g or 1 stick) Unsalted Butter, softened
  • 1/2 cup (100 g) Granulated or Caster Sugar
  • 1/2 cup (90 g) Brown Sugar
  • 1 Large Egg
  • 1 tsp Vanilla Extract
  • 11/2 cups (210 g) All Purpose or Plain Flour
  • 1/2 tsp Baking Soda
  • 1/2 cup (75 g) Chocolate Chips, plus a few extra for decorating
  • 1/2 cup (150 g) Nutella

DIRECTIONS:

  1. Coat skillet pan with butter
  2. In a mixing bowl beat the butter, sugar, brown sugar, vanilla extract and mix it until pale and creamy. Add in egg and beat until combined. Add the sifted flour and baking soda and gently mix it in. Add in the chocolate ship and stir it.
  3. Place half of the cookie dough onto your prepared skillet. Press down to form one even layer. Then, spread out the Nutella on top. Place the other half of the cookie dough above the Nutella and press down to form an even layer.
  4. Bake the cookie at 175 C for 30 minutes.
Posted in

Red Velvet Whoopie Pies

< Back to Recipe Listings

Red Velvet Whoopie Pies

by Jehanne Ali

Love is in the air! February is synonymous with the love month as Valentine’s Day is on 14th, and this month is extra special with Lunar New Year around. Make these red velvet whoopie pies to celebrate with your loved ones, family gatherings and parties. They are mildly sweet complemented very well with the cream cheese frosting.  These are the ultimate decadence in little packages!

Cuisine : Baking Course : Dessert Skill Level : Novice
Prep : 20 mins Cook : 10 mins Ready in : 30 mins Serves : 12


INGREDIENTS:

  • For the whoopies
    • 120g Unsalted butter
    • 120g Castor sugar
    • 1 tsp Vanilla extract
    • 1 Large egg
    • 240g Plain flour
    • ¼ tsp Baking soda
    • 1 tsp Baking Powder
    • 1 tbsp Cocoa powder
    • ½ tsp Salt
    • 1 tbsp Vinegar
    • ½ cup Buttermilk
    • 1 tsp Red colouring

    For the cream cheese

    • 100g Salted butter
    • 100g Cream cheese
    • 150g Icing sugar
    • 1 tsp Vanilla extract

DIRECTIONS:

  1. Cream the butter and sugar in a stand mixer or using hand mixer, until pale and fluffy
  2. Add the vanilla and egg. Beat for few more minutes
  3. In a separate bowl, sift the flour with cocoa powder, salt, baking soda and baking powde
  4. In a jug, mix the vinegar with red colouring and buttermilk until just combined
  5. Add the buttermilk mix alternating with flour mix into the batter until all is incorporated
  6. Spoon the mix onto a silicone mat or baking paper
  7. Bake the whoopies for 12 minutes at 180°C

For the heart-shaped whoopies

  1. Use the Martellato Heart-shaped plunge cutter to cut out the shape once the whoopies are baked.
  2. Prepare the frosting. Cream the butter and sugar until pale. Add in the vanilla and cream cheese, beat for few more minutes.
  3. Tip: Cream cheese is much softer than butter so should be added last to ensure the frosting is stiff, and not runny.
  4. To assemble: Pipe some icing onto a whoopie and sandwich with another whoopie on top.
Posted in

Chocolate Popsicles

< Back to Recipe Listings

Chocolate Popsicles

by ToTT

Chocolate + Popsicles! The one thing you need to learn how to do in this hot summer. You just need a Popsicle mould and this video and you are good to go.

Cuisine : Baking Course : Dessert Skill Level : Novice
Prep : 5 mins Cook : 10 mins Ready in : 375 mins Serves : 8


INGREDIENTS:

  • 2 cups of Southdale Farm Milk
  • 2 tbsp Sugar
  • 2 tbsp Cocoa Powder
  • 1 cup Semi-sweet Chocolate Chips

DIRECTIONS:

  1. Heat up 2 cups of Southdale Farm Milk on high heat.
  2. Turn off heat before milk boils.
  3. Whisk in 2 tbsp of sugar and cocoa powder.
  4. Pour mixture into 1 cup of semi-sweet chocolate chips and let it sit for 2 minutes.
  5. Whisk until chocolate is completely melted.
  6. Let mixture cool before pouring into Popsicle mould.
  7. Place Popsicle sticks into the mould.
  8. Freeze it for 6 hours or more.
  9. Unmould the Popsicle and enjoy!
Posted in

Healthy Yogurt Bark

< Back to Recipe Listings

Healthy Yogurt Bark

by ToTT

Who says healthy food are not yummy? They will realised that its not true when they try this Healthy Yogurt Bark. It’s easy to do and most importantly, it’s delicious!

Cuisine : Healthy Cooking Course : Dessert Skill Level : Novice
Prep : 10 mins Cook : 0 mins Ready in : 190 mins Serves : 20 pieces


INGREDIENTS:

  • 1 cup Natural Yogurt
  • 1 Banana – mashed
  • 3 tbsp Cocoa Powder
  • 1 tbsp Honey
  • 2 tbsp Macadamia Nuts
  • Garnish with nuts of your choice and sliced bananas

DIRECTIONS:

  1. Mix all ingredients in a large bowl until well incorporated.
  2. Spread evenly on baking tray with baking sheet.
  3. Sprinkle chopped nuts and layer sliced bananas.
  4. Freeze for 3 hours to harden.
  5. Cut and serve!
Posted in

Black Sesame Macaron

< Back to Recipe Listings

Black Sesame Macron

by Mimi Wahadi

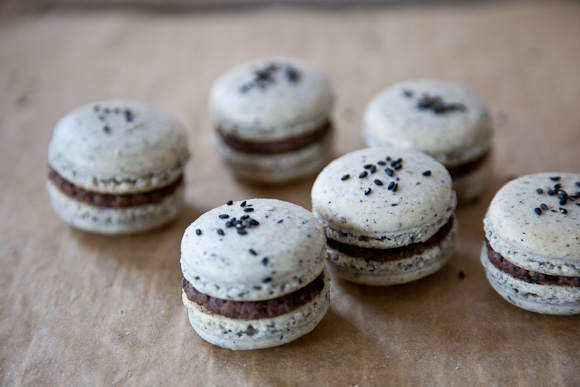
If you love sesame seeds, you’ve got to give this Black Sesame Macarons a try! This recipe by Chef Mimi teaches you to bake the perfect macaron that is light and airy that sandwiches the fragrant Black Sesame Custard Filling.

Cuisine : Baking Course : Dessert Skill Level : Novice
Prep : 45mins Cook : 25 mins Ready in : 70 mins Serves : 20-25


INGREDIENTS:

  • 125 g Almond Ground (Sifted)
  • 125 g Icing Sugar (Sifted)
  • 125 g Sugar
  • 100 g Egg Whites
  • 5 g Toasted Black Sesame

Black Sesame Seed Custard Filling

  • 160 g Egg Yolks 
  • 100 g Corn Flour 
  • 1000 ml Milk 
  • 100 g Sugar 
  • 150 g Black Sesame Powder [instant, add in 30 ml of hot water to form a paste] 
  • 50 g Butter

DIRECTIONS:

1. To make the macaron shell, kindly follow Step 2 – 16.

2. Mix the sifted ground almond and icing sugar in a bowl.

3. Heat up a pot of water for the bain marie.

4. Place the egg whites and sugar into a bowl.

5. Whisk the egg whites and sugar vigorously on top of the pot of bain marie.

6. While whisking, insert a finger to test the temperature of the egg whites.

7. The temperature should be very hot to touch.

8. Quickly transfer the mixture into the mixer and whisk on a highest speed.

9. When the meringue starts to form, lower the speed and add the colouring.

10. Continue to whisk until firm.

11. Fold in the almond ground and icing sugar into the meringue when it firms up.

12. Beat the mixture to a smooth dropping consistency. Add toasted black sesame.

13. Fill the mixture into a piping bag with a piping tube.

14. Pipe into drops of round shape onto the baking tray lined with baking paper.

15. Bake at 160°C for approximately 14 minutes. (Temperature and the timing of baking will varies according to the size of the piping and the oven used)

16. When the macaron shells are ready, put aside to cool.

17. To make the Black Sesame Seed Custard Filling, kindly follow Step 18 – 22.

18. Mix egg yolks and corn flour together in a bowl. Add in a little milk to dilute the mixture. Sift.

19. Heat up the rest of the milk and sugar in a pot till boiling.

20. When mixture boils, add in the egg yolk and corn flour mixture. Whisk till thicken. Add the sesame paste, continue to boil till thickens.

21. Take off from the heat and whisk in butter. Transfer to a bowl, cover with cling film and leave it to cool. Use as required.

22. Pipe in the filling and it is ready to be served.

Posted in