Stuffed SousVide Boneless Chicken Leg

< Back to Recipe Listings

Stuffed SousVide Boneless Chicken Leg

by Felix Chong

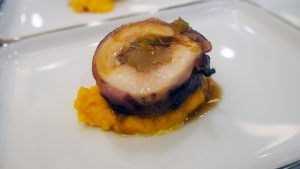
Try this Stuffed SousVide Boneless Chicken Leg from Chef Felix Chong for a unique and luxurios main dish! Stuffed with foie gras and caramelized apples, it goes perfectly with the tender chicken. The bacon cuts through the sweetness of the caramelized apples, adding another layer of flavour and complexity to the dish.

Cuisine : European Course : Main Skill Level : Novice
Prep : 30 mins Cook : 45 mins Ready in : 75 mins Serves : 1


INGREDIENTS:

  • 1pc Boneless Chicken Leg
  • 50 – 60g Foie Gras
  • 6cs Bacon Strips
  • 1pc Apple
  • 50g Caster Sugar
  • 1 tbsp Unsalted Butter
  • 500g Carrots
  • 300ml Veal Jus
  • 1 tsp Truffle Oil

DIRECTIONS:

  1. Prepare a pot of boiling water and place the carrots in it till fully cooked for about 15 min.
  2. Remove from the pot and pass through a fine strainer.
  3. Transfer to a small pot and butter monte it till a light and fluffy texture is obtained.
  4. Remove the skin from the chicken.
  5. Lay out the chicken in between 2 pcs of cling film and use a kitchen pounder to flatten it and season well with salt and pepper and set aside in the fridge.
  6. Peel off the apple skin and dice it into small cubes.
  7. Heat up a pan with caster sugar. Once it starts to caramelize, place the apple cubes in it and steer for about 30 seconds. Lastly, add in unsalted butter to it and simmer for another 2 mins.
  8. Remove the apple and cool it down.
  9. Place the foie gras on the chicken in a straight roll together with the caramelized apple and roll it up tight.
  10. Roll up the stuffed chicken with the bacon strips and vacuum pack tight to remove excess air in the bag.
  11. Sousvide the chicken in the water bath and pan fry it over a non-stick pan – ensure the bacon is nice and crispy.
  12. Portion into 5-6 pcs and palce it on top of the carrot mash and drizzle over with truffle veal jus! 
Posted in

Tart Au Pommes

< Back to Recipe Listings

Tart Au Pommes

by Thripti Hinduja

Learn to make a classic Tart Au Pommes (Apple Pie) with a flaky crust topped with toothsoome apple for a heart-warming family gathering!

Cuisine : Baking Course : Dessert Skill Level : Novice
Prep : 50 mins Cook : 25 mins Ready in : 75 mins Serves : 6-8


INGREDIENTS:

  • 125 g Flour (Crust)
  • 60 g Butter (Crust)
  • 30 g Sugar (Crust)
  • 2 tbsp Cold water (Crust)
  • 1/2 tbsp White distilled vinegar (Crust)
  • 5 Apples (Filling & Topping)
  • 30 g Sugar (Filling & Topping)
  • 30 g Butter (Filling & Topping)
  • Cinnamon to taste (Filling & Topping)
  • Nutmeg to taste (Filling & Topping)
  • 3 tbsp + 1 tbsp Sugar for topping cinnamon (mixed together) – (Filling & Topping)
  • 2 tbsp Apricot jam (Filling & Topping)

DIRECTIONS:

Crust

  1. Mix the flour and the sugar in a bowl.
  2. Chop the butter and rub it into the flour until it resembles bread crumbs.
  3. Stir in the water and the vinegar. Place the dough in plastic wrap and refrigerate for 30 min until firm.

Filling

  1. Peel and Chop up Four of the apples. Place them in a pan with the butter, sugar, cinnamon and the nutmeg. Add 2 tbsp of water and cook over high heat until the mixture starts to bubble.
  2. Turn the heat down and cook until the mixture all the moisture evaporates.

Assemble the Tart

  1. Divide the dough into 3 parts. Roll the out on a floured surface and place on a baking sheet with baking paper. Sprinkle the dough with a little cinnamon sugar. Top with the apple mixture, leaving an inch of space around the edges.
  2. Slice the fifth apple and arrange on top of the filling. Roll up the edges, to form sides to the tart. Sprinkle over some more cinnamon sugar and bake at 180C for 25 min or until golden brown.
  3. Warm the apricot jam with a tsp of water and brush the top of the tart for a glossy finish.
Posted in

Cute Bear-Patterned Swiss Roll

< Back to Recipe Listings

Cute Bear-Patterned Swiss Roll

by Trish Yee

As if the Swiss Cake Roll was not pretty and cute enough as it is, now you can make your very own adorable Bear-Patterned Swiss Roll! This one is sure to impress. 

Cuisine : Baking Course : Dessert Skill Level : Novice
Prep : 90 mins Cook : 20 mins Ready in : 110 mins Serves : 2-4


INGREDIENTS:

  • For the Cake Batter Ingredients (A): Egg Yolk Mixture 
    • 3 Egg Yolks
    • 35g Caster Sugar
    • 40g Vegetable Oil
    • 60g Milk
    • ½ tsp Vanilla Essence
    • 80g Cake Flour
    • ¼ tsp Red Food Colouring

    Ingredients (B): Egg White Mixture

    • 3 Egg Whites
    • 30g Caster Sugar
    • 1 tsp Corn Flour

    To make the pattern: 

    • Pinch of Corn Flour
    • 1 Egg White

    Egg Yolk Mixture

    • Egg Yolk Mixture
    • 2 tsp + 2 tsp + 2 tsp Cake Flour
    • 1½ tsp + 1½ tsp Cocoa Powder
    • 1/8 tsp Black Food Colouring

    For the chocolate cream filling:

    • ½ tsp Gelatine powder dissolved in 2 tsp hot water
    • 200ml Whipping Cream
    • 1 tbsp Caster Sugar
    • Strawberry Filling

DIRECTIONS:

  1. Preheat oven using 170°C. Prepare a 10” x 10” or 25cm baking tray and line with silicon mat or parchment paper over the design template. Grease the silicon mat/parchment paper with vegetable oil.
  2. Beat 3 egg yolks with 35g of sugar for about 8-10 minutes till it forms into a thick pale yellow mixture.
  3. In a separate bowl, combine 60g of water, 40ml vegetable oil and ½ tsp vanilla essence.
  4. Pour in slowly in addition to the egg yolk mixture, till it is fully incorporated with the egg yolk mixture.
  5. Sift in 80g of cake flour and continue to beat till batter is sticky.
  6. In 3 separate small bowls, add 2 tsp of egg yolk batter & 1 tsp of cake flour in each small bowl.
  7. In a separate bowl, beat 1 egg white till glossy and stiff peaks are about to form, add a pinch of corn flour and continue to beat until stiff.
  8. Add 2 tbsp of the egg white mixture to each small bowl and set aside the remaining egg whites mixture.
  9. Add 1/8 tsp of cocoa powder to one of the bowl and mix well.
  10. Add black food colouring to one small bowl and mix well.
  11. Transfer the 3 bowls of pattern mixture into 3 separate piping bags.
  12. Pipe the black coloured pattern mixture to draw the eyes and nose of the bear. Put inside oven to bake for 1 min.
  13. Once the eyes and noses are baked, pipe the white and brown pattern mixture to draw the bear’s snouts. Bake in oven for another 1 min.
  14. Once the snouts are baked, pipe the remaining white and brown mixture to draw the bear’s faces on top of the snouts. Bake further for another 1 min.
  15. Add ¼ tsp of red food colouring to the egg yolk batter.
  16. In a big mixing bowl, beat 3 egg whites with 30g caster sugar until it turns glossy and stiff peaks, add in 1tsp of corn flour and continue to beat till stiff.
  17. Mix in the remaining egg white and mix well.
  18. Add the egg white mixture, 1/3 at a time, to the egg yolk batter and fold in using the spatula.
  19. Dust the baking tray light with some cake flour to avoid cake sticking to the silicon mat.
  20. Pour batter onto the baking pan with baked patterns. Spread the batter evenly using the spatula. Gently tap pan onto the table to release any air pockets.
  21. Bake in preheated oven for 15mins. Remove from oven and cover with a new sheet of parchment paper. Invert the pan onto a wire rack and unmould the cake.
  22. Gently peel of the silicon mat and use a new sheet of parchment paper to cover the top of the cake to allow latent heat to escape for about 5 minutes.
  23. Invert the cake onto the silicon mat and roll up the cake and leave it to cool for 15mins.

    To make the whipped cream filling:

  24. Dissolve the gelatine powder completely in hot water.

  25. Using an electric beater, whip the cream with sugar using high speed till it becomes glossy and stiff peak, add in the gelatine solution. Continue to beat for another min.

  26. Put in the refrigerator to chill until ready to use.

    To assemble:

  27. Dissolve 10g sugar in 20g of hot water.

  28. Unroll the cake and brush the cake with the sugar syrup and spread cream filling evenly, leaving a 3cm space at the opposite end.

  29. Wrap the cake with parchment paper and twist both ends to secure the roll.

  30. Refrigerate for at least an hr and slice off both ends of the deco roll before serving.

Posted in

Spiced Banana Chocolate Chip Cake

< Back to Recipe Listings

Spiced Banana Chocolate Chip Cake

by Claire Marie Chang

The hunt for the perfect Banana Cake is over! Indulge in this moist Spiced Banana Chocolate Chip Cake with a light and divine Cookie Butter Swiss Meringue Buttercream!

Cuisine : Baking Course : Dessert Skill Level : Novice
Prep : 30 mins Cook : 50 mins Ready in : 80 mins Serves : 8-12


INGREDIENTS:

  • 60g Unsalted Butter, Melted
  • 65g Vegetable Oil
  • 2 Whole Eggs (65g with shell)
  • 125g Milk
  • 250g Banana Puree
  • 200g Light Brown Sugar
  • 250g Plain Flour
  • 7g Baking Soda
  • 3g Baking Powder
  • 2g Salt
  • 1teasp Cinnamon, ground
  • 75g Semi-Sweet Chocolate Chips
  • 3/ About 110g Egg whites from 65g eggs
  • 70g Brown Sugar
  • 250g Unsalted Butter, Cubed (Softened but cold)
  • 50-100g Cookie Butter, Smooth or Crunchy
  • 1/2 teasp Cinnamon, Ground to taste
  • Salt to taste

DIRECTIONS:

  1. * Preheat oven to 170-180°C. (One Bowl Method)
  2. Melt Butter and set aside to cool.
  3. Mix eggs, milk and banana puree till well combined.
  4. Sift all dry ingredients into bowl. Mix on low speed to combine.
  5. Slowly add wet mixture into dry ingredients.
  6. Slowly add melted butter/oil into mixture and mix till well combined.
  7. Once fully incorporated, divide into 2 equal portions using a weighing scale into greased and lined 6” tins. About 500g each.
  8. Bake for 40-50 mins till a cake tester comes out clean.
  9. Unmould and cool the cake onto a rack.
  10. *Keep at room temperature for up to 3 days or keep chilled for up to 7 days.
  11. Prepare a Bain Marie/Water Bath.
  12. Combine egg whites and sugar in a grease proof metal/glass bowl.
  13. Over a steaming Bain Marie, heat the mixture gently while stirring regularly.
  14. To test if the egg white mixture is ready, rub it between your fingers to feel if the sugar has dissolved.
  15. Once ready, remove from the heat.
  16. Using the whisk attachment, start at med till a solid white meringue forms and then switch to Med High. It takes about 5 minutes.
  17. Once the mixing bowl feels cool to touch, switch to the Paddle attachment.
  18. At low speed, add butter cubes one at a time until fully incorporated.
  19. Turn to med high speed and whip for 2-5mins.
  20. Add cookie butter and cinnamon to taste. Whip till incorporated.
  21. This buttercream keeps up to 7 days.


Posted in

Devil’s Chocolate Bundt Cake with Chocolate Ganache

< Back to Recipe Listings

Devil’s Chocolate Bundt Cake with Chocolate Ganache

by Trish Yee

Try this ultra-rich Devil’s Chocolate Bundt cake for a nice chocolatey surprise! The cake itself has a deep and intense chocolate flavour, and to sweeten the deal, the Chocolate Ganache covering the cake adds a velvety smooth finish to this perfect cake! 

Cuisine : Baking Course : Dessert Skill Level : Novice
Prep : 30 mins Cook : 60 mins Ready in : 90 mins Serves : 6-8


INGREDIENTS:

  • For the Cake
    • Vegetable Oil Cooking Spray
    • 340g Unsalted Butter, room temperature
    • 100g Unsweetened Cocoa Powder
    • 200ml Boiling Water
    • ½ cup Sour Cream
    • 300g Cake Flour
    • ¼ tsp Fine Salt
    • 1 tsp Baking Powder
    • 1 tsp Baking Soda
    • 150g Brown Sugar
    • 200g Caster Sugar
    • 200g Icing Sugar
    • 5 Eggs
    • 1 tbsp Pure Vanilla Extract
    • 190g Dark Coverture Chocolate Chips
  • For the Glaze
    • ½ cup Heavy Cream
    • 120g Chopped Semi-Sweet Chocolate
    • Pinch of Salt


DIRECTIONS:

  1. Preheat oven at 180°C. Spray a 12-cup non-stick Bundit pan with cooking spray.
  2. Place chocolate in a heatproof bowl and pour boiling water over and stir until chocolate has melted. Set aside to cool.
  3. Place butter with caster sugar, brown sugar and vanilla extract into a mixing bow. Fit in the paddle attachment and beat on medium-high speed until mixture is pale and creamy.
  4. Add in the eggs, one at a time, beating well after each addition.
  5. Reduce the speed to medium and gradually add in the chocolate mixture, beating until well combined.
  6. Add in the sour cream and fold in well.
  7. Sift the icing sugar over the mixture and fold in slowly. Sift in the flour and cocoa powder and fold in until mixture is well combined.
  8. Scrape batter into prepared baking pan and bake for 45 – 50 mins. Transfer to a wire rack set over a parchment paper lined baking sheet. Let cool 30 mins before turning out onto a wire rack to cool completely.
  9. Bring cream to a boil in a medium pot. Add chocolate and let stand 5 mins. Add salt and stir until smooth. Let stand for 10 mins, and then pour over cake, allowing the glaze to drop down sides and cover cake. Let set 3 hours at room temperature or 1 hour in refrigerator.
Posted in

Ile Flottante (Floating Islands)

< Back to Recipe Listings

Ile Flottante (Floating Islands)

by Susanne Despature

An elegant French dessert consisting of meringue floating on crème anglaise (a vanilla custard). Taste the light vanilla frangrance as the meringue melts in your mouth.

Cuisine : Baking Course : Dessert Skill Level : Novice
Prep : 25 mins Cook : 40 mins Ready in : 65 mins Serves : 4


INGREDIENTS:

  • Vanilla Custard
    • 50cl Fresh Milk
    • 1 pod of Vanilla
    • 100g Caster Sugar
    • 3 Egg Yolk
    • ½ tbsp Corn Starch (10g)

    Mango Passion-Fruit Coulis

    • 1 Mango
    • 2-3 Passion Fruit Juice (without seeds)
    • 5-7cl Sugar Syrup
    • 1 Lime Juice

    Egg Whites

    • 3 Egg Whites
    • 40g Caster Sugar
    • 1 pinch of Cream of Tartar
    • ½ Lime (zest finely grated)
    • 100g Grated and Roasted Coconut

DIRECTIONS:

          For Vanilla Custard

  1. In a pan, bring the milk to a boil. Open the vanilla pod and add the seeds & pod – cover the pan and let the vanilla infuse for 15 minutes or more.

  2. In a bowl, combine sugar and egg yolks and whisk until the mixture is light and foamy. Add the corn starch and mix with egg mixture.

  3. Bring the vanilla milk to a boil, remove the pod and pour it over the egg mixture, stirring constantly.

  4. Pour everything back into the pan over medium heat. As you whisk — you must whisk constantly to keep the eggs from scrambling — you’ll see that the cream will start out light and foamy, then the bubbles will get bigger, and then, as it gets hotter and hotter, it will start to thicken and the whisk will leave tracks. Heads up at this point — the tracks mean the cream is almost ready. Don’t stop whisking or checking the temperature, and have patience —depending on how much heat you’re giving the cream, getting it thick can take as long as 10 minutes.

  5. As soon as it comes to a boil*, remove the cream from the heat and strain it into a bowl. Let the cream stand, stirring occasionally, until it cools to 40 degrees C, about 10 minutes (it will thicken even more). You can put the bowl on an ice bath to drop the temperature faster.

  6. *Tip: Starch helps the cream to thicken and prevents the eggs from curdling when brought over 85°C.

    For Mango Passion-Fruit Coulis

  7. Peel the mango and cut the flesh in cubes.

  8. Put them in a blender, adding some sugar syrup, lime juice and passion fruit juice. Blend them and strain if necessary

    For Egg Whites

  9. In a bowl, whisk the egg whites and cream of tartar until stiff. Add the sugar and whisk until the egg whites form a « bird beak ». Add the lime and mix with the egg white.

  10. Spoon the stiff egg white in small mould (ceramic or glass).

  11. Cook in a microwave at 600 W for 45 seconds, four at a time. When cooked, remove from oven and coat them with some roasted coconut.

    To Serve

  12. In a bowl, ladle some vanilla custard, add some mango passion-fruit custard and top with a « floating island ».


Posted in

Roast Pork Loin with Apple Chutney

< Back to Recipe Listings

Roast Pork Loin with Apple Chutney

by Eric Low

Put a twist to your pork loin with this recipe by Chef Eric Low – roasted in the oven till the meat is tender and succulent, the pork loin goes well with the Apple Chutney and creates a unique blend of flavours!

Cuisine : European Course : Main Skill Level : Novice
Prep : 30 mins Cook : 45 mins Ready in : 75 mins Serves : 10-12


INGREDIENTS:


For the Pork Loin

  • 2kg Pork Loin, 7-8cm thick
  • 1 tbsp Chopped Garlic
  • 1 tbsp Paprika
  • 2 tsp Salt
  • 1 tsp Coarse Ground Black Pepper
  • 4 stalks Fresh Rosemary, chopped
  • 1 tbsp Dijon Mustard
  • 6 tbsp Olive Oil

Roasting Vegetables

  • 4 large Onions, cut into wedges
  • 4 tbsp Olive Oil
  • 1 tsp Salt
  • 1 tsp Coarse Ground Black Pepper

For the Apple and Raisin Chutney

  • 100g Sugar
  • 4 tbsp Water
  • 1pc Cinnamon Stick
  • 300ml Apple Juice
  • 30g Raisins, diced
  • 4 Medium Green Apples, diced
  • Cornstarch for thickening
  • 2 tbsp Cider Vinegar
  • 1 tsp Lemon Zest

DIRECTIONS:

          For the Pork Loin

  1. Mix the spices, seasonings, mustard and olive oil together. Rub all over the pork loin.

  2. Preheat oven to 180°C. Line baking tray with foil. Toss roasting onions with olive oil with salt and pepper.

  3. Spread onions on baking tray and place the pork loin on top. Roast in the oven for 40-45 minutes.

  4. Allow to rest for 20 minutes before slicing. Puree the roasted onions and dilute with some water to a sauce consistency. Season to taste. Serve roasted onion sauce with sliced pork loin.

    For the Apple and Raisin Chutney

  5. Caramelize sugar with cinnamon stick. Pour in apple juice. Add the raisins and cook for 2 minutes.

  6. Add in the diced apples and cook for another 5 minutes. Thicken chutney with cornstarch. Add in the lemon juice and zest. Remove from heat and keep warm.

Posted in

German Black Forest Cake

< Back to Recipe Listings

German Black Forest Cake

by Julie Yee

Impress your guests with this chocolate cherry layered cream cake by Chef Julie – add in the rum for a special touch and added flavour!

Cuisine : Baking Course : Dessert Skill Level : Novice
Prep : 90 mins Cook : 30 mins Ready in : 120 mins Serves : 6-8


INGREDIENTS:

  • For the Chocolate Sponge Group 1 (Sifted together)
    • 80g Cake Flour
    • 2 tbsp Cocoa Powder

    Group 2 (Beat together)

    • 4 no. Egg
    • 4 no. Yolk
    • 100g Fine Sugar
    • 1 tsp Vanilla Extract

    Group 3

    • 50g Warm Oil
    • 50g Warm Milk
    • 1 tsp Chocolate Paste

    For the Chocolate Mousse

    • 80g Coveture Chocolate
    • 1 no. Egg Yolk
    • 160g Whipped Cream

    For the Chantilly Cream

    • 250g Fresh Whipping Cream
    • 2 tbsp Fine Sugar
    • ½ tsp Vanilla Extract
    • 1 tsp Rum (if use)

DIRECTIONS:

         For the Chocolate Sponge

  1. Sift Group 1 together.

  2. Beat the egg white and sugar till peak.

  3. Add in the yolks and whisk till fluffy.

  4. Fold in Group 1 by hand.

  5. Add in Group 3 & fold in by hand.

  6. Bake at 200ºC for 12-15 mins.

    For the Chocolate Mousse

  7. Melt the dark couveture over a double boiler (saucepan with simmering water).

  8. Take away from the heat and add in the egg yolk and whisk until the couveture has fully melted.

  9. Measure and whip 160 g (5.6 oz.) of the heavy cream again to a uniform consistency.

    For the Fresh Chantilly Cream

  10. Brush cake with the cherry syrup.

  11. Spread the mousse on top.

  12. Arrange the cherry on the roll.

  13. Fold the bottom part of the sponge with the baking paper. Then lift the baking paper and roll up the cake. Use a long ruler to tighten the roll.

  14. Divide roll into thick pieces. Decorate with swirls of whipped cream, chocolate flakes and cherries.


Posted in

Pomelo Mango Mousse Cake

< Back to Recipe Listings

Pomelo Mango Mousse Cake

by Julie Yee

A wonderful mango dessert comprising layers of mango mousse, mango cream and a cake sponge to soak it all in – an absolute must-try for mango lovers! 

Cuisine : Baking Course : Dessert Skill Level : Novice
Prep : 60 mins Cook : 10 mins Ready in : 70 mins Serves : 6-8


INGREDIENTS:

  • For the Mango Mousse
    • 50g Orange Juice
    • 300g Mango Puree
    • 10g Gelatin
    • 150g Whipped Cream
    • 50g Egg White
    • 50g Sugar
    • For the Mango Cream
    • 1 tbsp Sugar
    • 1 tsp Corn Flour
    • 40g Mango Puree
    • 1 tsp Lemon Juice
    • 1 no. Egg
    • 25g Butter
    • 1 tbsp Pomelo Pulp

    For the Mango Jelly

    • 90g Mango Puree
    • 40g Water
    • 4g Gelatine
    • 1 tsp Orange Liquer

DIRECTIONS:

          For the Mango Mousse

  1. Soak gelatin in cold water for 10 mins.

  2. Bring the orange juice with the mango puree and basil leaf to a simmer.

  3. Pour the gelatin into the hot mango puree

  4. Stir the hot puree over ice water till cool.

  5. Mix the whipped cream with the meringue briefly.

  6. Fold the mexture into the cooled puree.

  7. Pour into the cake ring and place a small cake ring in the middle.

  8. Freeze the mango mousse.

    For the Mango Cream

  9. Mix everything together and go through a sieve.

  10. Simmer the mixture in a pot till thick.

  11. Add in the butter & pomelo pulp.

    For the Mango Jelly

  12. Boil the mango puree with the water.

  13. Add in the gelatin.

  14. Add in the liquer if using.

    Assembly

  15. Place a piece of sponge on the bottom.

  16. Spread the mango cream on top.

  17. Remove the mousse ring and the tart mould from the mango mousse.

  18. Place on top of a wire rack.

  19. Pour the mango jelly over the mango mousse.

  20. Place the mango mousse on top of the sponge cake.

  21. Spoon some mango cubes and pomelo pulp in the middle of the cake.

  22. Brush some jelly at the side of the sponge.

  23. Sprinkle a little almond flakes around it. Serve chilled.

Posted in

Strawberry Mille-Feuille

< Back to Recipe Listings

Strawberry Mille-Feuille

by Thripti Hinduja

This dish, ‘Strawberry Mille-Feuille’ literally translates to a thousand layers. This refers to the paper-thin layers of the delicate puff pastry. Using puff pastry that is readily available in local stores, you will create a feather-light dessert with a vanilla-infused custard cream, and complemented with fresh strawberry slices.

Cuisine : Baking Course : Dessert Skill Level : Novice
Prep : 75  mins Cook : 30 mins Ready in : 105 mins Serves : 6


INGREDIENTS:

  • 375g Milk
  • 75g Sugar
  • 25g Corn Flour
  • 1 tbsp Vanilla Bean Paste
  • 35g Butter
  • 5 Egg Yolks
  • 12 Strawberries (each sliced into 4)

DIRECTIONS:

         For Puff Pastry

  1. Cut each sheet into 8 equal pieces.

  2. Lay them on a greased baking sheet. Dock them with a fork. Place another baking sheet over them and bake at 190°C for 10 minutes.

  3. Remove the top baking sheet, reduce the heat to 180°C and bake until golden brown (about 5 to 10 minutes). Allow to cool.

    For Custard Filling

  4. Heat the milk in a sauce pan.

  5. At the same time, whisk the egg yolks and sugar together till creamy. Whisk in the corn flour and the vanilla bean paste.

  6. Drizzle in the warm milk, whisking all the time.

  7. Pour it back into the sauce pan and cook until the custard bubbles and thickens.

  8. Take it off the heat and add in the butter.

  9. Cool completely. Refrigerate for an hour.

    For Assembly

  10. Pipe the custard on a piece of puff pastry (with a star shaped nozzle if desired).

  11. Place sliced strawberries over.

  12. Put another puff pastry layer on top and repeat the layering.

  13. Place the third puff pastry over and refrigerate for one hour.

  14. Dust with icing sugar before serving.


Posted in