Steam Ginger Marinated Chicken with Jin Hua Ham and Mushrooms

< Back to Recipe Listings

Steam Ginger Marinated Chicken with Jin Hua Ham and Mushrooms

by Eric Low

This tasty Steam Ginger Marinated Chicken with Jin Hua Ham and Mushrooms dish will surely get you salivating! Prepare this tender and juicy chicken dish, which contains the finest essence of Jin Hua Ham and mushrooms. 

Cuisine : Asian Course : Main Skill Level : Novice
Prep : 70 mins Cook : 20 mins Ready in : 90 mins Serves : 4


INGREDIENTS:

  • Chicken
    • 1 tbsp Oyster Sauce
    • 1 tsp Dark Soya Sauce
    • 12 slices of Ginger (finely sliced)
    • 400g Boneless Chicken Leg (cut into 4cm dices)
    • ½ tsp Coarse Ground Black Pepper
    • 1 tbsp Corn Starch

    Assembly

    • 12 pieces of Jin Hua Ham, sliced (use Italian Parma Ham if Jinhua Ham is not available)
    • 12 pieces of Chinese Dried Mushrooms (soaked and stalks trimmed)
    • Dried Lotus Leaves, soak in warm water for 10 minutes

    Garnishing

    • Dash of Shaoxing Huatiao Wine (绍兴花雕酒)
    • Coriander Leaves (香叶)

DIRECTIONS:

  1. Marinate chicken with rest of ingredients for an hour.
  2. Arrange chicken on a steaming plate lined with lotus leaves. Alternate each piece of chicken with a slice of ham and a piece of mushroom.
  3. Steam chicken for 20 minutes. Serve chicken with a dash of wine and coriander leaves over rice.
Posted in

Kueh Salat

< Back to Recipe Listings

Kueh Salat

by Julie Yee

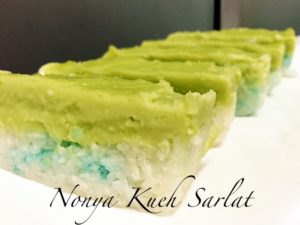
Learn to make a traditional and mouth-watering Nonya Kueh Salat which layers of flavourful rice topped with sweet kaya custard.

Cuisine : Baking Course : Dessert Skill Level : Novice
Prep : 220 mins Cook : 75 mins Ready in : 295 mins Serves : 6-8


INGREDIENTS:

  • 300 gm Glutinous Rice (Pulot Layer)
  • 150 gm Thick Coconut Milk (Pulot Layer)
  • 60 gm Water (Pulot Layer)
  • 1/4 teasp Salt (Pulot Layer)
  • Pandan Leaf (Pulot Layer)
  • 3 no Eggs (Pandan Layer)
  • 100 gm Sugar (Pandan Layer)
  • 1 tbsp Custard Powder (Pandan Layer)
  • 40 gm Rice Flour (Pandan Layer)
  • 50 gm Fresh Pandan Juice (Pandan Layer)
  • 1/4 teasp Salt (Pandan Layer)
  • 280 gm Thick Coconut Milk (Pandan Layer)

DIRECTIONS:

  1. To make the rice layer, start by soaking the rice for at least 3hrs.
  2. Pour coconut milk. Water & salt into it.
  3. Put the pandan leaf and steam for 30mins.
  4. Drizzle with the bunga telang flower juice if using.
  5. ** Check rice is cooked or not, if not drizzle with 1 tbsp. of water.
  6. Use a fork to slight mix the blue rice.
  7. Press rice with wet a presser or spatula till slightly compact.
  8. Keep rice in steamer while preparing the kaya.
  9. To make the kaya layer, start by mixing sugar, custard powder, rice flour, fresh pandan juice, salt and thick coconut milk except the eggs till smooth.
  10. Add in the eggs last.
  11. Cook over the medium heat till slightly thickened.
  12. Pour over the hot rice & steam at medium low fire for another 25mins till kaya has soft set. 
  13. Tips: Do not soak glutinuous rice overnight as all the fragrant will be dissolved. |Pro-long or high heat steaming of the kaya will dehydrate and “aged” the kaya. | Cover a dry towel over the kaya to prevent steam water from staining the kaya.
Posted in

Moist Organic Apple Cake

< Back to Recipe Listings

Moist Organic Apple Cake

by Daniele Sarno

Desserts can be delicious and healthy with this Moist Organic Apple Cake topped with Toasted Pine Nuts by Chef Daniele Sarno!

Cuisine : Baking Course : Dessert Skill Level : Novice
Prep : 10 mins Cook : 40 mins Ready in : 50 mins Serves : 6


INGREDIENTS:

  • 3 Organic apples
  • Juice of 1 lemon
  • 120g Muscovado sugar
  • Seeds scraped from 1 vanilla pod or a few drops of good vanilla essence
  • 3 nos. Organic whole eggs
  • 170g Unbleached organic plain flour
  • 90g Unsalted butter
  • 10g Natural baking powder for 170g flour
  • 30g Pine nuts

DIRECTIONS:

  1. Gently melt the butter into a small casserole, taking care that it doesn’t burn.
  2. Peel the apples and cut them into small pieces. Add the lemon juice and 50 g (1/4 cup) of the sugar. Mix together and set aside.
  3. Break the eggs into a large bowl. Add the remaining sugar and beat together well.
  4. Add the melted butter, the vanilla, the flour and the natural baking powder, mixing well.
  5. Add the apples.
  6. Put the mixture in a cake tin, sprinkle the toasted pine nuts on top and bake for 40 minutes at 170°C or until a skewer inserted in the center of the cake comes out clean.
  7. Serve with whipped cream, custard or vanilla ice cream.
Posted in

Longevity Noodles with Superior Stock and Quail Eggs

< Back to Recipe Listings

Longevity Noodles with Superior Stock and Quail Eggs

by Eric Low

This popular noodle dish is often served on birthdays, New Years, and other special occasions. Serve it with Superior Stock and Quail Eggs paired with home-made broth,  ideal for your empty stomach!

Cuisine : Asian Course : Main Skill Level : Novice
Prep : 20 mins Cook : 15 mins Ready in : 35 mins Serves : 6


INGREDIENTS:

  • 400g Longevity Noodles
  • 6 tbsp Oil (for cooking)
  • 1 tsp Chopped Garlic
  • 200g Pork Loin or Fillet (sliced), marinated with dash of Maggi Seasoning Sauce and 1 tbsp Cornstarch
  • 30g Dried Shitake Mushrooms (sliced)
  • 100g Chinese Chives (koo chye), cut into 3cm lengths
  • 1 litre of Water
  • 3 tbsp Concentrated Chicken or Scallop Stock
  • 2 tbsp Oyster Sauce
  • 12 pieces of Prawns (peeled)
  • 200g Bean Sprouts
  • Cornstarch (for thickening)
  • 12 pieces of Quail Eggs (hard boiled and peeled)

DIRECTIONS:

  1. In a large pot of boiling water, blanch noodles for 5-10 minutes until tender. Refresh in cold water and set aside.
  2. Heat oil in wok, sauté garlic till fragrant. Add pre marinated pork slices and cook briefly. Stir in mushrooms and Chinese chives and sauté for 2 minutes.
  3. Pour in water and bring to boil. Season with concentrated stock and oyster sauce. Add prawns and bean sprouts. Thicken sauce slightly with some cornstarch.
  4. Return noodles and quail eggs to boiling for a quick blanch. Transfer to serving plate and pour sauce over noodles.
Posted in

Steamed Fish Fillet with Zucchini Ratatouille

< Back to Recipe Listings

Steamed Fish Fillet with Zucchini Ratatouille

by Susanne Despature

Savour the sweetest, most delicious seafood you’ve ever tasted with Chef Susanne’s Steamed Fish Fillet recipe with a side of refreshing Zucchini Ratatouille!

Cuisine : European Course : Main Skill Level : Novice
Prep : 10 mins Cook : 42 mins Ready in : 52 mins Serves : 4


INGREDIENTS:

  • 4 Threadfin fillet (or red snapper, barramundi), 120g/ pc
  • 1 no Big yellow onion
  • 2 cloves Garlic
  • 10 g Butter
  • 1 tbsp Olive oil
  • 1 tbsp White wine vinegar
  • 1 tbsp Raw sugar
  • 1 no Zucchini
  • 1 can Tomatoes, chopped
  • 1/2 bunch Sweet basil
  • Salt, pepper, thyme

DIRECTIONS:

  1. Place thread fin fillet in steamer basket.
  2. Peel the onion and slice it finely in a food processor. (Set aside)
  3. Do the same with the zucchini (if zucchini is too large, cut in two, length wise, set aside.)
  4. Chop the garlic finely using a mini bowl of food processor.
  5. In a non-stick pan or wok, heat the butter and olive oil over medium heat. Add sliced onion, chopped garlic, sugar and salt. Fry on low heat for 5 minutes, until onions are translucent, then add white wine vinegar and fry for another 15 minutes, until the onion are caramelized and soft.
  6. Add zucchini, sprinkle with salt and fry on medium heat with onions, until translucent.
  7. Add chopped tomatoes and thyme and mix gently with zucchini. Cook for 10 minutes or until the juices have reduced a little bit. Season to taste with salt and pepper, add finely chopped basil.
  8. Steam fish fillet for 5-7 minutes or until the flesh turns opaque and white – add salt.
  9. On a plate, place 2-3 spoonful of ratatouille in the middle. Top with fish and garnish with basil.
Posted in

Strawberry Shortcake

< Back to Recipe Listings

Strawberry Shortcake

by Philia Ng

The moist Japanese Vanilla Sponge layered with Chantilly Cream and fresh strawberries is the best way to end your meal!

Cuisine : Baking Course : Dessert Skill Level : Novice
Prep : 20 mins Cook : 25 mins Ready in : 45 mins Serves : 6


INGREDIENTS:

  • Japanese Vanilla Sponge
    • 3 Eggs
    • 95g Sugar
    • 30g Milk
    • 90g Cake flour
    • 30g Melted unsalted butter
  • Chantilly Cream
    • 400g Dairy whipping cream
    • 40g Icing sugar

DIRECTIONS:

         For the Japanese Vanilla Sponge

  1. Whisk the egg and sugar over a bowl of simmering water, until the sugar is completely melted.
  2. Remove from the heat and continue to whisk it until it is whitish and fluffy, add in the milk and whisk it until ribbon stage.
  3. Fold in the sieved flour into the batter.
  4. Lastly, add in the melted butter and fold it well.
  5. Bake it at 180°C, non-fan mode for 25 minutes.

    For the Chantilly Cream                 

  6. Whisk the cream until soft peaks.

  7. Add in the icing sugar and whisk until it is stiff.

  8. Chill until you are ready to use it.

Posted in

Clam Chowder

< Back to Recipe Listings

Clam Chowder

by Michele Ow

Try this amazingly creamy Clam Chowder that is made from scratch with live clams and enjoy the true taste of seafood!

Cuisine : European  Course : Appetizer  Skill Level : Novice
Prep : 60 mins Cook : 20 mins Ready in : 80 mins Serves : 2


INGREDIENTS:

  • ½ Live clams
  • 1 no. Potato for baking
  • 4 pcs Bacon
  • ½ no. Onion
  • Butter
  • Cream
  • Olive oil
  • Chives for garnish

DIRECTIONS:

  1. Bake potato in foil in oven @ 180°C for 30 mins.
  2. Allow potato to cool before shredding.
  3. In a wok, steam clams lightly. Remove the shells and clam meat; reserve liquid.
  4. Lay out 2 strips of bacon and slice finely into strips.
  5. Heat a sauce pan. Add butter and olive oil and fry onions until translucent. Add bacon and fry until fragrant.
  6. Add clam juice and water, following by shredded baked potato. Allow to simmer for 20 minutes.
  7. Finish with cream.
  8. Place the other 2 pieces of bacon between kitchen towels and put in microwave for 3 minutes.
  9. Place soup in 2 bowls and garnish with bacon piece and chives.
Posted in

Beer Braised Pork Belly with Onions

< Back to Recipe Listings

Beer Braised Pork Belly with Onions

by ToTT

Chef Eric Low shares his recipe for a hearty and flavourful Beer Braised Pork Belly with onions for the ultimate feast!

Cuisine : Asian Course : Main Skill Level : Novice
Prep : 2900 mins Cook : 150 mins Ready in : 3050 mins Serves : 4


INGREDIENTS:

  • 400 g Pork belly, sliced thick- 100g each
  • 1 tsp Coarse ground black pepper
  • 2 tbsp Brown sugar
  • 1 tsp Salt
  • 2 tbsp Oil for cooking
  • 1 no White onions, cut into cubes
  • 1 stalk Celery, cut into cubes
  • 1/2 medium Carrot, cut into cubes
  • 1 no Bay leaf
  • 1 sprig Thyme
  • 4-6 no Cloves
  • 1 no Cinnamon stick/ (1/3 tsp cinnamon powder)
  • 350 ml Beer
  • 500 ml Chicken stock
  • Salt & pepper to taste

DIRECTIONS:

  1. Mix pepper, brown sugar and salt together. Rub over pork pieces and cure for two days in the fridge.
  2. Rinse and pat dry pork pieces with paper kitchen towels.
  3. Preheat oven to 170˚C. Heat a heavy, medium-sized pot over medium-high heat. Pour oil into the pot, and sear the pork pieces on each side golden brown. Set the meat aside and remove excess fat, leaving about 1 tbsp in the pot.
  4. Add onions, celery and carrot to the pot, sauté until soften and slightly caramelized. Add the bay leaf, thyme and beer. Bring sauce to a simmer, and reduce by half.
  5. Return pork to pot. Pour in chicken stock. Bring braise to a simmer, skimming off any visible scum and fat. Cover and place into the oven on the centre rack. Cook until meat is fork tender, about 2.5 hours.
  6. After oven braising is done, transfer meat pieces out of pot and keep warm. Drain braising liquid and discard the solids. Bring liquid to a simmer and reduce until desired consistency and flavour, season if needed. Return meat to pot and serve with sauce.
Posted in

Braised Mee Pok with Homemade XO Sauce

< Back to Recipe Listings

Braised Mee Pok with Homemade XO Sauce

by Eric Low

This dish is an ultimate local favourite. Make your own paste fit for an emperor with the ingredients of your choice: dried scallops, dried shrimps, garlic and lots of chillies!

Cuisine : Asian Course : Main Skill Level : Novice
Prep : 10 mins Cook : 15 mins Ready in : 25 mins Serves : 4


INGREDIENTS:

    • 250ml Oil
    • 100ml Chilli Oil
    • 1 tbsp Chopped Garlic
    • 100g Chopped Shallots
    • 30g Tee Poh Fish (Dried Flat Fish Fillets), deep fried till crispy, grounded
    • 160g Dried Shrimp (coarsely blended, soaked for 10 minutes)
    • 40g Dried Scallops (blended and soaked for 10 minutes)
    • 40g Jinhua Ham (diced)
    • 2 tbsp Light Miso Paste
    • 3 tbsp Sugar

    Assembly

    • 2 packets of Dried Mee Pok Noodles (~100g each)
    • 100ml Water
    • 1 tsp Concentrated Chicken or Scallop Flavoured Stock
    • 160g XO Sauce
    • 4 pieces of Kai Lan/Taiwanese Baby Cabbage (Xiao Bai Cai), blanched
    • 12 pieces of Fresh Prawns (blanched)
    • Coriander Leaves (for garnish)

DIRECTIONS:

  1. Combine water with Maggi Concentrated Chicken Stock. Bring to the boil and add the chili oil and XO Sauce.
  2. Bring a large pot of water to boil. Blanch noodles for 30 seconds and transfer to XO sauce. Braised noodles for 2 minutes until cooked.
  3. Divide noodles into 4 portions. Top up noodles with blanched Taiwanese cabbage and fresh prawns. Garnish with coriander leaves and serve.
Posted in

Poached Pears in Red Wine

< Back to Recipe Listings

Poached Pears in Red Wine

by Eric Low

These Red Wine Poached Pears make an elegant and delicious dessert! Spice it up with spices for an extra punch in flavour!

Cuisine : Baking Course : Dessert Skill Level : Novice
Prep : 10 mins Cook : 5 mins Ready in : 495 mins Serves : 2


INGREDIENTS:

  • 80g Sugar
  • 1/2 no Lemon
  • 1 pc Cinnamon stick
  • 1/3 btl Red wine
  • 100 ml Water
  • 2 Medium pears, peeled (Anjou, Borsch, Packham), cored and cut into quarters

DIRECTIONS:

  1. Combine sugar, lemon and spices with red wine and water. Bring to boil.
  2. Poach pears in syrup for 5minutes. Turn off the heat and allow pears to steep in solution till cooled. Chilled the pears overnight and use as required in salad, desserts or serve just simply on its own.
Posted in