Black Forest Pitted Cherry Roll

< Back to Recipe Listings

Black Forest Pitted Cherry Roll

by Julie Yee

Enjoy the sweet symphony of chocolate and pitted cherries with this irresistible and chocolaty Black Forest Cherry Rolls by Chef Julie!

Cuisine : Baking Course : Dessert Skill Level : Novice
Prep : 15 mins Cook : 120 mins Ready in : 135 mins Serves :6


INGREDIENTS:

  • Chocolate Roll Group 1 (Sift together)
    • 70g Cake/top flour
    • 1 tbsp Chocolate powder
    • ½ tsp Baking powder

    Group 2 (Beat together)

    • 3 nos. (110g) Egg whites
    • 6 nos. (100g) Egg yolks
    • 1 tsp Vanilla extract
    • Group 3
    • 45g Hot corn oil
    • 45g Hot milk

    Milky Chocolate Cream

    • 150g Whipping cream
    • 1 tbsp Condensed milk
    • 4 tbsp Melted chocolate/Nutella
    • 1 tbsp Neutral fond powder
    • 1 tsp Vanilla paste

DIRECTIONS:

        For the Chocolate Roll

  1. Sift Group 1 together.

  2. Beat egg white till soft peaks with sugar; add in egg yolks & vanilla (Group 2). Whisk till thick and ribbon-like stage.

  3. Pour in the warm milk & whisk for another few seconds.

  4. Hand-fold sifted flour.

  5. Hand-fold the warm oil.

  6. Bake at 200°C for 10 mins.

  7. Cover with a clean wet towel till use.

    For the Milky Chocolate Cream

  8. Whip the fresh cream.

  9. Add in condensed milk & Neutral Fond Powder.

  10. Brush cake with the pitted cherry syrup.

  11. Spread cream on the Swiss roll & place pitted cherry on top.

  12. Roll cake up tightly.

Posted in

Cute Bear-Patterned Swiss Roll

< Back to Recipe Listings

Cute Bear-Patterned Swiss Roll

by Trish Yee

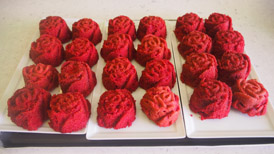
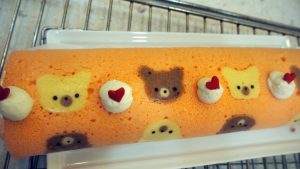
As if the Swiss Cake Roll was not pretty and cute enough as it is, now you can make your very own adorable Bear-Patterned Swiss Roll! This one is sure to impress. 

Cuisine : Baking Course : Dessert Skill Level : Novice
Prep : 90 mins Cook : 20 mins Ready in : 110 mins Serves : 2-4


INGREDIENTS:

  • For the Cake Batter Ingredients (A): Egg Yolk Mixture 
    • 3 Egg Yolks
    • 35g Caster Sugar
    • 40g Vegetable Oil
    • 60g Milk
    • ½ tsp Vanilla Essence
    • 80g Cake Flour
    • ¼ tsp Red Food Colouring

    Ingredients (B): Egg White Mixture

    • 3 Egg Whites
    • 30g Caster Sugar
    • 1 tsp Corn Flour

    To make the pattern: 

    • Pinch of Corn Flour
    • 1 Egg White

    Egg Yolk Mixture

    • Egg Yolk Mixture
    • 2 tsp + 2 tsp + 2 tsp Cake Flour
    • 1½ tsp + 1½ tsp Cocoa Powder
    • 1/8 tsp Black Food Colouring

    For the chocolate cream filling:

    • ½ tsp Gelatine powder dissolved in 2 tsp hot water
    • 200ml Whipping Cream
    • 1 tbsp Caster Sugar
    • Strawberry Filling

DIRECTIONS:

  1. Preheat oven using 170°C. Prepare a 10” x 10” or 25cm baking tray and line with silicon mat or parchment paper over the design template. Grease the silicon mat/parchment paper with vegetable oil.
  2. Beat 3 egg yolks with 35g of sugar for about 8-10 minutes till it forms into a thick pale yellow mixture.
  3. In a separate bowl, combine 60g of water, 40ml vegetable oil and ½ tsp vanilla essence.
  4. Pour in slowly in addition to the egg yolk mixture, till it is fully incorporated with the egg yolk mixture.
  5. Sift in 80g of cake flour and continue to beat till batter is sticky.
  6. In 3 separate small bowls, add 2 tsp of egg yolk batter & 1 tsp of cake flour in each small bowl.
  7. In a separate bowl, beat 1 egg white till glossy and stiff peaks are about to form, add a pinch of corn flour and continue to beat until stiff.
  8. Add 2 tbsp of the egg white mixture to each small bowl and set aside the remaining egg whites mixture.
  9. Add 1/8 tsp of cocoa powder to one of the bowl and mix well.
  10. Add black food colouring to one small bowl and mix well.
  11. Transfer the 3 bowls of pattern mixture into 3 separate piping bags.
  12. Pipe the black coloured pattern mixture to draw the eyes and nose of the bear. Put inside oven to bake for 1 min.
  13. Once the eyes and noses are baked, pipe the white and brown pattern mixture to draw the bear’s snouts. Bake in oven for another 1 min.
  14. Once the snouts are baked, pipe the remaining white and brown mixture to draw the bear’s faces on top of the snouts. Bake further for another 1 min.
  15. Add ¼ tsp of red food colouring to the egg yolk batter.
  16. In a big mixing bowl, beat 3 egg whites with 30g caster sugar until it turns glossy and stiff peaks, add in 1tsp of corn flour and continue to beat till stiff.
  17. Mix in the remaining egg white and mix well.
  18. Add the egg white mixture, 1/3 at a time, to the egg yolk batter and fold in using the spatula.
  19. Dust the baking tray light with some cake flour to avoid cake sticking to the silicon mat.
  20. Pour batter onto the baking pan with baked patterns. Spread the batter evenly using the spatula. Gently tap pan onto the table to release any air pockets.
  21. Bake in preheated oven for 15mins. Remove from oven and cover with a new sheet of parchment paper. Invert the pan onto a wire rack and unmould the cake.
  22. Gently peel of the silicon mat and use a new sheet of parchment paper to cover the top of the cake to allow latent heat to escape for about 5 minutes.
  23. Invert the cake onto the silicon mat and roll up the cake and leave it to cool for 15mins.

    To make the whipped cream filling:

  24. Dissolve the gelatine powder completely in hot water.

  25. Using an electric beater, whip the cream with sugar using high speed till it becomes glossy and stiff peak, add in the gelatine solution. Continue to beat for another min.

  26. Put in the refrigerator to chill until ready to use.

    To assemble:

  27. Dissolve 10g sugar in 20g of hot water.

  28. Unroll the cake and brush the cake with the sugar syrup and spread cream filling evenly, leaving a 3cm space at the opposite end.

  29. Wrap the cake with parchment paper and twist both ends to secure the roll.

  30. Refrigerate for at least an hr and slice off both ends of the deco roll before serving.

Posted in

Durian Cupcake

< Back to Recipe Listings

Durian Cupcake

by Julie Yee

Calling all durian lovers! Try this Durian cupcake recipe by Chef Julie Yee, it is moist, soft and filled with fresh durian!

Cuisine : Baking Course : Dessert Skill Level : Novice
Prep : 20 mins Cook : 25 mins Ready in : 45 mins Serves : 6-8


INGREDIENTS:

  • Group 1
  • 250gm Butter
  • 180gm Castor sugar
  • Group 2
  • 4 Egg
  • 1teasp Glycerine*
  • 1/2teasp Vanilla Extract
  • 4tbsp UHT Milk
  • Group 3
  • 240gm Cake Flour
  • 1tbsp Custard Powder
  • 6gm/ 1 1/4 teasp Baking Powder
  • 150gm Fresh Durian

DIRECTIONS:

  1. Pre-heat the oven at 180C about 20mins before baking.
  2. Cream butter and castor sugar (1) until light and fluffy.
  3. Add in the eggs and glycerine (2) and beat for another 5mins.
  4. Add in the rest of the ingredients (3).
  5. Bake at 180C for 20-25mins / 9” x 9” square for 50mins.
Posted in

Spanish Churros – 2 Ways

< Back to Recipe Listings

Spanish Churros – 2 Ways

by Mimi Wahadi

Churros are delicious fritters that are dusted with a fragrant mixture of Cinnamon Sugar. They are the Spanish equivalent of doughnuts, sold at many cafes. Serve these warm, sprinkled with Cinnamon Sugar or drizzled with honey. They are quick and easy to make!

Cuisine : Baking Course : Dessert Skill Level : Novice
Prep : 30 mins Cook : 25 mins Ready in : 55 mins Serves : 2-4


INGREDIENTS:

  • 50g Bread Flour High (High Protein Flour)
  • 50g Plain All Purpose Flour
  • 12g Caster Sugar
  • 2g Salt
  • 65g Unsalted Butter
  • 190ml Water
  • 3 nos Whole Eggs
  • For the Cinnamon Sugar (For dusting the churros)
    • 10g Cinnamon Powder
    • 100g Caster Sugar


DIRECTIONS:

  1. Preheat oven to 200°C and gently heat up vegetable oil in the frying pot.
  2. Sift flour and salt in a bowl.
  3. In a medium pot, heat up butter, water and sugar until the butter is completely melted.
  4. Bring to boil and add the sifted flour. Continue to stir until the mixture resembles a ball and no longer sticks to the sides of the pot.
  5. Remove from heat and cool it down a bit before incorporating the eggs gradually until a thick smooth mixture is achieved.
  6. Transfer the dough into a piping bag fitted with a small star nozzle.
  7. For the Baked Churros – Pipe long lines on a tray lined with baking parchment. Bake in the oven for approximately 12 – 15 mins depending on your oven.
  8. For the Deep-Fried Churros – When the oil is hot and ready to use, pipe long lines into the oil and fry till golden brown.
  9. When the churros are ready, roll them into the cinnamon sugar.
Posted in

Cream Corn Kaya Chiffon Cake

< Back to Recipe Listings

Cream Corn Kaya Chiffon Cake

by Julie Yee

This Cream Corn Kaya Chiffon cake by Chef Julie Yee is sweet, light and fluffy and perfect for tea break!

Cuisine : Baking Course : Dessert Skill Level : Novice
Prep : 20 mins Cook : 22 mins Ready in : 42 mins Serves : 6-8


INGREDIENTS:

  • 4 Egg White
  • 8 Egg Yolk
  • 90gm Castor Sugar
  • 120gm Cake Flour
  • 1teasp Baking Powder
  • 60gm Corn Oil
  • 40gm Hot Water
  • 250gm Thick Coconut Milk
  • 130gm Milk
  • 200gm Cream Corn
  • 100gm Sugar
  • 40gm Hoon Kueh Powder
  • 25gm Custard Powder
  • A pinch of Salt

DIRECTIONS:

  1. Preheat the oven at 200ºC for 30mins – use the middle shelf
  2. Whisk egg white then add in fine sugar.
  3. Add in egg yolks & beat for another 3mins.
  4. Pour in water & mix for 10seconds.
  5. Fold in the sifted flours.
  6. Add in warm corn oil by hand. Mix well.
  7. Bake at 180ºC for 22mins. Slice into 3 layers when cool.
  8. Spread with the Cream Corn kaya fudge between layers.
  9. Mix thick coconut milk, milk, cream corn, sugar, hoon kueh powder, custard power, salt & simmer all ingredients together till boil & thick.
Posted in

Tenderloin with Red Wine Sauce

< Back to Recipe Listings

Tenderloin with Red Wine Sauce

by Eric Low

Indulge in this juicy, seasoned to perfection Tenderloin with Red Wine Sauce that will leave you wanting more!

Cuisine : European Course : Main Skill Level : Novice
Prep : 20 mins Cook : 30 mins Ready in : 50 mins Serves : 8


INGREDIENTS:

  • Basic Brown Sauce
  • 4 tbsp Oil
  • 1 kg Beef Bones / Oxtail
  • 1 White Onion, rough cut
  • 1 extra White Onion, cut into half, grill cut side on pan until charred
  • 1 small Carrot, rough cut
  • 1 stalk Celery, rough cut
  • 1 tsp Chopped Garlic
  • 1 tbsp Tomato Paste
  • 200 ml Port/ Red Wine
  • 3 L Water
  • Mushroom Sauce
  • 50 g Butter
  • 1/2 tsp Garlic
  • 40 g Chopped Onions
  • 250 g Mushroom [any kind]
  • 500 ml Basic Brown Sauce
  • 2 sprigs Fresh Thyme
  • 40 ml Whipping Cream [35% Fat]
  • Salt to Taste
  • 8 pcs of 80-100 g Tenderloin Steak
  • 1 tsp Dijon Mustard
  • Salt
  • Coarse Ground Black Pepper

DIRECTIONS:

  1. To make the Basic Brown Sauce, kindly follow Step 2 – 6.
  2. In a saucepan, heat the oil and brown the bones and tendon.
  3. Add the vegetables and garlic, sauté until they are slightly brown.
  4. Add the tomato paste and deglaze with the red wine.
  5. Pour in the water and bring the mixture to boil. Simmer until ¼ (about 500 – 600 ml) of it is left.
  6. Strain and discard the solids. Reserve.
  7. To make the Basic Brown Sauce, kindly follow Step 8 – 10.
  8. In a saucepan, melt the butter and sauté the garlic, onions and mushrooms for 2 minutes.
  9. Add in the brown sauce, bring to boil, stirring constantly.
  10. Pour in the cream and mix well. Reserve.
  11. To make the Steak, kindly follow Step 12-13.
  12. In a non-stick frying pan, grill the steaks for about 2 – 3 minutes over high heat on each side to get a medium doneness.
  13. Serve with the mushroom sauce.
Posted in

Buffalo Wings

< Back to Recipe Listings

Buffalo Wings

by Michele Ow

These easy-to-make hot Buffalo wings are crispy and flavourful – always yummy to snack on! Serve it with Blue Cheese Sauce for a mouth-watering appetizer!

Cuisine : American Course : Appetizer Skill Level : Novice
Prep : 5 mins Cook : 20 mins Ready in : 25 mins Serves : 4


INGREDIENTS:

  • ½ kg Chicken winglets/drumlets
  • 1 tbsp Cayenne
  • 1 tsp Crushed red pepper flakes
  • 1 tbsp Garlic powder
  • 1 tbsp Onion powder
  • ½ cup Hot sauce
  • ¼ cup Brown sugar
  • Butter
  • Salt & pepper

DIRECTIONS:

  1. Fill a steamer tray and steam the chicken pieces for 10 mins and allow the wings to cool on a cooling rack and dry them with kitchen towels.
  2. Start a deep fryer and fry the chicken until crisp.
  3. For buffalo sauce, get a separate saucepan and add butter. When melted, add hot sauce, cayenne, garlic powder, onion powder and brown sugar. Heat for 5 minutes until the sauce is fully incorporated. ***Do not over heat!
  4. Toss wings with buffalo sauce.
Posted in

Spiced Banana Chocolate Chip Cake

< Back to Recipe Listings

Spiced Banana Chocolate Chip Cake

by Claire Marie Chang

The hunt for the perfect Banana Cake is over! Indulge in this moist Spiced Banana Chocolate Chip Cake with a light and divine Cookie Butter Swiss Meringue Buttercream!

Cuisine : Baking Course : Dessert Skill Level : Novice
Prep : 30 mins Cook : 50 mins Ready in : 80 mins Serves : 8-12


INGREDIENTS:

  • 60g Unsalted Butter, Melted
  • 65g Vegetable Oil
  • 2 Whole Eggs (65g with shell)
  • 125g Milk
  • 250g Banana Puree
  • 200g Light Brown Sugar
  • 250g Plain Flour
  • 7g Baking Soda
  • 3g Baking Powder
  • 2g Salt
  • 1teasp Cinnamon, ground
  • 75g Semi-Sweet Chocolate Chips
  • 3/ About 110g Egg whites from 65g eggs
  • 70g Brown Sugar
  • 250g Unsalted Butter, Cubed (Softened but cold)
  • 50-100g Cookie Butter, Smooth or Crunchy
  • 1/2 teasp Cinnamon, Ground to taste
  • Salt to taste

DIRECTIONS:

  1. * Preheat oven to 170-180°C. (One Bowl Method)
  2. Melt Butter and set aside to cool.
  3. Mix eggs, milk and banana puree till well combined.
  4. Sift all dry ingredients into bowl. Mix on low speed to combine.
  5. Slowly add wet mixture into dry ingredients.
  6. Slowly add melted butter/oil into mixture and mix till well combined.
  7. Once fully incorporated, divide into 2 equal portions using a weighing scale into greased and lined 6” tins. About 500g each.
  8. Bake for 40-50 mins till a cake tester comes out clean.
  9. Unmould and cool the cake onto a rack.
  10. *Keep at room temperature for up to 3 days or keep chilled for up to 7 days.
  11. Prepare a Bain Marie/Water Bath.
  12. Combine egg whites and sugar in a grease proof metal/glass bowl.
  13. Over a steaming Bain Marie, heat the mixture gently while stirring regularly.
  14. To test if the egg white mixture is ready, rub it between your fingers to feel if the sugar has dissolved.
  15. Once ready, remove from the heat.
  16. Using the whisk attachment, start at med till a solid white meringue forms and then switch to Med High. It takes about 5 minutes.
  17. Once the mixing bowl feels cool to touch, switch to the Paddle attachment.
  18. At low speed, add butter cubes one at a time until fully incorporated.
  19. Turn to med high speed and whip for 2-5mins.
  20. Add cookie butter and cinnamon to taste. Whip till incorporated.
  21. This buttercream keeps up to 7 days.


Posted in

Red Velvet Rose Cake with White Chocolate Cream Cheese Glaze

< Back to Recipe Listings

Red Velvet Rose Cake with White Chocolate Cream Cheese Glaze

by Trish Yee

If the word ‘red velvet’ isn’t enough to make you try your hands at these lovely little cakes, what about the white chocolate cream cheese sauce that is drizzled over the top of the cakes? Make these today as a gift or as a nice treat for you and your family!

Cuisine : Baking Course : Dessert Skill Level : Novice
Prep : 30 mins Cook : 20 mins Ready in : 50 mins Serves : 6-8


INGREDIENTS:


  • For the Cake
    • 1¼ cups (125 grams) Sifted Cake Flour
    • ¼ tsp Baking Powder
    • ¼ tsp Salt
    • 1 tbsp (10g) Regular or Dutch-processed Cocoa Powder
    • ¼ cup (57 grams) Unsalted Butter, at room temperature
    • ¾ cups (150 grams) Granulated White Sugar
    • 1 large Egg
    • ½ tsp Pure Vanilla Extract
    • ½ cup (120ml) Buttermilk
    • 1 tbsp Liquid Red Food Colouring
    • ½ tsp White Distilled Vinegar
    • ½ tsp Baking Soda
  • For the Glaze: White Chocolate Cream Cheese Sauce
    • ½ cup Heavy Cream
    • 100g White Chocolate Buttons
    • 2 tbsp Mil
    • 50g Cream Cheese


OLYMPUS DIGITAL CAMERA

DIRECTIONS:

  1. Preheat oven to 170°C and grease the Bundt Pan.
  2. In a large bowl sift together the flour, baking powder, salt and cocoa powder.
  3. Using the kitchen machine, insert the paddle attachment to beat the butter until soft (about 1 – 2 mins). Add the sugar and beat until light and fluffy (about 2 – 3 mins). Add the egg and beat until incorporated. Scrape down the sides of the bowl. Add the vanilla extract and beat until combined.
  4. In a measuring cup, combine the buttermilk with the red food colouring. With the mixer on low speed, alternately add the flour mixture and buttermilk to the butter mixture, in three additions, beginning and ending with the flour.
  5. In a small cup combine the vinegar and baking soda. Allow the mixture to fizz and then quickly fold into the cake batter.
  6. Spoon batter into each mini rose muffin Bundt pan) until 2/3 full.
  7. Bake in a preheated oven for 20mins or until a knife inserted into the centre of the cake comes out clean.
  8. Serve with the white chocolate cream cheese sauce.

    For the Glaze: White Chocolate Cream Cheese Sauce

  9. Whisk the cream cheese using a hand mixer till smooth.
  10. In a separate heatproof bowl, melt the white chocolate with the heavy cream and milk.
  11. Once chocolates are fully melted, leave to cool for 5 minutes.
  12. Add the white chocolate mixture to the cream cheese and beat till smooth and creamy.
  13. Serve with mini rose velvet cakes.
Posted in

Stir Fried Japanese Udon

< Back to Recipe Listings

Stir Fried Japanese Udon

by Eric Low

If you love simple, easy and healthy Asian recipes, you should try this Stir Fried Japanese Udon by Chef Eric.

Cuisine : Asian Course : Main Skill Level : Novice
Prep : 5 mins Cook : 15 mins Ready in : 20 mins Serves : 2


INGREDIENTS:

  • 60 ml Oil
  • 2 medium Eggs
  • 2 cloves Garlic, chopped
  • 30 g Fresh Shiitake Mushrooms, sliced
  • 30 g Onions, sliced
  • 30 g Carrot, shredded
  • 80 g Cabbage, sliced
  • 30 g Green Pepper, sliced
  • 50 g Japanese Fish Cakes, sliced
  • 100 ml Tonkatsu Sauce
  • 25 ml Kikkoman Soya Sauce
  • 2 pkts Udon Noodles
  • 10 g Spring Onions, sliced
  • Katsuo Bushi Flakes

DIRECTIONS:

  1. In a frying pan, heat the oil and scramble the eggs till foamy. Add the chopped garlic followed by the sliced vegetables and mushrooms.
  2. Cook for another 3minutes and add in the 3 sauces and water.
  3. Stir in the noodles and cook for 5 minutes until the water have almost evaporated but still moist.
  4. Sprinkle with katsuo bushi flakes and spring onions just before serving.
Posted in