Stuffed SousVide Boneless Chicken Leg

< Back to Recipe Listings

Stuffed SousVide Boneless Chicken Leg

by Felix Chong

Try this Stuffed SousVide Boneless Chicken Leg from Chef Felix Chong for a unique and luxurios main dish! Stuffed with foie gras and caramelized apples, it goes perfectly with the tender chicken. The bacon cuts through the sweetness of the caramelized apples, adding another layer of flavour and complexity to the dish.

Cuisine : European Course : Main Skill Level : Novice
Prep : 30 mins Cook : 45 mins Ready in : 75 mins Serves : 1


INGREDIENTS:

  • 1pc Boneless Chicken Leg
  • 50 – 60g Foie Gras
  • 6cs Bacon Strips
  • 1pc Apple
  • 50g Caster Sugar
  • 1 tbsp Unsalted Butter
  • 500g Carrots
  • 300ml Veal Jus
  • 1 tsp Truffle Oil

DIRECTIONS:

  1. Prepare a pot of boiling water and place the carrots in it till fully cooked for about 15 min.
  2. Remove from the pot and pass through a fine strainer.
  3. Transfer to a small pot and butter monte it till a light and fluffy texture is obtained.
  4. Remove the skin from the chicken.
  5. Lay out the chicken in between 2 pcs of cling film and use a kitchen pounder to flatten it and season well with salt and pepper and set aside in the fridge.
  6. Peel off the apple skin and dice it into small cubes.
  7. Heat up a pan with caster sugar. Once it starts to caramelize, place the apple cubes in it and steer for about 30 seconds. Lastly, add in unsalted butter to it and simmer for another 2 mins.
  8. Remove the apple and cool it down.
  9. Place the foie gras on the chicken in a straight roll together with the caramelized apple and roll it up tight.
  10. Roll up the stuffed chicken with the bacon strips and vacuum pack tight to remove excess air in the bag.
  11. Sousvide the chicken in the water bath and pan fry it over a non-stick pan – ensure the bacon is nice and crispy.
  12. Portion into 5-6 pcs and palce it on top of the carrot mash and drizzle over with truffle veal jus! 
Posted in

Seafood Spaghetti in Squid Tomato Sauce

< Back to Recipe Listings

Seafood Spaghetti in Squid Tomato Sauce

by Michele Ow

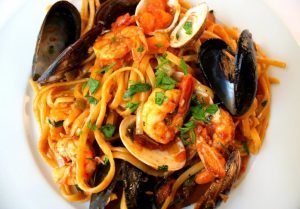
Enjoy the true taste of seafood with this flavourful Seafood Spaghetti in Squid Tomato Sauce which will leave you wanting more!

Cuisine : European Course : Main Skill Level : Novice
Prep : 15 mins Cook : 20 mins Ready in : 35 mins Serves : 2


INGREDIENTS:

  • Olive Oil
  • 1 Anchovies
  • 1/2 pieces Calamari
  • 4 Prawns
  • 8 Mussels
  • 2 garlic cloves, minced
  • 1/2 Onion, finely chopped
  • 1/4 cup White Wine
  • 1 cup Tomato crushed/ Tomato puree
  • 1 cup Water
  • 1 cup Sugar
  • 2 tbsp Finely chopped fresh parsley

DIRECTIONS:

  1. Heat butter with olive oil in a large skillet over high heat. Add seafood and cook. Take the calamari out at 1 minute, prawns at 1½ minutes. Transfer into a bowl.
  2. Reduce heat to medium high. Heat remaining 1 tbsp oil, then add garlic, anchovies and onion. Cook for 3 minutes until onion is translucent.
  3. Add wine and bring to simmer, scraping the bottom of the skillet to mix the brown bits into the liquid. Simmer for 1 minute or until alcohol smell has evaporated.
  4. Add tomato mix, sugar, salt & pepper. Low heat to medium high, bring to simmer and cook for 2 minutes. Adjust salt and pepper to taste.
  5. Boil the pasta and add it into the sauce to mix.
  6. Serve, drizzle with olive oil and garnish.
Posted in

Tart Au Pommes

< Back to Recipe Listings

Tart Au Pommes

by Thripti Hinduja

Learn to make a classic Tart Au Pommes (Apple Pie) with a flaky crust topped with toothsoome apple for a heart-warming family gathering!

Cuisine : Baking Course : Dessert Skill Level : Novice
Prep : 50 mins Cook : 25 mins Ready in : 75 mins Serves : 6-8


INGREDIENTS:

  • 125 g Flour (Crust)
  • 60 g Butter (Crust)
  • 30 g Sugar (Crust)
  • 2 tbsp Cold water (Crust)
  • 1/2 tbsp White distilled vinegar (Crust)
  • 5 Apples (Filling & Topping)
  • 30 g Sugar (Filling & Topping)
  • 30 g Butter (Filling & Topping)
  • Cinnamon to taste (Filling & Topping)
  • Nutmeg to taste (Filling & Topping)
  • 3 tbsp + 1 tbsp Sugar for topping cinnamon (mixed together) – (Filling & Topping)
  • 2 tbsp Apricot jam (Filling & Topping)

DIRECTIONS:

Crust

  1. Mix the flour and the sugar in a bowl.
  2. Chop the butter and rub it into the flour until it resembles bread crumbs.
  3. Stir in the water and the vinegar. Place the dough in plastic wrap and refrigerate for 30 min until firm.

Filling

  1. Peel and Chop up Four of the apples. Place them in a pan with the butter, sugar, cinnamon and the nutmeg. Add 2 tbsp of water and cook over high heat until the mixture starts to bubble.
  2. Turn the heat down and cook until the mixture all the moisture evaporates.

Assemble the Tart

  1. Divide the dough into 3 parts. Roll the out on a floured surface and place on a baking sheet with baking paper. Sprinkle the dough with a little cinnamon sugar. Top with the apple mixture, leaving an inch of space around the edges.
  2. Slice the fifth apple and arrange on top of the filling. Roll up the edges, to form sides to the tart. Sprinkle over some more cinnamon sugar and bake at 180C for 25 min or until golden brown.
  3. Warm the apricot jam with a tsp of water and brush the top of the tart for a glossy finish.
Posted in

Fluffy Surabaya Cake

< Back to Recipe Listings

Fluffy Surabaya Cake

by Julie Yee

Learn how to make this fluffy and soft Surabaya Cake recipe by Chef Julie Yee! It is light , moist and taste amazing with strawberry jam between each layer.

Cuisine : Baking Course : Dessert Skill Level : Novice
Prep : 20 mins Cook : 20 mins Ready in : 40 mins Serves : 6-8


INGREDIENTS:

  • 30gm Egg yolks
  • 280gm (1 1/2 cups) Granulated sugar
  • 375gm (2 1/2 cups) Butter, softened
  • 150gm (1 1/4 cups) Flour
  • 1 tbsp Mocha or chocolate paste (or 2 tbsp cocoa powder)
  • Strawberry Jam

DIRECTIONS:

  1. Pre-heat the oven 180C degrees Celsius and grease the pan.
  2. Beat the butter at high speed for about 10 minutes until it turns pale white in colour.
  3. Beat the egg yolks with sugar until pale and tripled in volume. When you lift the beater, it should form a ribbon.
  4. Pour the yolk mixture slowly into the butter mixture and fold until fully combined. Be sure to scrape the sides of the bowl for any butter so the entire mixture is incorporated.
  5. Sift in the flour and fold. Careful not to over fold as over mixing will result in a reduced volume of batter.
  6. Divide the mixture equally into 3 portions. For one portion, add cocoa powder/chocolate/mocha paste and lightly fold.
  7. Bake in 3 separate pans for 20 minutes or until cake springs back when touched.
  8. Let the cake cool and spread strawberry jam between each layer.
Posted in

Tomato/Watermelon Gazpacho with Greek Yoghurt & Asian Herbs

< Back to Recipe Listings

Tomato/Watermelon Gazpacho with Greek Yoghurt & Asian Herbs

by Susanne Despature

Make this fuss-free, no-cooking-required gazpacho for an impressive starter to your meal! 

Cuisine : European Course : Appetizer Skill Level : Novice
Prep : 40 mins Cook : 0 mins Ready in : 40 mins Serves : 6


INGREDIENTS:

  • 200g Chopped Tomatoes (Can)
  • 1 tbsp Tomato Puree
  • 1 small Red Bell Pepper
  • ½ – 1 medium Red Chili, without seeds
  • 250g Watermelon
  • 1 stalk Lemongrass, finely chopped
  • 10cl Chicken stock
  • White or Red Wine Vinegar, Tabasco, Salt, Pepper
  • Herb Sour Cream
    • 200g Sour Cream
    • 50g Herbs (e.g. Thai Basil, Coriander, Sweet Basil, Flat Parsley..) finely chopped
    • Salt & Pepper


DIRECTIONS:

  1. Remove the skin and dice watermelon flesh.
  2. Wash bell pepper and remove stem. Dice them in 2×2 cubes and combine with chopped tomatoes, watermelon, chicken stock, tomato puree, chili and chopped lemongrass in a blender. Blend for 2 mins of position 3 of Cuisinart Blender or until very smooth, then strain through a sieve, pressing with a soup ladle. Season to taste with salt, pepper, some white vinegar and Tabasco, and then keep refregerated until you serve.

    Chilled Herb Sour Cream:

  3. Combine all ingredients and palce in the freezer for 30 mins, mix from time to time with a fork to prevent crystals from forming – don’t freeze completely!

    To Serve: 

  4. Mix well gazpacho before serving – then ladle into 6 soup dishes. Add a splash of chilled herb sour cream in the middle, and drizzle some oilive oil on top. Garnish with herbs and serve with olive oil crostini.

Posted in

Pistachio Financiers

< Back to Recipe Listings

Pistachio Financiers

by Lin Weixian

Devour these decadent, buttery Pistachio Financiers from Chef Lin Wei Xian, tastes lovely with tea or coffee!

Cuisine : Baking Course : Dessert Skill Level : Novice
Prep : 740 mins Cook : 8 mins Ready in : 748 mins Serves : 12


INGREDIENTS:

  • 55g Icing Sugar
  • 50g Cake Flour
  • 15g Ground Pistachio
  • 35g Ground Almond
  • 3 pinch Baking Powder

DIRECTIONS:

  1. Mix together icing sugar, cake flour, ground pistachio, ground almond, and baking powder.
  2. Add the egg white into the dry ingredients, bit by bit to avoid lumps
  3. Add pistachio paste with a bit of the above mixture and combine.
  4. Melt unsalted butter. When it’s lukewarm, mix into the whole mixture.
  5. Refrigerate batter for a minimum of 12hrs.
  6. The following day, pre-heat oven to 210°C.
  7. Fill financier moulds ¾ full and bake till golden brown for approximately 6-8mins.
  8. Remove from oven and allow to cool before removing from financier mould.
Posted in

Roast Pork with Miso Dressing

< Back to Recipe Listings

Roast Pork with Miso Dressing

by Eric Low

Prepare this delicious and flavorful Roast Pork with Miso Dressing by Chef Eric for your loved ones!

Cuisine : Fusion Course : Main Skill Level : Novice
Prep : 20 mins Cook : 40 mins Ready in : 60 mins Serves : 4


INGREDIENTS:

  • 500 g Pumpkins, washed, cut into slices
  • Salt
  • 4 pcs of Pork Fillet ~140g each
  • Oil for cooking
  • 1 tbsp Ginger Juice
  • 1 tbsp Dark Miso Paste
  • 2 tbsp Mirin
  • 4 tbsp Mirin
  • 1/2 no of Lemon Juice
  • 2 tbsp Dark Miso Paste
  • 1 tsp Chopped Ginger
  • 2 stalks Spring Onions, finely diced

DIRECTIONS:

  1. Preheat oven to 180C. Line baking tray with aluminium foil and season the pumpkins with some salt and drizzle it with some oil. Roast pumpkins in the oven for 30mins.
  2. Marinate pork with ginger juice, dark miso paste and mirin for at least 15mins.
  3. Combine ingredients for miso dressing.
  4. Heat frying pan with some oil. Pan-sear the pork fillets on all sides. Transfer to oven and bake @ 180C for 10mins. Allow pork to cool slightly before slicing.
  5. Arrange sliced pork on roasted pumpkins, spoon some dressing over and serve.
Posted in

Black Forest Pitted Cherry Roll

< Back to Recipe Listings

Black Forest Pitted Cherry Roll

by Julie Yee

Enjoy the sweet symphony of chocolate and pitted cherries with this irresistible and chocolaty Black Forest Cherry Rolls by Chef Julie!

Cuisine : Baking Course : Dessert Skill Level : Novice
Prep : 15 mins Cook : 120 mins Ready in : 135 mins Serves :6


INGREDIENTS:

  • Chocolate Roll Group 1 (Sift together)
    • 70g Cake/top flour
    • 1 tbsp Chocolate powder
    • ½ tsp Baking powder

    Group 2 (Beat together)

    • 3 nos. (110g) Egg whites
    • 6 nos. (100g) Egg yolks
    • 1 tsp Vanilla extract
    • Group 3
    • 45g Hot corn oil
    • 45g Hot milk

    Milky Chocolate Cream

    • 150g Whipping cream
    • 1 tbsp Condensed milk
    • 4 tbsp Melted chocolate/Nutella
    • 1 tbsp Neutral fond powder
    • 1 tsp Vanilla paste

DIRECTIONS:

        For the Chocolate Roll

  1. Sift Group 1 together.

  2. Beat egg white till soft peaks with sugar; add in egg yolks & vanilla (Group 2). Whisk till thick and ribbon-like stage.

  3. Pour in the warm milk & whisk for another few seconds.

  4. Hand-fold sifted flour.

  5. Hand-fold the warm oil.

  6. Bake at 200°C for 10 mins.

  7. Cover with a clean wet towel till use.

    For the Milky Chocolate Cream

  8. Whip the fresh cream.

  9. Add in condensed milk & Neutral Fond Powder.

  10. Brush cake with the pitted cherry syrup.

  11. Spread cream on the Swiss roll & place pitted cherry on top.

  12. Roll cake up tightly.

Posted in

Cute Bear-Patterned Swiss Roll

< Back to Recipe Listings

Cute Bear-Patterned Swiss Roll

by Trish Yee

As if the Swiss Cake Roll was not pretty and cute enough as it is, now you can make your very own adorable Bear-Patterned Swiss Roll! This one is sure to impress. 

Cuisine : Baking Course : Dessert Skill Level : Novice
Prep : 90 mins Cook : 20 mins Ready in : 110 mins Serves : 2-4


INGREDIENTS:

  • For the Cake Batter Ingredients (A): Egg Yolk Mixture 
    • 3 Egg Yolks
    • 35g Caster Sugar
    • 40g Vegetable Oil
    • 60g Milk
    • ½ tsp Vanilla Essence
    • 80g Cake Flour
    • ¼ tsp Red Food Colouring

    Ingredients (B): Egg White Mixture

    • 3 Egg Whites
    • 30g Caster Sugar
    • 1 tsp Corn Flour

    To make the pattern: 

    • Pinch of Corn Flour
    • 1 Egg White

    Egg Yolk Mixture

    • Egg Yolk Mixture
    • 2 tsp + 2 tsp + 2 tsp Cake Flour
    • 1½ tsp + 1½ tsp Cocoa Powder
    • 1/8 tsp Black Food Colouring

    For the chocolate cream filling:

    • ½ tsp Gelatine powder dissolved in 2 tsp hot water
    • 200ml Whipping Cream
    • 1 tbsp Caster Sugar
    • Strawberry Filling

DIRECTIONS:

  1. Preheat oven using 170°C. Prepare a 10” x 10” or 25cm baking tray and line with silicon mat or parchment paper over the design template. Grease the silicon mat/parchment paper with vegetable oil.
  2. Beat 3 egg yolks with 35g of sugar for about 8-10 minutes till it forms into a thick pale yellow mixture.
  3. In a separate bowl, combine 60g of water, 40ml vegetable oil and ½ tsp vanilla essence.
  4. Pour in slowly in addition to the egg yolk mixture, till it is fully incorporated with the egg yolk mixture.
  5. Sift in 80g of cake flour and continue to beat till batter is sticky.
  6. In 3 separate small bowls, add 2 tsp of egg yolk batter & 1 tsp of cake flour in each small bowl.
  7. In a separate bowl, beat 1 egg white till glossy and stiff peaks are about to form, add a pinch of corn flour and continue to beat until stiff.
  8. Add 2 tbsp of the egg white mixture to each small bowl and set aside the remaining egg whites mixture.
  9. Add 1/8 tsp of cocoa powder to one of the bowl and mix well.
  10. Add black food colouring to one small bowl and mix well.
  11. Transfer the 3 bowls of pattern mixture into 3 separate piping bags.
  12. Pipe the black coloured pattern mixture to draw the eyes and nose of the bear. Put inside oven to bake for 1 min.
  13. Once the eyes and noses are baked, pipe the white and brown pattern mixture to draw the bear’s snouts. Bake in oven for another 1 min.
  14. Once the snouts are baked, pipe the remaining white and brown mixture to draw the bear’s faces on top of the snouts. Bake further for another 1 min.
  15. Add ¼ tsp of red food colouring to the egg yolk batter.
  16. In a big mixing bowl, beat 3 egg whites with 30g caster sugar until it turns glossy and stiff peaks, add in 1tsp of corn flour and continue to beat till stiff.
  17. Mix in the remaining egg white and mix well.
  18. Add the egg white mixture, 1/3 at a time, to the egg yolk batter and fold in using the spatula.
  19. Dust the baking tray light with some cake flour to avoid cake sticking to the silicon mat.
  20. Pour batter onto the baking pan with baked patterns. Spread the batter evenly using the spatula. Gently tap pan onto the table to release any air pockets.
  21. Bake in preheated oven for 15mins. Remove from oven and cover with a new sheet of parchment paper. Invert the pan onto a wire rack and unmould the cake.
  22. Gently peel of the silicon mat and use a new sheet of parchment paper to cover the top of the cake to allow latent heat to escape for about 5 minutes.
  23. Invert the cake onto the silicon mat and roll up the cake and leave it to cool for 15mins.

    To make the whipped cream filling:

  24. Dissolve the gelatine powder completely in hot water.

  25. Using an electric beater, whip the cream with sugar using high speed till it becomes glossy and stiff peak, add in the gelatine solution. Continue to beat for another min.

  26. Put in the refrigerator to chill until ready to use.

    To assemble:

  27. Dissolve 10g sugar in 20g of hot water.

  28. Unroll the cake and brush the cake with the sugar syrup and spread cream filling evenly, leaving a 3cm space at the opposite end.

  29. Wrap the cake with parchment paper and twist both ends to secure the roll.

  30. Refrigerate for at least an hr and slice off both ends of the deco roll before serving.

Posted in

Durian Cupcake

< Back to Recipe Listings

Durian Cupcake

by Julie Yee

Calling all durian lovers! Try this Durian cupcake recipe by Chef Julie Yee, it is moist, soft and filled with fresh durian!

Cuisine : Baking Course : Dessert Skill Level : Novice
Prep : 20 mins Cook : 25 mins Ready in : 45 mins Serves : 6-8


INGREDIENTS:

  • Group 1
  • 250gm Butter
  • 180gm Castor sugar
  • Group 2
  • 4 Egg
  • 1teasp Glycerine*
  • 1/2teasp Vanilla Extract
  • 4tbsp UHT Milk
  • Group 3
  • 240gm Cake Flour
  • 1tbsp Custard Powder
  • 6gm/ 1 1/4 teasp Baking Powder
  • 150gm Fresh Durian

DIRECTIONS:

  1. Pre-heat the oven at 180C about 20mins before baking.
  2. Cream butter and castor sugar (1) until light and fluffy.
  3. Add in the eggs and glycerine (2) and beat for another 5mins.
  4. Add in the rest of the ingredients (3).
  5. Bake at 180C for 20-25mins / 9” x 9” square for 50mins.
Posted in