Chocolate Easter Nest

< Back to Recipe Listings

Chocolate Easter Nest

by ToTT

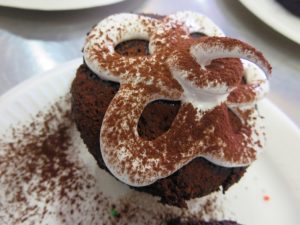
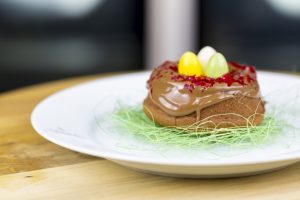
Brilliant to make with little children over the holidays, these pretty little easter nests are great fun to make with the kids and decorated with mini chocolate eggs. Make them this Easter! 

Cuisine : Baking Course : Dessert Skill Level : Novice
Prep : 20 mins Cook : 15 mins Ready in : 35 mins Serves : 12


INGREDIENTS:

  • Chocolate Biscuit
    • 110g Dark chocolate Coverture, 65% cocoa
    • 50g Butter
    • 40g Almond powder
    • 40g Rice flour
    • 2 Egg yolks
    • 2 Egg whites
    • Salt

    Decoration

    • 100g Dark or milk chocolate coverture
    • Sprinkles & Mini-sugar eggs

DIRECTIONS:

  1. Prepare chocolate biscuit: In a bowl on a double boiler, melt chocolate coverture drops with butter, stirring gently with a rubber spatula from time to time. Remove from heat when melted.
  2. Add egg yolks and stir.
  3. In a stand mixer or with an electric hand mixer, whisk egg white until foamy, add slowly sugar until you get stiff peaks.
  4. In a bowl, mix almonds, rice flour and a pinch of salt.
  5. Add ½ of the flour/almond mix to the chocolate batter and fold in gently.
  6. Add ½ of the stiff egg white into the chocolate batter, then the rest of the flour/almond and finish with the remaining egg white – fold in everything carefully, make sure that the ingredients are well mixed.
  7. Fill 12 donut silicon moulds with the batter, using a piping bag with round tip (10mm).
  8. Place in preheated oven at 180° C, fan forced. Bake 12-14 minutes, until the cake fills the mould and a toothpick comes out clean.
  9. Take out of the oven, remove the nests carefully from the rings and let cool out.
  10. Melt chocolate coverture on a double boiler, glaze nests with molten chocolate and sprinkle with edible pearls or grated coconut. Place some small sugar eggs in the middle of the nest.
Posted in

Lemon Blueberry Cream Scones

< Back to Recipe Listings

Lemon Blueberry Cream Scones

by Claire Marie Chang

These Lemon Blueberry Cream scones are tangy and loaded with fresh blueberries are soft and fluffy!

Cuisine : Baking Course : Dessert Skill Level : Novice
Prep : 20 mins Cook : 15 mins Ready in : 35 mins Serves : 6-8


INGREDIENTS:

  • 280 g Cake Flour
  • 1 tbsp / 15 g Baking Powder
  • 40 g White Caster Sugar
  • 1/4 tsp Sea Salt/Fine Salt
  • 70 g Unsalted Butter, Cold & Cubed
  • 80 g Fresh Blueberries
  • 215 g Whipping Cream, Cold
  • 15 g Lemon Juice
  • Zest of a lemon

DIRECTIONS:

  1. Preheat oven to 220°C / 200°C Fan
  2. Combine dry ingredients in a large mixing bowl.
  3. Rub butter into dry ingredients till it forms fine crumbs.
  4. Slowly add cream to form dough.
  5. Knead very lightly. Add blueberries into the dough. Do not over mix the dough.
  6. Flour your worktop.
  7. Roll the dough to 3cm thickness. Cut the dough into 2-3” rounds.
  8. Re roll remaining dough *Do note these won’t be as fluffy.
  9. Place them on baking paper lined trays. About 2” apart.
  10. Brush tops with egg wash.
  11. Bake for 12-15mins till the tops are golden brown.
  12. * Keep at room temperature for up to 3 days.
Posted in

Mini Chocolate Cupcakes with Marshmallow Frosting

< Back to Recipe Listings

Mini Chocolate Cupcakes with Marshmallow Frosting

This decadent Chocolate Marshmallow Cupcake pairs a rich, moist and buttery chocolate flavored cupcake with a soft and fluffy Marshmallow Frosting. Make these for the kids as a treat! 

Cuisine : Baking Course : Dessert Skill Level : Novice
Prep : 30 mins Cook : 30 mins Ready in : 60 mins Serves : 48 mini cupcakes


INGREDIENTS:

    For the Chocolate Cupcakes

    • 3 cups Sugar
    • 3 cups Cake flour
    • 1½ cup Cocoa powder
    • 1 tbsp Baking soda
    • 1½ tsp Baking powder
    • 1½ tsp Salt
    • 1½ cup Buttermilk
    • ¾ cup Vegetable oil
    • 1½ cup Warm water
    • 3 Large eggs
    • 1½ Vanilla extract

    For the Marshmallow Frosting

    • 8 Large egg whites at room temperature
    • 2 cups Granulated sugar
    • ½ tsp Cream of tartar
    • 1/8 tsp Fine salt
    • 2 tsp Vanilla extract

DIRECTIONS:

          For the Chocolate Cupcakes

  1. Preheat oven to 160ºC. Place cupcake holders in mini cupcake trays.
  2. Place all dry ingredients in the mixing bowl and mix on very low to combine. Add buttermilk, oil and water and mix on medium until combined; add eggs and vanilla and mix on medium again until just combined.
  3. Fill each cupcake holder 2/3 with batter and bake for 10-20 minutes until firm. Cool in pan for 5 minutes before removing onto a wire rack to cool completely before icing.

    For the Marshmallow Frosting

  4. Pour water 1 inch deep into a small pot and place over medium heat to bring to a simmer. Place all ingredients except vanilla in a glass bowl and place over simmering water. Whisk by hand for about 6 minutes until sugar is dissolved and mixture is hot.

  5. Pour hot mixture into Kenwood mixing bowl and whisk on medium for 1 minute. Increase to high and keep whisking until stiff, glossy peaks form – this should take about 5 minutes. Add the vanilla and whisk 1 more minute.

Posted in

Stuffed Portobello Mushrooms

< Back to Recipe Listings

Stuffed Portobello Mushrooms

by Felix Chong

This stuffed portobello mushrooms are a delight for any dinner table! Stuffed with creamy cheese flavourful bacon, you’ll be left wanting seconds! 

Cuisine : European Course : Appetizer Skill Level : Novice
Prep : 15 mins Cook : 20 mins Ready in : 35 mins Serves : 2


INGREDIENTS:

  • 2pcs Portobello Mushroom
  • 1 tbsp Bacon
  • 1 tbsp Pistachio Kernel
  • 2 tbsp Japanese Breadcrumbs
  • 1 Egg
  • 2 tbsp Cream
  • 50g Cheddar Cheese
  • 50g Mozzarella Cheese
  • 1 tbsp Flour
  • 200ml Beer
  • 1 tsp Dijon Mustard
  • Pinch of Horseradish
  • Dash of Tabasco

DIRECTIONS:

  1. Gently twist off or cut off the stem of each mushroom. Holding a mushroom in one hand, use a spoon to gently scrape out all of the gills from the underside of the Portobello mushroom cap and discard.
  2. Chop the bacon and pistachio into tiny bits and mix them well with the breadcrumbs, eggs and cream. Season with salt and pepper and set aside.
  3. Spoon the fillings generously onto the underside of the mushroom cap. Sprinkle over with some mozzarella cheese and oven bake at 190 degrees for approximately 8 to 12 minutes.
  4. Preparing the fondue: mix the shredded mozzarella cheese and cheddar cheese in a mixing bowl with a pinch of flour.
  5. Heat up a pot with beer, mustard, horseradish, tobasco and pinch of chopped garlic.
  6. Add in half of the cheese mixture and stir it constantly till the cheese is melted evenly before adding the rest of the cheese into it.
  7. Keep the fondue warm and spoon it over the gratinated mushroom and sprinkle with paprika powder.
Posted in

Nine Layer Rainbow Lapis

< Back to Recipe Listings

Nine Layer Rainbow Lapis

by Julie Yee

These colourful steamed Rainbow Lapis is what we grew up with. You can now make this perennial favourite at home with the recipe shared by Chef Julie Yee!

Cuisine : Asian Course : Dessert Skill Level : Novice
Prep : 15 mins Cook : 40 mins Ready in : 55 mins Serves : 6


INGREDIENTS:

  • 40g Rice Flour
  • 190g Tapioca Flour
  • 400g Coconut Milk
  • ½ tsp Salt
  • 160g Coconut Milk
  • 160g Sugar
  • 6 no. Pandan leaves

DIRECTIONS:

  1. Mix rice flour, tapioca flour, 400g coconut milk and ½ tsp salt in a big bowl and whisk to combine. (Group )
  2. Place pandan leaves, sugar and 160g coconut milk in a saucepan and cook till sugar has melted.
  3. Pour the hot mixture into Group 1.
  4. Divide the portion into 4 portions.
  5. Add the desired colourings to the other 3 portions.
  6. Line 8” square tray with grease proof paper.
  7. Scoop 1 ladle & steam for 5mins. Pour the 2nd layer immediately & steam for another 5 mins.
  8. For the last layer, add in the red portion & steam for about 20 mins.
  9. *White > Blue > Green > Violet > White > Blue > Green > Violet > Red


Posted in

Banana Muffin with Granola

< Back to Recipe Listings

Banana Muffin with Granola

by Julie Yee

Comforting banana bread muffins with a crunch of granola on top. Funs treat anytime of the day!

Cuisine : Baking Course : Dessert Skill Level : Novice
Prep : 15 mins Cook : 30 mins Ready in : 45 mins Serves : 12


INGREDIENTS:

  • 3/4 cup Granola
  • 120 g Plain Flour
  • 1/2 teasp Baking soda
  • 3/2 teasp Baking powder
  • 100 g Fine sugar
  • 110 g Olive oil
  • 1 Egg (large)
  • 1/2 teasp Vanilla extract
  • 220 ml Mashed banana
  • 1 teasp Lemon juice
  • 1/4 teasp Salt

DIRECTIONS:

  1. Mashed the banana coarsely with a fork and add in the lemon juice and salt
  2. Sift the flour, baking powder and baking soda together.
  3. Whisk oil and sugar together till sugar melt.
  4. Add in the beaten egg and vanilla extract.
  5. Add in the banana & sifted flours into mixture.
  6. ** Fold gently and mix briefly till small lumps of flour is still visible.
  7. Sprinkle whole grain cereals on top. Decorate with extra slices of banana.
  8. Bake the muffins at 180ºC for 25 -30mins (fan- mode) till golden brown.
Posted in

Mille Feuille Jivara

< Back to Recipe Listings

Mille Feuille Jivara

by Lin Weixian

Traditionally made of three layers of puff pastry, alternating with two layers of pastry cream, Chef Lin’s version is something that no one can resist! 

Cuisine : Baking Course : Dessert Skill Level : Novice
Prep : 30 mins Cook : 15 mins Ready in : 45 mins Serves : 4-6


INGREDIENTS:

  • For the Hazelnut Dacquiose 
    • 150g Egg whites
    • 50g Sugar
    • 135g Ground hazelnut
    • 150g Sugar
    • 35g Hazelnut, roasted and chopped

    For the Crispy Praline

    • 160g Praline paste
    • 16g Milk chocolate
    • 12g Butter
    • 80g Feuillentine

    For the Jivara Chantilly

    • 315g Cream
    • 210g Milk chocoalte jivara

DIRECTIONS:

        For the Hazelnut Dacquoise

  1. Prepare the workstation.

  2. Scale the ingredients.

  3. Stir ground hazelnut with the 150g of sugar, set aside

  4. Whip the egg whites with 50g of sugar to soft peaks.

  5. Fold the dry ingredients into the whipped egg whites.

  6. Spread the dacquiose onto a tray lined with parchment paper and sprinkle the chopped hazelnuts on top

  7. Bake at 160ºC till golden brown.

  8. Cool down and set aside.

    For the Crispy Praline

  9. Prepare the workstation.

  10. Scale the ingredients.

  11. Melt milk chocolate with butter and mix into the praline paste.

  12. Fold the feuillentine into the mixture.

  13. Spread the crispy praline on top of the dacquoise and set in the chiller.


    For the Jivara Chantily

  14. Prepare the workstation.
  15. Scale the ingredients.
  16. Bring to boil cream and pour on top of the chocolate.
  17. Mix well, blend with hand blender and strain into container, cover with clingfilm and keep one night in chiller.

    Assembling

  18. With a small amount of Chantilly, stick on sheet of milk chocolate on top of the dacquoise.

  19. With a round nozzle, pipe dome on top and cover with another sheet of milk chocolate.

  20. Keep in chiller until ready to serve.

Posted in

Chocolate Scones

< Back to Recipe Listings

Chocolate Scones

by Mimi Wahadi

These Chocolate Chip Scones are wonderfully tender, lightly sweetened and perfect alongside a cup of coffee for breakfast or dessert.

Cuisine : Baking Course : Dessert Skill Level : Novice
Prep : 15 mins Cook : 20 mins Ready in : 35 mins Serves : 6


INGREDIENTS:

  • 210g All Purpose Flour
  • 8g Baking Powder
  • 2g Baking Soda
  • 4g Salt
  • 100g Unsalted Butter (cold)
  • 190g Liquid Cream
  • 80g Dark Chocolate Chips

DIRECTIONS:

  1. Pre heat the oven to 200°C.
  2. In a large bowl, combine the flour, baking powder, baking soda and salt to incorporate.
  3. Scatter the cold butter over the mixture and rubbed in until mixture turns crumbly.
  4. Add chocolate chips.
  5. Add the cream and mix with a fork to resemble a rough dough.DO NOT OVER MIX!
  6. Roll the dough gently to about 2.5 cm in height.
  7. Cut using a stainless steel cutter.
  8. Brush the top of scones with beaten eggs and sprinkle with coarse sugar.
  9. Bake the scones for approximately 15-20 mins till golden brown.
  10. Serve Warm.


Posted in

Matcha Souffle

< Back to Recipe Listings

Matcha Souffle

by Trish Yee

Fluffy soufflé accented with matcha powder, this Matcha Souffle is simply irresistible!

Cuisine : Baking Course : Dessert Skill Level : Novice
Prep : 45 mins Cook : 15 mins Ready in : 60 mins Serves : 4


INGREDIENTS:

  • 150ml Milk (Eggyolk Mixture)
  • 100ml Heavy whipping cream (double cream) (Eggyolk Mixture)
  • 3 Large yolks (Eggyolk Mixture)
  • 2 tbsp Sugar (Eggyolk Mixture)
  • 25g Flour (Eggyolk Mixture)
  • 1-2 tbsp Matcha green tea powder (Eggyolk Mixture)
  • 3 Egg whites (Egg white Mixture)
  • 44g (4tbsp) Granulated sugar (Egg white Mixture)

DIRECTIONS:

  1. Preheat the oven to (200°C).
  2. For the ramekins: Brush the ramekins with butter, and dust the insides with sugar.
  3. Chill the ramekins in refrigerator to set.
  4. For the egg yolk mixture, follow Steps 5 to 12
  5. In a large bowl, beat the egg yolks and sugar together.
  6. Sift the flour into the egg mixture and mix well.
  7. Heat the milk and heavy cream in a small saucepan until almost boiling.
  8. Add a one spoon hot milk mixture into the egg mixture and whisk well until the mixture is smooth.
  9. Then gradually whisk in the rest of the milk mixture.
  10. Pour the mixture back into the saucepan. Whisk the mixture ALL TIMES over a medium-low heat for 3-4 minutes until thickened and smooth. KEEP WHISKING during this process otherwise your custard will overcook and become clumpy.
  11. When the egg yolk custard has thickened, immediately transfer to a bowl (otherwise remaining heat from the saucepan will “overcook” the mixture). Cover with plastic wrap and cool to room temperature (you can put in the fridge to make this process faster).
  12. Once the custard has cool down, sift matcha green tea powder into the custard.
  13. For the egg white mixture, follow Steps 14 to 20
  14. Whisk the egg whites in a clean bowl till bubbles start to form.
  15. Start adding sugar gradually a spoonful at a time. Once you add all the sugar, increase the speed to Level 8 and whisk to make a firm, glossy meringue, about 3-4 minutes.
  16. Whisk ⅓ of the meringue into the custard and mix until homogenous.
  17. Very carefully fold in the rest of the meringue using a rubber spatula. Do not over mix.
  18. Divide the soufflé mix into the ramekins. Tap them on the work surface to level the mixture and run the thumb around the edge.
  19. Place the ramekins on a baking tray and bake for 12-15 minutes until well risen and slightly golden on top. The soufflé should wobble gently in the middle when it’s ready.
  20. Dust with powder sugar and place on a plate. Serve immediately.
Posted in

Almond Tartlettes

< Back to Recipe Listings

Almond Tartlettes

by Susanne Despature

These nutty, rich and crunchy tartlettes are perfect for any dessert table – learn the basic tartlette shell and you can be as creative as you want with the flavours! 

Cuisine : Baking Course : Dessert Skill Level : Novice
Prep : 30 mins Cook : 30 mins Ready in : 60 mins Serves : 4


INGREDIENTS:


  • For the Tartlette Shell
    • 100g Pâte sablée sucrée
    • For the basic Pâte Sucrée
    • 125g Unsalted butter
    • 80g Icing sugar
    • 1 Vanilla pod, pulp
    • 40g White almond powder
    • 1 Egg, 60g
    • 200g Plain flour
    • 1 pinch Salt
  • For the Almond Filling
    • 70g White almond powder
    • 70g Unsalted butter
    • 90g Sugar
    • 2 Eggs
    • ½ pod Vanilla, pulp
    • 2-3 drops Bitter almond extract
    • 1 tbsp flour
    • 100g Heavy cream, 35%
    • 200g Sour cherries without pit (frozen)
    • 50g Almond flakes

DIRECTIONS: 

          For the basic Pâte Sucrée

  1. Using an electric mixer, mix the butter and icing sugar until creamy – add the vanilla pulp, salt, almonds, mix again, than add the egg and mix well. Sift the flour into the butter/egg cream, and then mix just until the dough comes together.

  2. Remove the dough from the mixer, pat into a rectangle and cover in cling wrap. Refrigerate for at least one night before using.

    For the Tartlette Shell

  3. To line the tartlet shells: roll out the pâte sucrée to 5 mm thick. Cut 10 cm circles from the dough and with a spatula put it over the moulds and line them.

  4. Trim the excess dough by pressing the rolling pin on the border of the tartlet moulds, in order to cut it off. Refrigerate for some hours.

    For the Almond Filling

  5. Preheat the oven at 200ºC.

  6. Whisk the soft butter with sugar, almond powder, vanilla pulp and the bitter almond extract until very light and fluffy – add the eggs one per one, then the flour and the cream in a steady stream and continue to whisk until it doubled in volume.

  7. Spread the almond filling on the bottom of the tartlet mould, add some frozen sour cherries and sprinkle the tartlets with some almond flakes.

  8. Bake in the lowest part of the preheated oven for 25 to 30 minutes or until golden brown.

  9. Take the tartlets out of their mould and let them cool out on a tray. Dust them with icing sugar.

Posted in