Panna Cotta with Fruit Compote

< Back to Recipe Listings

Panna Cotta with Fruit Compote

by Jehanne Ali

Panna Cotta is an Italian classic which is simple to make at home with this recipe shared by Chef Jehanne Ali! It tastes amazing when served with fruit compote!

Cuisine : Baking Course : Dessert Skill Level : Novice
Prep : 20 mins Cook : 25 mins Ready in : 45 mins Serves : 6


INGREDIENTS:

  • 100ml Heavy cream
  • 100ml Greek yogurt, cold
  • ½ no. Vanilla pod
  • 2 tbsp Caster sugar (or honey)
  • 1 tbsp Gelatin powder

DIRECTIONS:

  1. Simmer the cream with sugar and vanilla beans until it reaches boiling point.
  2. In a separate bowl, sprinkle the gelatin in a bowl of 3 tbsp cold water.
  3. Using double boiling or microwave, melt the gelatin and pour into the hot cream.
  4. Add the yogurt, and mix well.
  5. Divide into jars and chill until set.
  6. Serve with fruit compote on top.
Posted in

Cream Cheese Biscuit Bun

< Back to Recipe Listings

Cream Cheese Biscuit Bun

by Julie Yee

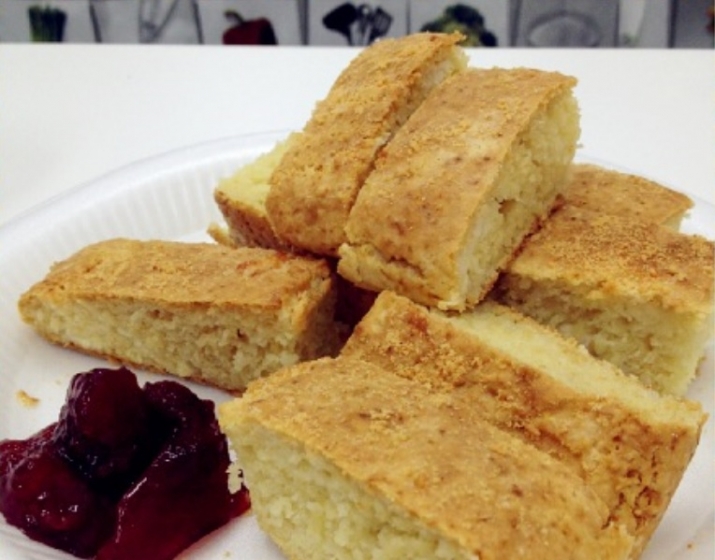
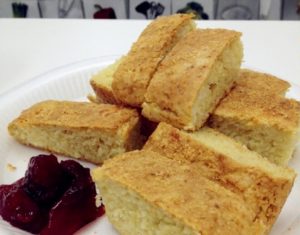
Enjoy the simplicity of this Cream Cheese Biscuit Bun with Cranberry Jam for the perfect snack!

Cuisine : Baking Course : Dessert Skill Level : Novice
Prep : 20 mins Cook : 15 mins Ready in : 35 mins Serves : 16


INGREDIENTS:

  • 90g Bread flour
  • 80g Cake flour
  • 1 tbsp Sugar
  • 1 tbsp Baking powder
  • 5 tsp Salt
  • ¾ tsp Baking soda
  • 130g Buttermilk
  • 60g Cream cheese
  • 30g Salted butter
  • Sprinkling of Parmesan cheese

DIRECTIONS:

  1. Mix all items except the buttermilk in a big bowl to crumb-like texture.
  2. Make a well in the centre and pour in the buttermilk. Knead gently and briefly until dough comes together.
  3. Roll into a rectangle 10cm x 8cm x 2cm thick and cut into 5cm square.
  4. Bake at 220ºC till light brown for 12 -15mins. Serve warm.
Posted in

Florentines

< Back to Recipe Listings

Florentines

by Thripti Hinduja

Try making these chewy, luxurious biscuits at home that is worth the calories!

Cuisine : Baking Course : Dessert Skill Level : Novice
Prep : 35 mins Cook : 10 mins Ready in : 45 mins Serves : 1 container


INGREDIENTS:

  • 10 g Butter
  • 50 g Sugar
  • 10 g Liquid Glucose
  • 50 g Whipping Cream
  • 60 g Sliced Almonds
  • 50 g Candied Orange Rind
  • 100 g Chocolate For Coating

DIRECTIONS:

  1. Put the butter, sugar, liquid glucose and the cream in a pan.
  2. Cook the mixture stirring occasionally until it turns golden brown.
  3. Take it off the heat and add in the sliced almonds and the candied orange peel
  4. Divide the mixture into 20 g balls and place them into silicone molds.
  5. Flatten them slightly and bake them in a preheated oven at 180 ºC for 8-10minutes.
  6. Allow to cool, take them out and spread with melted coating chocolate.
  7. Allow the chocolate to set in the refrigerator for about 15 minutes.
  8. Store in an airtight container for a week.
Posted in

Fruit Tartlets with Almond Filling

< Back to Recipe Listings

Fruit Tartlets with Almond Filling

by Susanne Despature

These colourful and jewel-like fruit tartlets you might see in traditional French bakeries are always an eye-catcher. Filled with almond cream and a hint of bitter almond, everyone loves them! And, good news: they are deceptively easy to prepare! These are perfect for a summer afternoon tea with friends, when soft fruits and berries are plentiful and at their best. Don’t hesitate to prepare the tartlets one day before your tea – the almond filling will set and the taste is even better!

Cuisine : Baking Course : Dessert Skill Level : Novice
Prep : 30 mins Cook : 20 mins Ready in : 60 mins Serves : 12


INGREDIENTS:

    • 150g Pâte sablée sucrée*
    • 70g White almond powder
    • 70g Unsalted butter
    • 90g Sugar
    • 2 Eggs
    • ¼ tsp Bitter almond extract
    • 1 tbsp Plain flour
    • 100g Heavy cream 35 %
    • 200g Fresh berries & fruits

    *For the Pâte sablée (French term for a delicate cookie-like crust)

    • 125g Unsalted butter
    • 80g Icing sugar
    • ½ tsp Vanilla flavour
    • 1 egg, 60g
    • 200g Plain flour
    • 40g White almond powder
    • ½ tsp Salt

DIRECTIONS:

  1. Preheat oven at 200°C.
  2. Roll out the pastry on lightly floured surface, 3 mm thick and cut 12 rounds of pastry about 10 cm in diameter.
  3. Line French tartlette pan with rounds of pastry, trimming away any excess using a rolling pin.
  4. Prepare almond filling : in a bowl of your stand mixer, whisk soft butter with sugar, almond powder and bitter almond extract until very light and fluffy – add eggs little by little, then flour and cream in a steady stream and continue to whisk until it doubled in volume.
  5. Spread 1 tablespoon almond filling on the bottom of the tartlet mould (you can do a second tray with the remaining filling).
  6. Bake in the lowest part of the preheated oven for 20 or until golden brown.
  7. Take tartlets out of the pan and let them cool out on a wire rack.
  8. Decorate your almond tartlets with colour berries, kiwi or grapes.

    *For the Pâte sablée

  9. In a stand mixer, mix butter and icing sugar using a flat beater, until creamy.

  10. Add vanilla flavour, salt and egg. Mix well on medium speed.

  11. Sift the flour and almond powder into butter/egg cream, then mix just until the dough comes together.

  12. Remove dough from the mixer, pat into a rectangle and cover in cling wrap. Refrigerate for at least one night before using.

Posted in

Cream Cheese Brownie

< Back to Recipe Listings

Cream Cheese Brownie

by Philia Ng

Learn to make these deliciously healthy Air Fried Seaweed Chips and snack on it throughout this Chinese New Year without having to worry about the calories!

Cuisine : Baking Course : Dessert Skill Level : Novice
Prep : 30 mins Cook : 35 mins Ready in : 65 mins Serves : 6-8


INGREDIENTS:

  • 250g Cream cheese
  • 80g Icing sugar
  • 1 tsp Vanilla essence
  • 55g Egg
  • 125g Chocolates feves ( 55%- 70%)
  • 125g Golden churn unsalted butter
  • 40g Brown sugar
  • 110g Eggs
  • 65g Plain flour

DIRECTIONS:

  1. Melt chocolate, butter and sugar over a pot of simmering water.
  2. Add in the eggs and mix well.
  3. Add in the flour to combine well.
  4. Cheese Layer: Whip the softened cream cheese and sugar until fluffy than add in the eggs and vanilla essence and combine well
  5. Pour the brownies batter into a pan.
  6. Pour the cheese layer on top and level it well.
  7. Bake at 170 degree Celsius for 35 mins.
  8. Variations: You may omit the cheese layer and topped with marshmallows, any roasted nuts of your choice.
Posted in

Lemon Drizzle Cake

< Back to Recipe Listings

Lemon Drizzle Cake

by Thripti Hinduja

Impress your guests with this toothsome treat for your next tea party. You can whip up this delicious and easy Lemon Drizzle Cake recipe in no time!

Cuisine : Baking Course : Dessert Skill Level : Novice
Prep : 25 mins Cook : 30 mins Ready in : 55 mins Serves : 6-8


INGREDIENTS:

  • 90 g Unsalted butter
  • 120 g Caster Sugar
  • 1 no Lemon Zest
  • 2 Eggs
  • 50 g Sour Cream
  • 1 tsp Vanilla Extracts
  • 1/8 tsp Salt
  • 70 g Plain Flour
  • 25 g Cake Flour
  • 1/4 tsp Baking Soda
  • 1 no Lemon Juice (Crunchy Glaze)
  • 55 g Granulated Sugar (Crunchy Glaze)

DIRECTIONS:

  1. Cream the butter and the sugar together until light and fluffy.
  2. Add in the eggs one by one until fully incorporated.
  3. Mix the sour cream and the vanilla extract. Do not over beat at this point or the mixture might split.
  4. Sift in the dry ingredients and mix until smooth.
  5. Pour the batter in a 6 or 7″ baking tin lined with parchment paper and greased with a little butter.
  6. Bake at 170 C for 25-30 minutes or until a skewer inserted comes out clean.
  7. As soon as the cake is out of the oven, prick it all over with a skewer or tooth pick.
  8. Mix the lemon juice with the granulated sugar for a minute and then brush it all over the
Posted in

Classic Chocolate Chip Cookies

< Back to Recipe Listings

Classic Chocolate Chip Cookies

by Philia Ng

Who can resist cookies especially so when they taste so much like those from popular cookie shops? Now you can make them at home, hand-made from scratch – they are a breeze to make! These cookies are good for a couple of weeks in an air-tight container and you can even sandwich them with vanilla ice cream anytime you want a delicious treat!

Cuisine : Baking Course : Dessert Skill Level : Novice
Prep : 10 mins Cook : 20 mins Ready in : 30 mins Serves : 80pcs


INGREDIENTS:

  • 200g Unsalted Butter
  • 150g Castor Sugar
  • 150g Light Brown Sugar
  • 3 Eggs
  • 390g Plain Flour
  • 1¼ tsp Baking Soda
  • 250g Mini Chocolate Chips

DIRECTIONS:

  1. Cream the softened butter and sugar together until just combined and not fluffy.
  2. Add in the eggs and mix well.
  3. Add in the plain flour and baking soda.
  4. Lastly, add in the chocolate chips and mix well.
  5. Using the Nordic Ware Cookie Dropper, scoop onto the baking tray and space out evenly and bake it at fan mode oven at 180° for 20 min or until golden brown.
Posted in

Nonya Crispy Kueh Bulu

< Back to Recipe Listings

Nonya Crispy Kueh Bulu

by Julie Yee

Bake this delicate Nonya Kueh Bulu for the perfect Chinese New Year snack! It is crispy on the outside and fluffy on the inside!

Cuisine : Asian Course : Dessert Skill Level : Novice
Prep : 20 mins Cook : 10 mins Ready in : 30 mins Serves : 6-10


INGREDIENTS:

  • 5 Egg (320gm)
  • 300gm Sugar
  • 1/2 tsp Vanilla Powder
  • 50gm of Cake Flour with every 180gm of batter

DIRECTIONS:

  1. Preheat oven at 180°C.
  2. Whisk eggs, sugar & vanilla till fluffy.
  3. Fold in 50gm flour with 180gm batter. Place mixture into piping bag.
  4. Heat up empty mould at the stove / oven & grease with melted butter or coconut oil.
  5. Pipe the batter inside and cook over stove for a couple of minutes till bulu expand slightly.
  6. Place in oven for 8-10mins till brown.
  7. Use the satay stick to take out the kueh bulu.
Posted in

Tofu Cheesecake

< Back to Recipe Listings

Tofu Cheesecake

by Trish Yee

Looking for a healthy Cheesecake recipe? Than you got to try this light, silky smooth Tofu Cheesecake that is nutritious and delicious!

Cuisine : Baking Course : Dessert Skill Level : Novice
Prep : 30 mins Cook : 0 mins Ready in : 270 mins Serves : 6-8


INGREDIENTS:

  • 120g Digestive biscuits (Base)
  • 70g Butter, melted (Base)
  • 150g Silken tofu (Filling)
  • 125g Cream cheese (Filling)
  • 80g Greek yoghurt (Filling)
  • 25g Butter, melted (Filling)
  • 50g Icing sugar (Filling)
  • 30g Milk (Filling)
  • 20g Hot Water
  • 11/2 tsp Powdered Gelatine

DIRECTIONS:

  1. Prepare a 6 inch spring form pan by lining the base with baking paper.
  2. In a food blender, blend the biscuits until they resemble fine breadcrumbs.
  3. Transfer the crumbs into a bowl and stir in the melted butter. Press the crumbs onto the base of the pan, making sure it is as even as possible. Leave it in the fridge for at least 10min to set the base.
  4. Place all the ingredients for the filling into a food processor and pulse a few times to get a smooth mixture.
  5. In a small bowl, combine the gelatine and hot water and stir thoroughly until all the gelatine has dissolved.
  6. Add the gelatine to the filling and blend to incorporate thoroughly.
  7. Pour the filling through a sieve over the base. The sieve helps to remove any air bubbles.
  8. Place the cheesecake into the fridge and let set for at least 4 hours, preferably overnight.
Posted in

Chocolate Peanut Butter Crème Brulee


< Back to Recipe Listings

Chocolate Peanut Butter Crème Brulee

by Mimi Wahadi


These indulgent Crème Brulees are deliciously decadent with Chocolate Peanut Butter!

Cuisine : Baking Course : Dessert Skill Level : Novice
Prep : 10 mins Cook : 240 mins Ready in : 250 mins Serves : 6


INGREDIENTS:

  • 50g Sugar
  • 2 no. Egg yolks
  • 150ml Whipping cream
  • 85g Chocolate coverture
  • 5g Peanut butter


DIRECTIONS:

  1. Whisk sugar and egg yolks till well mixed and thicken.
  2. Slowly pour hot cream that has been boiled into egg mixture still beating till well combined.
  3. Place the entire mixture into the saucepan and set over medium heat, stir till sauce thickens, and add chocolate & peanut butter until well combined. Do not over boil. Pour into aluminum cup and chill for at least 4 hours.
Posted in