Strawberry Pavlova

< Back to Recipe Listings

Strawberry Pavlova

by Lin Weixian

This dreamy-looking Strawberry Pavlova is bound to make you crave for more!

Cuisine : Dessert  Course : Baking  Skill Level : Novice
Prep : 20 mins Cook : 60 mins Ready in : 1 hr 20 mins  Serves : 1-2 Servings


INGREDIENTS                                          

  • 100gm Egg Whites
  • 100gm Icing Sugar
  • 100gm Sugar
  • Yoplait Strawberry Yogurt as needed
  • Fresh Berries

DIRECTIONS

  1. Prepare the workstation.
  2. Scale the ingredients.
  3. Beat egg whites; add sugar to form stiff peaks.
  4. Finish off by delicately folding in sifted icing sugar.
  5. Pipe into shape of an inverted, hollow cone.
  6. Bake at 125C for 60 minutes.
  7. Cool down before piping Yoplait Strawberry Yogurt into the pavlova.
  8. Decorate attractively with fresh fruits.
  9. Serve immediately.
Posted in

Cheesecake Brownies

< Back to Recipe Listings

Cheesecake Brownies

by Lin Weixian

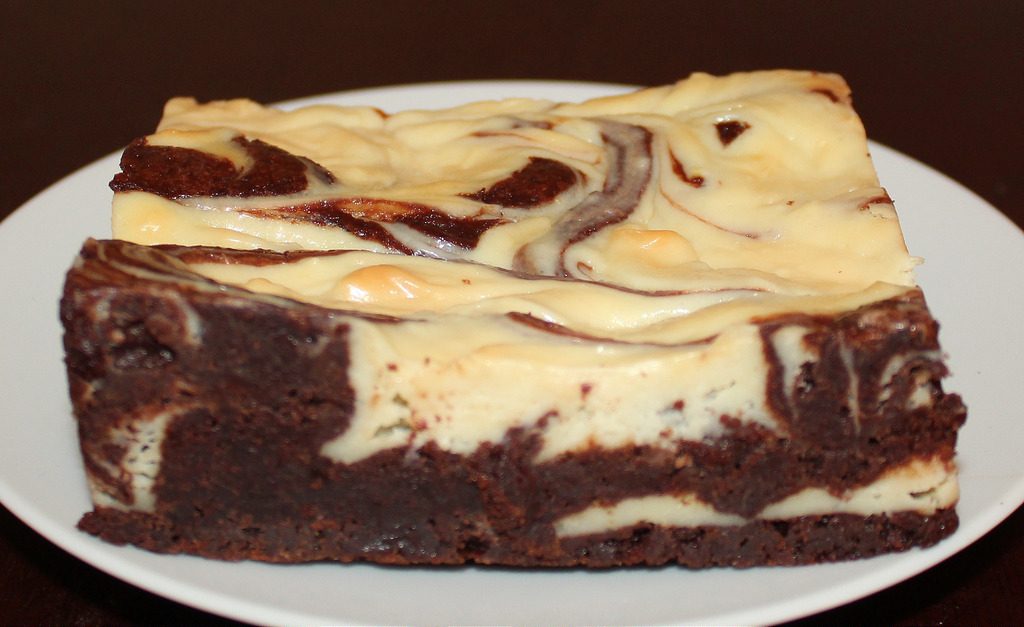
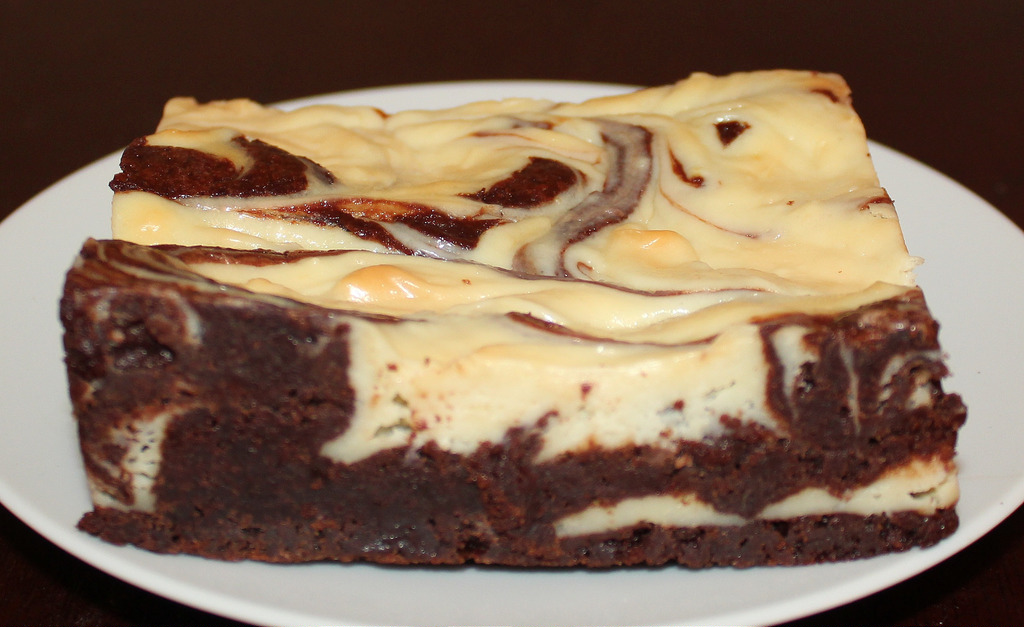
A combination of cheesecake and brownies makes a rich, fudgy and dreamy Cheesecake Brownie!

Cuisine : Dessert  Course : Baking  Skill Level : Novice
Prep : 40 mins Cook : 40-45 mins Ready in : 1 hr 20 – 1 hr 25 mins  Serves : 1-2 Servings


INGREDIENTS                                          

  • Brownies Batter
    • 60gm Valrhona Equatorial
    • 62gm Valrhona Cocoa Mass
    • 105gm Unsalted Butter
    • 80gm Eggs, beaten
    • 140gm Sugar
    • 12gm Inverted Sugar
    • Pinch of Salt
    • 50gm Cream
    • 55gm Cake Flour, sifted
    • 50gm Walnut, chopped
  • Cheesecake Batter
    • 365gm Cream cheese, room temp
    • 100gm Sugar
    • Pinch of Salt
    • 100gm Eggs
    • 55gm Sour Cream
    • 32gm Cream

DIRECTIONS FOR BROWNIES BATTER                                        

  1. Prepare the workstation.
  2. Scale the ingredients.
  3. Melt the chocolate, cocoa mass and butter together.
  4. Whisk up the eggs with sugar, inverted sugar and salt.
  5. Fold the chocolate mixture (40C) into the egg mixture.
  6. Fold in cream.
  7. Fold in flour and walnuts.
  8. Set aside mixture.

DIRECTIONS FOR CHEESECAKE BATTER

  1. Prepare the workstation.
  2. Scale the ingredients.
  3. Soften cream cheese with sugar and salt at low speed.
  4. Add eggs gradually until just mixed.
  5. Add sour cream and cream until just mixed.
  6. Set aside mixture.

ASSEMBLING

  1. Pour two-third of the brownies batter into prepared mould. Spread evenly.
  2. Pour cheesecake batter onto brownie batter. Spread evenly.
  3. Drop the reserved brownie batter in large dollops over the topping. Draw the handle of a spoon through the two batters to create a swirled effect.
  4. Bake at 175C until the top is just set, 40 to 45 mins. Let cool completely in the pan on a wire rack before cutting into desired size.


Posted in

Topinambour Soup

< Back to Recipe Listings

Topinambour Soup

by Stephan Zoisl

Topinambour Soup – Jerusalem Artichoke Soup is a show-stopping appetizer that is creamy and nutritious!

Cuisine : European  Course : Appetizer  Skill Level : Novice
Prep : 15 mins Cook : 15 mins Ready in : 30 mins  Serves : 1-2 Servings


INGREDIENTS                                          

  • 1kg Topinambour, Jerusalem Artichoke
  • 200gm White Onions
  • 250gm Butter
  • 100ml White Wine
  • 2L Vegetable Stock or Water
  • 300ml Cream
  • 60ml Almond Oil
  • 100gm Malto Sec
  • 1 punnet Purple Shiso
  • Bay leaf, salt & black pepper for seasoning
  • Deco: Freid Artichoke Chips, Purple Shiso

DIRECTIONS FOR TOPINAMBOUR SOUP                                    

  1. Peel the topinambour (Jerusalem artichoke), cut in half. Peel the onions, cut in small cubes.
  2. Melt the butter in a bigger pot, by low heat – add the onions and sauté them without giving colour.
  3. Add the topinambour – sauté for 5minutes, season with salt, pepper and bay leaf.
  4. Add the white wine, reduce the wine by half. Add the vegetable stock or water.
  5. Boil till the topinambour are soft and blend till smooth.
  6. Taste and season again, might add a little bit of fresh lemon choose if it needs a bit more acid. Last – transfer back into the pot, add the cream – boil ones and serve.

DIRECTIONS FOR ALMOND SOUP

  1. Place the malto-sec into a blender, slowly add the almond oil. Once everything is combined, give it a strong blend.

ASSEMBLING

  1. Place the powder in the soup bowl, followed by the fried artichoke chips, garnished with purple shiso. Serve the soup in extra pot and pour into the bowl at the table.
Posted in

Japanese Strawberry Shortcake

< Back to Recipe Listings

Japanese Strawberry Shortcake

by Julie Yee

Japanese Strawberry Shortcake is made from a light and airy shortcake layered with Chantilly cream and sliced strawberries that are popular in Japan!

Cuisine : Baking  Course : Dessert  Skill Level : Novice
Prep : 45 mins Cook : 15 mins Ready in : 60 mins  Serves : 1×7” Cake


INGREDIENTS                                          

  • Japanese Strawberry Chantilly Shortcake
    • 3 Egg
    • 1 Egg Yolk
    • 80gm Castor Sugar
    • 110gm Cake Flour
    • 20ml UHT Milk
    • 30gm Corn Oil
    • ½ tsp Vanilla
  • Chantilly Cream
    • 200gm Fresh Whipping Cream 35%
    • 150gm Pastry Cream (recipe below)
  • Pastry Cream
    • 250gm Milk
    • 2 Egg Yolk
    • 50gm Sugar
    • 2 tbsp Corn Starch
    • 1 tsp Vanilla Paste
  • Liquor Syrup
    • 50gm Castor Sugar
    • 50gm Hot Water
    • 1 tbsp Liquor
    • 150gm Strawberry Slices
    • Extra Strawberry for Cake Decoration

DIRECTIONS FOR JAPANESE STRAWBERRY CHANTILLY SHORTCAKE

  1. Whisk egg & sugar till ribbon stage over a pot of water.
  2. Fold in sifted flour & vanilla.
  3. Fold in melted butter.
  4. Bake 200C for 12 mins in 3×7” trays.

DIRECTIONS FOR CHANTILLY CREAM

  1. Fold the 2 ingredients together.

DIRECTIONS FOR PASTRY CREAM

  1. Boil the milk.
  2. Mix the yolk, sugar & corn starch together.
  3. Temper the milk with yolk mixture & bring back to boil till thick.
  4. Cool down the mixture.

ASSEMBLY

  1. Level the shortcake and brush it with liquor syrup for the cake to stay moist.
  2. Layer the cake with chantillly cream and sliced strawberries.
  3. Decorate with full strawberries.
Posted in

Baked Creamy Chicken Pasta

< Back to Recipe Listings

Baked Creamy Chicken Pasta

by Mimi Wahadi

This cheesy Baked Creamy Chicken Pasta is perfect for a cold night in that will be enjoyed by your family!

Cuisine : European  Course : Main  Skill Level : Novice
Prep : 25 mins Cook : 30 mins Ready in : 55 mins  Serves : 1-2 Servings


INGREDIENTS                                          

  • Handmade Pasta
    • 200gm All-Purpose Flour
    • 2 Large Eggs
  • Chicken Cream Sauce
    • 3 tbsp Olive Oil
    • ¼ cup Onions, chopped
    • 1 tsp Garlic, chopped
    • ¼ cup All-Purpose Flour
    • 2 cups Chicken Stock
    • Dried Rosemary & Parsley
    • 250ml Full Cream Milk
    • 200ml Cooking Cream
    • 200gm Boiled Chicken Meat
    • 2 pcs Chicken Sausage
    • 50gm Mushroom (optional), sliced

DIRECTIONS FOR HANDMADE PASTA

  1. In a stand mixer attached with a dough hook, combine all ingredients and mix.
  2. Beat until dough become light yellow, smooth and soft.
  3. Rest the dough for 10 mins.
  4. Roll and cut the pasta dough. Dust with semolina and flour.
  5. Set aside until ready to boil.
  6. In a deep pot, boil water and add salt.
  7. Boil pasta for approximately 3-4 mins. Drain and toss with olive oil.

DIRECTIONS FOR CREAM CHICKEN SAUCE          

  1. Finely chop the onions, garlic, rosemary and gently fry on a medium heat in the olive oil for approx. 3 mins stirring continuously.
  2. Add the flour followed by chicken stock.
  3. Reduce heat to low, add cream and milk, stir gently, add mushrooms, ensuring all ingredients are covered in cream.
  4. Add the roughly chopped chicken meat.
  5. Drain pasta and add to sauce – stir pasta and sauce to ensure all pasta is covered.
  1. Preheat the oven to 200°C.
  2. Add the cooked pasta to the thickened sauce, making sure it’s coated completely.
  3. Toss in the chicken pieces. Pour the pasta mixture into the prepared aluminium casserole dish, and then top with chicken sausages,mozzarella cheese and parmesan powder.
  4. Bake it uncovered for 20 minutes, until the cheese is melty and the edges are bubbly.
  5. Let it rest for 5 minutes before serving.
Posted in

Kway Pie Tee

< Back to Recipe Listings

Kway Pie Tee

by Charlynn Gwee

Get your guests to fill in the Kway Pie Tee shells with chicken and pine nuts in a do-it-yourself Kway Pie Tee party!

Cuisine : Asian  Course : Appetizer Skill Level : Novice
Prep : 10 mins Cook : 15 mins Ready in : 25 mins  Serves : 12 Mini Shell


INGREDIENTS                                          

  • 2 tbsp Oil
  • 1 tsp Chopped Garlic
  • ½ tbsp Chopped Ginger
  • ½ Diced Onions
  • 250gm Boneless Chicken Leg/ Breast (Diced)
  • ½ small Red Bell Pepper (Diced)
  • 100gm Zucchini (Seeded, diced)
  • 2 tbsp Oyster Sauce
  • 1 tsp Coarse Ground Black Pepper
  • 30gm Pine Nuts (Toasted)
  • Coriander Leaves for Garnish
  • Pie Tee Shells

DIRECTIONS

  1. Heat oil in pan, sauté garlic, ginger and onions till fragrant. Add the chicken and cook for two minutes.
  2. Toss in the bell peppers and zucchini, pour in oyster sauce and sprinkle black pepper over the chicken. Cook for another two minutes.
  3. Add in the pine nuts to the chicken, mix well and fill into pie tee cups as required. Garnish with some coriander leaves.
Posted in

Sukiyaki

< Back to Recipe Listings

Sukiyaki

by Autumn Brown

Loaded with vegetables, mushrooms and well-marbled beef in a sweet and savoury Kanto-Style soy sauce broth with Kansai-Style condiments! This is the dish to make for a heart-warming family gathering.

Cuisine : Asian  Course : Main  Skill Level : Novice
Prep : 10 mins Cook : 15 mins Ready in : 25 mins  Serves : 1-2 Servings


INGREDIENTS             

  • Well-marbled beef sliced for sukiyaki (3mm thick)
  • Preferably a good quality ribeye , short rib or chuckroll
  • Japanese Leak
  • Napa Cabbage
  • Carrot
  • Enoki Mushrooms
  • Fresh Shiitake Mushrooms
  • Firm Tofu
  • Konnyaku Noodles
  • Udon Noodles
  • Freshest Pasteurised Eggs (Optional)
  • Sukiyaki Sauce Kanto-Style, Eastern Japan
    • 1 part Sake
    • 1 part Mirin
    • 1 part Soy Sauce
    • 1 part Kombu Stock
    • ¼ part Brown Sugar
  • Sukiyaki Condiments Kansai-Style, Western Japan
    • Sake
    • Soy Sauce
    • Brown Sugar

DIRECTIONS

Kanto Style

  1. To make Kanto-style sukiyaki sauce, combine all ingredients inside Bruno Nabe Pot and bring to a boil for around 5 minutes to reduce the mixture slightly.
  2. Arrange Japanese cabbage, leek, tofu, mushrooms and simmer for about 3 minutes, then add the thinly sliced beef and udon. Simmer the ingredients for another 3-5 minutes until all ingredients are well-cooked.
  3. To enjoy Kanto-style sukiyaki, dip cooked vegetables and beef in beaten pasteurized egg.
  4. Add more sukiyaki sauce and repeat step 2 to continue cooking.

Kansai Style     

  1. To make Kansai-Style sukiyaki, preheat Bruno Nabe Pot on high.
  2. Place a piece of beef fat, move it around to render its fat. If you don’t have any beef fat, add 1 tsp of oil and spread it around.
  3. Add some brown sugar, and sear sliced beef in the pot. Drizzle sake and soy sauce. Let it sizzle, then flip the beef to cook the other side briefly. Do enjoy the beef by dripping in pasteurized eggs.
  4. In the same pot, arrange cabbage, leef, tofu, mushrooms, konnyaku noodles and sliced beef. Sprinkle brown sugar, drizzle soy sauce and sake. Allow ingredients to simmer and cook.
  5. To enjoy Kansai-style sukiyaki, dip cooked vegetables and beef in beaten pasteurized egg.
  6. Add the end when all ingredients are taken out of the pot, add cooked udon or rice to soak up the flavourful sauce. Add more brown sugar, soy sauce and sake if mixture is too dry.
Posted in

Salted Egg Yolk Cookies

< Back to Recipe Listings

Salted Egg Yolk Cookies

by Charlynn Gwee

Indulge in this melt-in-your-mouth, buttery and crumbly Salted Egg Cookies during your teatime!

Cuisine : Asian  Course : Dessert Skill Level : Novice
Prep : 15 mins Cook : 13-18 mins Ready in : 28-33 mins  Serves : 1-2 Servings


INGREDIENTS                                          

  • 125gm Plain Flour
  • 10gm Corn Flour
  • ½ gm Baking Powder
  • ½ gm Baking Soda
  • 10gm Milk Powder
  • 4 Salted Egg Yolk
  • 85gm Unsalted Butter
  • 2gm Salt
  • 40gm Caster Sugar
  • 1 Egg Yolk
  • Dash of Oil
  • Pinch of Salt
  • Black & White Sesame Seeds (Optional)


DIRECTIONS

  1. Preheat oven to 170C.
  2. Steam salted egg yolk, roughly chop and set it aside to cool.
  3. Cream butter, sugar and salt together till fluffy.
  4. Add in all sifted dry ingredients gradually.
  5. Gradually incorporate chopped egg yolk.
  6. Roll to 5mm thickness and cut out desired shape.
  7. Brush with egg wash and top with black and white sesame.
  8. Bake for 13-18 minutes.
Posted in

Chicken Kiev

< Back to Recipe Listings

Chicken Kiev

by Vivian Pei

Oozing with tarragon butter, this tasty and crispy Chicken Kiev recipe will leave you wanting more!

Cuisine : European  Course : Main  Skill Level : Novice
Prep : 80 mins Cook : 15 mins Ready in : 1 hr 35 mins  Serves : 2 Servings


INGREDIENTS             

  • 8 tbsp/ 110g Unsalted Butter, softened
  • 1 tsp Dried Parsley
  • 1 tsp Dried Tarragon
  • 1 tsp Kosher Salt, plus extra for seasoning chicken
  • ¼ tsp Freshly ground black pepper, plus extra for chicken
  • 2 large Boneless skinless chicken breast halves
  • 2 cups Whole eggs, beaten with 1 tsp water
  • Japanese bread crumbs (panko), plus ¼ cup for filling
  • Vegetable oil, for frying

DIRECTIONS

  1. Combine butter, parsley, tarragon, 1 teaspoon salt, and 1/4 teaspoon black pepper in a bowl. Mash with a fork to combine. Place mixture on plastic wrap or waxed paper and roll into small log; place in freezer.
  2. Place chicken breasts, 1 at a time, between 2 pieces of plastic wrap. Pound to no less than 3.5mm thickness. Season each piece of chicken with salt and pepper.
  3. Lay 1 chicken breast on a new piece of plastic wrap and place ¼ of the compound butter and 1tablespoon breadcrumbs in the centre of each breast. Using the plastic wrap to assist, fold in ends of breast and roll breast into a log, completely enclosing the butter; roll very tightly. Repeat with each breast. Place chicken in refrigerator for 1-2 hours, or up to overnight.
  4. Place egg and water mixture in a shallow dish and 2 cups bread crumbs in a different shallow dish.
  5. Heat 1/2-inch of vegetable oil in a large frying pan over medium-high heat.
  6. Dip each breast in the egg mixture and then roll in the bread crumbs. Gently place each breast in oil, sealed-side down, and cook until golden brown, approximately 5-6 minutes on each side until the chicken is golden brown. To test for doneness, cut into one of the rolled chicken breasts to make sure it doesn’t have a pink interior. Remove to a cooling rack set in a tray and allow to drain for 5 to 10 minutes before serving.
  7. Alternate method is to finish off in the oven:
  8. To cook, heat oven to 180C. Heat the oil in a large frying pan over a medium-high heat. Fry the Kievs for 2 to 3 mins each side until golden – you may need to do this in batches. Transfer to a baking tray and cook for 20-25 mins until cooked through.
Posted in

Mini French Toast Cups

< Back to Recipe Listings

Mini French Toast Cups

by ToTT

Baked mini French toast cups are the perfect breakfast to try with the kids this school holiday. These are great for picnics, breakfast on-the-go, or to kick-start a fun day out! #QuickBites

Cuisine : European Course : Main Skill Level : Novice
Prep : 20 mins Cook : 30 mins Ready in : 50 mins  Serves : 3 large ramekins


INGREDIENTS             

  • 115g Cream Cheese
  • 4 Eggs
  • 2/3 cup Milk
  • 1/3 cup Orange Juice
  • 1/4 cup Maple-flavored Pancake Syrup
  • 1/2 tsp Freshly Grated Orange Peel
  • 3 cups Baguette (about 4 slices – 1 inch)

DIRECTIONS 

  1. Heat oven to 350F. Whisk cheese in a medium bowl until smooth. Add in 1 egg at a time and whisk each addition until smooth.
  2. Stir in milk, maple syrup, orange juice and orange zest until blended.
  3. Divide the bread among greased ramekins. Slowly pour the mixture over the bread in each cup.
  4. Bake the french toast at 350F for about 30 mins.
Posted in