Sous Vide Wagyu Beef

< Back to Recipe Listings

Sous Vide Wagyu Beef

by Francois Mermilliod

Indulge in this all-star, easy-to-make Sous Vide Wagyu Beef that melts in your mouth.

Cuisine : European Course : Main Skill Level : Novice
Prep : 5 mins Cook : 65 mins Ready in : 70 mins Serves : 1


INGREDIENTS:

  • 200g Wagyu sirloin
  • 10ml Evoo
  • Few Sprigs
  • Black Pepper

DIRECTIONS:

  1. Vacuum pack the beef.
  2. Cook in water at 58 degrees for 1 hour.
  3. Sear the beef in a hot pan before serving.
  4. Served with a mesclun Salad.
Posted in

Apple Pie

< Back to Recipe Listings

Apple Pie

by Trish Yee

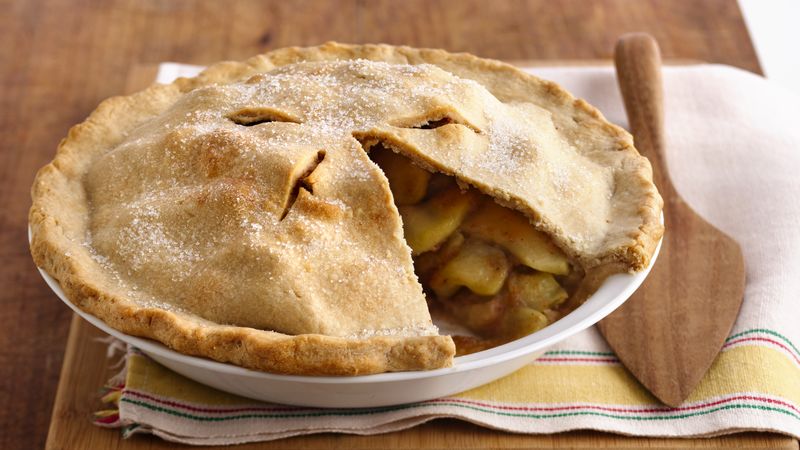
This homemade Apple Pie is a classic, from a scrumptious filling to the flaky pastry crust. 

Cuisine : Baking Course : Dessert Skill Level : Novice
Prep : 70 mins Cook : 45 mins Ready in : 115 mins Serves : 8-10 


INGREDIENTS:

Pastry

  • 110g Plain flour (Pastry)
  • 1/4 teasp Salt (Pastry)
  • 45g Unsalted butter, chilled and cubed (Pastry)
  • 75g Vegetable shortening, chilled (Pastry)
  • 50-60ml Ice water (Pastry)

Apple Pie Filling

  • 2 Green and 2 red apples (Apple Pie Filling)
  • 1/4 cup Sugar (Apple Pie Filling)
  • Dash of Nutmeg (Apple Pie Filling)
  • Dash of Cinnamon (Apple Pie Filling)
  • Pinch of Salt (Apple Pie Filling)
  • 1 tbsp Apple cider (Apple Pie Filling)
  • Vanilla pod extract (Apple Pie Filling)
  • 20g Butter (Apple Pie Filling)

DIRECTIONS:

For the pastry, follow steps 2 to 5.

2. Mix the flour and salt together in a large bowl. Add the butter and shortening.

3. Using two forks, cut the butter and shortening into the mixture until it resembles coarse meal or you may use food processer to do the work.

4. Drizzle the cold water in, 1 Tablespoon at a time, and stir with a rubber spatula or wooden spoon after every Tablespoon added. Do not add any more water than you need to. Stop adding water when the dough begins to form large clumps

5. Transfer the pie dough to a floured work surface. The dough should come together easily and should not feel overly sticky. Using floured hands, fold the dough into itself until the flour is fully incorporated into the fats. Form it into a ball. Divide dough in half. Wrap each tightly in plastic wrap. Refrigerate for at least 30 minutes.

6. For the Apple Pie Filling, follow steps 6 to 12.

7. In a large skillet, melt the butter over medium-high heat. Add the apples, and cook, stirring, until the sugar dissolves and the mixture begins to simmer, about 2 minutes. Cover, reduce heat to medium-low, and cook until the apples soften and release most of their juices, about 7 minutes.

8. Simmer over medium heat until thickened and lightly caramelized, about 10 minutes.

9. Add in the spices and the apple cider or lemon juice. Set aside to cool.

10. Line the bottom of a pie pan with one of the discs of dough, and trim it so it lays about ½ inch beyond the edge of the pan. Put the apple filling in the pan and mound it slightly in the centre.

11. Brush the top edges of the dough with the egg. Place the second disc of dough over the top. Fold the top layer of dough under the edge of the bottom layer and press the edges together to form a seal. Flute the edge as desired. Brush the surface of the dough with egg and then sprinkle with sugar. Pierce the top of the dough in several places to allow steam to escape while baking.

12. Bake the pie on a baking sheet until the crust is golden, about 30-45 minutes. Cool on a rack before serving.

Posted in

Chocolate Mocha Bundt Cake

< Back to Recipe Listings

Chocolate Mocha Bundt Cake

by Jehanne Ali

With the Eid festival looming around the corner, there is always a good excuse to bake a cake. But then again, do you really need an occasion to savour a good cake? Baking a cake can be so simple, yet the results can be etched in your family’s memories for years to come, after all they will remember the homemade cake better than shop bought anytime!

This chocolate mocha bundt cake makes use of the gorgeous spiral tin, and you really need very minimal decoration, as the design should be the masterpiece here. Melted chocolate drizzle is after all much healthier than sugary frosting. Bring it up a notch with fresh fruit like strawberries.

Cuisine : Baking Course : Dessert Skill Level : Novice
Prep : 15 mins Cook : 45 mins Ready in : 60 mins Serves : 12 


INGREDIENTS:

  • 200g unsalted butter
  • 180g castor sugar
  • 1 tsp vanilla extract
  • 4 large eggs, separated
  • ¼ tsp cream of tartar
  • ½ tsp baking soda
  • 2 tbsp water
  • ½ cup espresso
  • 3 tbsp whole milk
  • 200g cake flour
  • 50g cocoa powder
  • ½ tsp salt
  • 150g melted dark chocolate
  • Fresh strawberries for garnish

DIRECTIONS:

  1. Preheat the oven to 170°C.
  2. Cream the butter and sugar until pale and fluffy.
  3. Add in the vanilla extract and egg yolks, beat for another minute.
  4. Transfer the batter into a bowl.
  5. In a glass combine the baking soda and water; it will be fizzy.
  6. Add in the espresso, milk into the soda and combine well.
  7. Sift the cake flour, cocoa and salt together, and add into the batter alternating with the espresso mix until all is mixed well.
  8. Beat the egg whites with cream of tartar until stiff peaks are formed.
  9. Fold gently into the cake batter.
  10. Sprinkle some plain flour (or cake flour) onto the cake pan.
  11. Pour the batter into the cake pan and bake for 45 minutes.
  12. Once cake is cool, invert onto a cake stand or platter.
  13. Drizzle the melted chocolate on top and garnish with strawberries.
Posted in

Castella Gula Melaka Cake

< Back to Recipe Listings

Castella Gula Melaka Cake

by Julie Yee

Enjoy the fragrance of gula melaka with Chef Julie’s Castella Gula Melaka Cake recipe! This light and jiggly cake is the perfect end of a meal!

Cuisine : Baking Course : Dessert Skill Level : Novice
Prep : 20 mins Cook : 70 mins Ready in : 90 mins Serves : 6-8 pieces


INGREDIENTS:

  • Group A
    • 90g Corn oil
    • 130g Egg yolks
    • 120g Cake flour
    • 80ml Fresh milk
    • 40g Gula Melaka/ Palm sugar
    • 1tsp Vanilla extract
  • Group B
    • 220g Egg white
    • ½ tsp Lemon juice
    • ¼ tsp Salt
    • 80g Castor sugar
    • 50g Chopped Gula Melaka

DIRECTIONS:

  1. In a large mixing bowl, hand whisk egg yolks, oil, milk, whole egg until pale and well combined then sift in the flour and mix until smooth.
  2. Whisk the egg white until thick foams before slowly adding sugar and continue whisking until soft firm peak.
  3. Add ¼ portion of the meringue into egg yolks batter gently fold with a hand whisk till just combined before pouring the egg yolk batter back into the meringue.
  4. Pour half the cake batter into the pan, then sprinkle some chopped gula Melaka on top. Top up with remaining half batter .Knock the cake tin on the table top t get rid of air bubbles.
  5. Bake in a water bath for 10 minutes at 170C before reducing the temperature to 150C and continue to bake for another hour. Please take note that temperature and timing is only indicative here.
  6. Remove from oven and drop the pan from a height a couple of times to minimize shrinkage. Remove from mould by holding the paper lining and lifting up on to a cooling rack. Peel the paper from the sides and allow to cool before slicing.
Posted in

Flourless Chocolate Cake

< Back to Recipe Listings

Flourless Chocolate Cake

by Thripti Hinduja

This flourless recipe is richer than a regular chocolate cake. Create a dense piece of delicacy with mainly butter and chocolate and adapt this versatile recipe into your own invention according to your preference.

Cuisine : Baking Course : Dessert Skill Level : Novice
Prep : 135 mins Cook : 10 mins Ready in : 145 mins Serves : 6


INGREDIENTS:

  • 300g Chocolate
  • 200g Butter
  • 2 Eggs
  • 120g Caster Sugar

DIRECTIONS:

  1. Preheat the oven to 180°C.
  2. Butter and line a 6″ loose bottom tin with baking paper.
  3. Melt the chocolate and butter in a baine marie.
  4. Beat the eggs with sugar with an electrical whisk for 5 minutes, or until very thick and pale.
  5. Gently fold in the chocolate in two batches.
  6. Pour the mixture into the tin and bake for about 8-10 minutes. The cakes should be slightly soft.
  7. Cool completely. Refrigerate for at least two hours for it to set. Remove from mould and serve with ice cream or sour cream if desired
Posted in

Raspberry Mini-Charlotte

< Back to Recipe Listings

Raspberry Mini-Charlotte

by Susanne Despature

Surround the smooth pudding with crunchy ladyfingers and top with berries. Just like that, you have created a refreshing dessert packed with anti-oxidants and health benefits. Oh, don’t forget that it looks so delicate that your family and friends would be impressed for sure!

Cuisine : Baking Course : Dessert Skill Level : Novice
Prep : 150 mins Cook : 5 mins Ready in : 155 mins Serves : 6


INGREDIENTS:

  • Charlotte
    • 24 Ladyfingers

    Yogurt Cream

    • 100g Mixed Raspberries (frozen puree)
    • 50-60g Icing Sugar
    • 150g Greek Yogurt
    • 150g Mascarpone
    • ½ Lemon (or lime juice)
    • 160g Cream (35% fat)
    • 4 sheets of Gelatine (10g)
    • 125g Berries (raspberries, strawberries, blueberries, mint leaves)

    Raspberry Jelly

    • 125g Mixed Raspberries (frozen puree)
    • 50g Caster Sugar
    • ¼ tsp Agar-Agar

DIRECTIONS:

         Charlotte

  1. Put 6 circles on a tray (covered with baking paper) and line them with 8 ladyfingers (cut in 2 lengthwise), the sugar coated side towards the circle

    Raspberry Jelly

  2. Heat the raspberry puree with sugar and agar-agar in a small pan and let cook for 1 minute.

  3. Let cool out until room temperature (25 – 30°C)

    Yogurt Cream

  4. Whip the very cold whipping cream in a chilled bowl until stiff and refrigerate.

  5. Soak gelatine sheets in cold water for 10 minutes. Heat up raspberry puree and lemon juice in a small pan or in microwave (40°C), then dissolve soaked gelatine in the warm puree, stirring gently with a spoon.

  6. In a bowl, mix soft mascarpone with yogurt and icing sugar. Add raspberry puree and mix thoroughly. Refrigerate.

  7. When raspberry cream starts to gelify on the border, fold in carefully whipped cream with a rubber spatula.

  8. Fill raspberry cream in circles, almost to the top – let some space for raspberry jelly. Refrigerate the Charlottes for 1-2 hours, then pour gently raspberry jelly on top.

  9. Garnish with berries and mint leaves and refrigerate.

    To Serve

  10. Take away circles and present each Charlotte on individual plates.

Posted in

Lemongrass and Lime Madeleines

< Back to Recipe Listings

Lemongrass and Lime Madeleines

by President

Add an Asian twist to this traditional French cake. Savour the fragrant aroma of the lemongrass as you bake and bite into a refreshingly light sponge that is sure to delight your palate.

Cuisine : Baking Course : Dessert Skill Level : Novice
Prep : 30 mins Cook : 15 mins Ready in : 45 mins Serves : 12


INGREDIENTS:

  • 135g All-Purpose Flour
  • 4g Baking Powder
  • 100g Unsalted Président Butter (softened)
  • 135g Caster Sugar
  • 2 Large Limes (zested and juiced)
  • 4 Eggs
  • 2 stalks of Lemongrass (finely grated)

DIRECTIONS:

  1. Preheat the oven to 190°C.
  2. Sift the flour and baking powder together.
  3. Whisk the butter until creamy. Add sugar and lime zest, and whisk again until well combined. Whisk in eggs one by one. Add flour and lemongrass, and mix well.
  4. Cast into madeleine moulds (either silicon or black steel; avoid aluminium).
  5. Bake for 10 to 15 minutes, or until golden brown. Remove from the oven and drizzle with lime juice. Turn out onto a wire rack to cool.
Posted in

Fresh Raspberry Tart

< Back to Recipe Listings

Fresh Raspberry Tart

by Thripti Hinduja

This classic is made with fresh raspberries, pastry cream and tart dough. Satisfy your sweet tooth and make your own version of a fresh fruit tart at home!

Cuisine : Baking Course : Dessert Skill Level : Novice
Prep : 105 mins Cook : 20 mins Ready in : 125 mins Serves : 6


INGREDIENTS:

  • Crust
    • 250g Flour
    • 125g Cold Butter
    • 60g Sugar
    • 1 Egg

    Filling

    • 100g Raspberry Jam
    • 375g Milk
    • 75g Sugar
    • 25g Corn Flour
    • 1 tbsp Vanilla Bean Paste
    • 35g Butter
    • 5 Egg Yolks
    • 200g Raspberries

DIRECTIONS:

        Crust

  1. Line a pie mould with parchment paper.

  2. Cut the cold butter into small cubes. Crumble it into the flour and sugar.

  3. Add in the egg and form the mixture into a dough. Do not knead or overwork the dough. Cover it in cling film and let it sit in the refrigerator for 20 minutes.

  4. Roll out the dough in between two sheets of baking paper.

  5. Invert into a greased and lined pie mould. Let sit in the refrigerator for another 20 minutes.

  6. Dock the pie crust and blind bake in a preheated oven at 180°C for 15 minutes or until light brown.

  7. Brush with slightly beaten egg and place it back in the oven for 1 minute.

  8. Allow to cool 5 minutes before filling.

    Filling          

  9. Heat the milk in a sauce pan.

  10. At the same time, whisk the egg yolks and sugar together till creamy. Whisk in the corn flour and the vanilla bean paste.

  11. Drizzle in the warm milk, whisking all the time.

  12. Pour it back into the sauce pan and cook until the custard bubbles and thickens.

  13. Take it off the heat and add in the butter. Cool completely

    Assembling Tart

  14. Brush the base of the tart with the jam, reserving 2 tbsp for the topping.

  15. Pipe over the cold custard and arrange fresh raspberries over it.

  16. Warm the remaining jam with 1 tbsp of water and brush the raspberries with the jam.

  17. Refrigerate for at least an hour before serving.

Posted in

Brown Butter Madeleine

< Back to Recipe Listings

Brown Butter Madeleine

by Thripti Hinduja

Madeleines are also known as traditional French small cakes. These are traditional tea cakes with a crispy exterior and moist tender interior similar of a sponge cake. This recipe might look intimidating at first glance, but it’s definitely fool-proof!

Cuisine : Baking Course : Dessert Skill Level : Novice
Prep : 15 mins Cook : 10 mins Ready in : 25 mins Serves : 4


INGREDIENTS:

  • 2 Eggs
  • 110g Sugar
  • 50g Milk
  • 125g Flour
  • 5g Baking Powder
  • 1 tsp Vanilla
  • 50g Butter

DIRECTIONS:

  1. Beat the eggs and sugar with an electric whisk until foamy and a little pale.
  2. Sift the flour and baking powder together, and fold it into the egg mixture.
  3. Stir in the milk and vanilla.
  4. Melt butter over medium heat. Let it bubble away, stirring it frequently until the bubbles die down and the butter is browned.
  5. Take it off the heat and let it cool for a minute before adding it to the batter.
  6. Pipe the mixture into Madeleine moulds and bake at 190°C for 8 – 10 minutes
Posted in

Fruit Cake

< Back to Recipe Listings

Fruit Cake

by Thripti Hinduja

This fruit cake has low flour content and is made dense enough for the fruits to suspend. It is basically made with chopped (dried) fruits and/or dried fruit nuts. Unlike any other cakes, this may be stored for years –  just make sure you wrap the cake in alcohol soaked linen before storing!

Cuisine : American Course : Dessert Skill Level : Novice
Prep : 15 mins Cook : 40 mins Ready in : 55 mins Serves : 6


INGREDIENTS:

  • 150g Butter
  • 135g Sugar
  • 3 Eggs
  • 150g Plain Flour
  • 1 tsp Baking Powder
  • ½ tsp Nutmeg
  • ¼ tsp Clove Powder
  • 1 tsp Cinnamon
  • ½ tsp Ginger Powder
  • 70g Molasses or Black Treacle
  • 250g Soaked Fruits
  • 45g Candied Ginger
  • 45g Candied Peel
  • 45g Raisins
  • 45g Currants
  • 45g Cashew Nuts
  • 45g Almonds
  • 100g Orange Juice or Rum
  • 300g Marzipan
  • 300g Fondant
  • 100g Apricot Jam

DIRECTIONS:

  1. Cream the butter and the sugar together. Incorporate the eggs in one by one.
  2. Sift the flour with the baking powder and spices, and fold it into the butter and egg mixture.
  3. Stir in the molasses and the soaked fruits.
  4. Pour the batter in a prepared 6″ mold and bake it at 180°C for 30 – 40 minutes, or until a skewer comes out clean. Demould the cake and allow it to cool completely.
  5. Heat the apricot jam with 2 tbsp of water. Brush the cake with the jam.
  6. Roll out the marzipan and cover the cake.
  7. Brush the marzipan with a little jam and cover it with a layer of fondant.
  8. Decorate using coloured fondant cut-outs and ribbons if desired.
Posted in