Tuscan Fish Soup

< Back to Recipe Listings

Tuscan Fish Soup

by Michele Ow

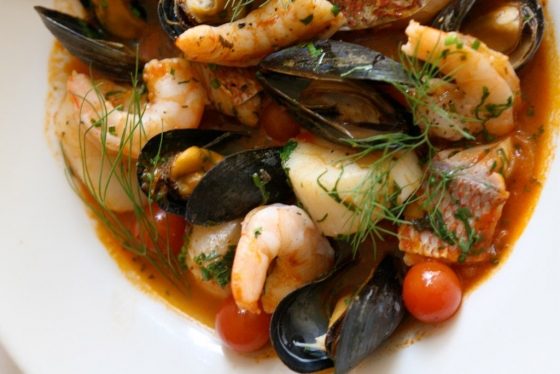
Serve this classic Tuscan fish stew to your family for a heart-warming dinner. Perfect when served with crusty bread that will soak up all the goodness

Cuisine : European Course : Main Skill Level : Novice
Prep : 15 mins Cook : 65 mins Ready in : 80 mins Serves : 4


INGREDIENTS:

  • 2 tbsp Vegetable oil
  • 5 tbsp Tomato paste
  • 2 Garlic cloves, minced
  • 1/2 tsp Chilli powder
  • 1/2 tsp Tumeric
  • 1/2 tbsp Paprika
  • 1/2 tbsp Cumin
  • Salt & pepper
  • 2 Potatoes
  • 1 Large carrot
  • 2 Tomatoes
  • 4 Fish fillets
  • 1 bunch Coriander, roughly chopped
  • 1/2 can Chick peas
  • Clams, mussels, prawns – Option

DIRECTIONS:

  1. Mix paste ingredients in a measuring jug.
  2. Slice potatoes, carrot & tomatoes 1/2 cm thick.
  3. Lay potato slices, followed by half the paste, and carrots and tomatoes then coriander, then half the chick peas.
  4. Repeat with another layer.
  5. Simmer at low heat for 1 hour.
  6. Before serving , add prawns, clams & mussels -if using and steam covered for 5 mins.
  7. Serve hot , garnished with fresh coriander.
Posted in

Banana Walnut Chiffon Cake

< Back to Recipe Listings

Banana Walnut Chiffon Cake

by Julie Yee

This Banana Walnut Chiffon Cake recipe produces a moist, soft, and flavourful cake that will be loved in the next get-together.

Cuisine : Baking Course : Dessert Skill Level : Novice
Prep : 15 mins Cook : 70 mins Ready in : 85 mins Serves : 6-8


INGREDIENTS:

  • Group 1 – Hand-whisk Together
  • 70 gm Egg yolk
  • 40 gm Warm Oil
  • 30 gm Water
  • 30 gm Fine Sugar
  • Group 2 – Mix Well
  • 70 gm Ripe Banana – Mashed Coarsely
  • 120 gm Ripe Banana – Cut into Cubes
  • 1/2 teasp Lemon Juice
  • Group 3
  • 110 gm Cake flour (sifted)
  • Group 4 – Beat together last using mixer
  • 2 tsp Corn
  • 90 gm Castor Sugar
  • 180g Egg Whites
  • Group 5
  • Walnut Bits

DIRECTIONS:

  1. Tray preparation: 20cm chiffon tin.
  2. Oven Preparation: Pre-heat oven at 170°C for at least 20mins.
  3. Use a hand whisk to combine (Group 1) together。
  4. Pour the warm liquid mixture (Group 2) & mix well.
  5. Add in sifted flour (Group 3) & mix till just smooth.
  6. Whisk the egg-white lightly.
  7. Add in the corn flour & sugar gently & whisk till firm peak.
  8. Fold the Yolk mixture into it. (Step 3 to 5)
  9. Add in the walnut bits (Grp.5) last.
  10. Pour mixture into dry and clean chiffon tin.
  11. Bake at low shelf – Bake at 170°C (non-fan mode) and bake for 15mins then lower to 160°C and bake for another 55mins or till dark golden brown.
  12. Turn cake tin upside down & cool cake completely before un-mould.
Posted in

Mango Cream Cheese Cake

< Back to Recipe Listings

Mango Cream Cheese Cake

by Mimi Wahadi

This delicious tropical mango cream cheesecake is a no-bake wonder, making it a great dessert for entertaining.

Cuisine : Baking Course : Dessert Skill Level : Novice
Prep : 120 mins Cook : 0 mins Ready in : 120 mins Serves : 6-8


INGREDIENTS:

  • 125gm Digestive Biscuits crumbs
  • 65gm Unsalted butter, melted
  • 10gm Honey
  • Part A
  • 250gm Cream Cheese
  • 55gm Caster Sugar
  • 100gm Whipping Cream
  • 70gm Mango Yoghurt
  • 5gm Gelatine Powder (dissolve in 25 gm of water to bloom)
  • Part B
  • 200gm Mango, cubes
  • 40gm Sugar
  • 15gm Lemon Juice (15gm)
  • 5gm Gelatine Powder (dissolve in 25 gm of water to bloom)

DIRECTIONS:

  1. Warm butter and honey.
  2. Add to the biscuits crumbs.
  3. Press the crust mixture tightly onto the prepared 7 inches cake tin.
  4. Chill the crust base untill further use.
  5. Whip the cream till medium soft peak. (Part A)
  6. In the mixer fitted with paddle, beat the cream cheese with caster sugar till light. (Part A)
  7. Add mango yoghurt. (Part A)
  8. Melt the gelatin over double boil, add to the cream cheese mixture. (Part A)
  9. Fold the cream into the mixture. (Part A)
  10. Pour mixture into the prepared cake tin with the biscuit. (Part A)
  11. Set In the freezer. (Part A)
  12. Gently heat up the lemon juice and sugar and add the bloomed gelatin. (Part B)
  13. Gently mix with the mangoes. (Part B)
  14. Take out the partially set cheesecake and pour on top of and let in set in the freezer. (Part B)


Posted in

Crab Stuffed Mushrooms

< Back to Recipe Listings

Crab Stuffed Mushrooms

This dish pairs succulent portobello mushrooms with a lusciously creamy crab filling. If rich flavours are your thing, you’ll love these.

Cuisine : European Course : Appetizer Skill Level : Novice
Prep : 15 mins Cook : 60 mins Ready in : 75 mins Serves : 2


INGREDIENTS:

  • 6 Button or Baby portobello mushrooms
  • ¼ Medium onion
  • 1 cloves Garlic
  • 2 tablespoons Unsalted butter
  • ¼ Jar crab meat
  • 1/8 teaspoon Salt
  • 1/8 teaspoon Pepper
  • 4 ounces Cream cheese, room temperature
  • 1 Egg yolk
  • ¼ cup Parmesan cheese, shredded
  • ½ Lemon, cut into wedges

DIRECTIONS:

  1. Clean dirt and debris from mushrooms by wiping them with a damp paper towel or rinsing them under running water in a strainer. Let them dry for a few minutes, and then pull off the mushroom stems from their caps (these pop right off). Set the mushroom caps aside.
  2. Mince the mushroom stems, onion, and garlic as finely as possible without turning them into mush.
  3. Place the butter in the frying pan on the stove over high heat. When the butter is melted and hot, dump in all your minced veggies and cook them for about 10 to 12 minutes, or until the liquid from the mushrooms is mostly evaporated. Stir occasionally.
  4. Add the crab meat, salt and pepper to the pan, and cook for a minute or two, just enough to heat the crab through. When it’s good to go, scrape the whole mixture into a bowl and let it cool for at least 20 minutes, or until it’s cool to the touch.
  5. Next, add in the cream cheese, egg yolk and half of the Parmesan cheese. Mix it thoroughlyt. If you are making the filling a day in advance, cover the bowl with plastic wrap and chill in the refrigerator. For those forging ahead, preheat the oven to 220 degrees C.
  6. Using a tablespoon, scoop a little bit of the crab mixture from the bowl and pack it down gently into a mushroom cap. Place the stuffed mushroom on your baking pan. You want a well-rounded mound of crab and cream cheese goodness on top. Repeat with the rest of the mushroom caps, then sprinkle on the remaining Parmesan cheese for a topping.
  7. Bake the stuffed mushrooms for 25 minutes. You’ll know they’re ready when the Parmesan cheese on top is a light golden brown. Remove the pan(s) from the oven.
  8. Before serving, cut the lemon into wedges and sprinkle a few drops of lemon juice onto each mushroom cap. Or, you can serve them on a tray with the lemon wedges and let your friends sprinkle on the lemon juice themselves. Enjoy!
Posted in

Mexican Bun

< Back to Recipe Listings

Mexican Bun

by Julie Yee

Crisp on the outside and deliciously fluffy on the inside, Mexican buns are great with coffee or just as an afternoon snack. 

Cuisine : Baking Course : Dessert Skill Level : Novice
Prep : 90 mins Cook : 30 mins Ready in : 120 mins Serves : 12 pcs


INGREDIENTS:

    • 300gm Bread Flour
    • 90gm Plain Flour
    • 15gm Milk Powder
    • 11gm / 1pkt Yeast
    • 210gm Water
    • 60gm Sugar
    • 90gm Egg
    • ½ teasp. Salt
    • 70gm Crisco Shortening
    • ** Butter cubes

    For The Coffee Topping Group 1

    • 60gm Butter
    • 50gm Sugar

    Group 2

    • 12gm Milk Powder
    • 25gm UHT Milk
    • ¼ teasp. Salt
    • 30gm Egg
    • 1 teasp. Coffee paste/ Emulco

    Group 3

    • 40gm Plain Flour
    • 20gm Rice Flour
    • 1/8 teasp Baking Soda
OLYMPUS DIGITAL CAMERA

DIRECTIONS:

         For the Mexican Bun

  1. Mix all Group1 ingredients & knead till “Pick-up” stage.

  2. Add in Group 2 & knead till “Developed “stage.

  3. Round dough & leave to ferment 1hr.

  4. Scale into 60gm. Wrap 1 small pc butter & round into ball.

  5. Sprinkle water on top & proof till double.

  6. Pipe coffee mixture on top.

  7. Bake at 190ºC for 12mins.

    For the Topping

  8. Mix butter & sugar until creamy

  9. Add in the egg & beat well mix well.

  10. Then, add in (Grp. 2) sifted flour (Grp. 3).

Posted in

Chocolate Torte Cake

< Back to Recipe Listings

Chocolate Torte Cake

by Trish Yee

Relish every spoonful of this luscious Chocolate Torte Cake topped with Chocolate Ganache, the best way to end your weekend!

Cuisine : Baking Course : Dessert Skill Level : Novice
Prep : 40 mins Cook : 60 mins Ready in : 100 mins Serves : 6-8


INGREDIENTS:

  • 115g Unsalted butter
  • 120g Cake flour
  • 1/2 teasp Salt
  • 1/4 teasp Baking powder
  • 260g Semisweet chocolate, coarsely chopped
  • 1 1/4 cups Sugar
  • 1 teasp Pure vanilla extract
  • 2 Large eggs
  • 1/2 cup Low-fat buttermilk
  • 1/2 cup Heavy cream
  • 150gm Semisweet chocolate, coarsely chopped
  • 2 tbsp Corn syrup

DIRECTIONS:

  1. Make cake: Preheat oven to 350 degrees. Butter an 8-inch round cake pan; line bottom with parchment or waxed paper.
  2. In a medium bowl, whisk together flour, salt, and baking powder. Set aside.
  3. In a large heatproof bowl set over (not in) a saucepan of simmering water, melt butter and chocolate, stirring frequently, 4 to 5 minutes. Remove bowl from pan. Whisk in sugar and vanilla, then eggs, buttermilk, and pistachios. Fold in flour mixture just until combined.
  4. Pour batter into prepared pan. Bake until a toothpick inserted in centre comes out with a few moist crumbs attached, 60 to 70 minutes. Let cool in pan 5 minutes; run a knife around edge, and invert onto a wire rack. Remove paper, and let cool completely, about 3 hours. (To store, wrap in plastic, and keep at room temperature, up to 3 days).
  5. Make ganache: In a small saucepan, bring cream to a simmer; remove from heat. Add chocolate, and let stand 5 minutes; whisk until smooth. Let cool until mixture falls back in ribbons when lifted with a spoon, 2 to 6 minutes.
  6. Set cake on a serving platter; tuck strips of parchment paper under edge of cake to prevent ganache from dripping on platter.
  7. Pour ganache onto centre of cake; using a table knife, spread evenly over the top and down the sides. Let set, about 30 minutes. Remove paper from under cake; serve.
Posted in

Baked Tapioca Kueh

< Back to Recipe Listings

Baked Tapioca Kueh

by Julie Yee

Baked Tapioca Kueh

Cuisine : Asian Course : Dessert Skill Level : Novice
Prep : 15 mins Cook : 60 mins Ready in : 115 mins Serves : 3


INGREDIENTS:

  • Group 1 (Dissolve in a saucepan)
    • 240gm Thick Coconut Milk
    • 110gm Sugar
    • ¼ tsp. Salt
    • 4 pcs Pandan Leaf

    Group 2 

    • 35gm Butter
    • 1 teasp. Vanilla Extract

    Group 3

    • 400gm Grated Tapioca
    • Grated Coconut
    • 20gm Tapioca Flour
    • 7gm Wheat Starch
    • 1 Egg
    • 1 Egg Yolk
    • * 1 egg yolk + a pinch of salt for brushing
OLYMPUS DIGITAL CAMERA

DIRECTIONS:

  1. Dissolve Group 1 in a saucepan.
  2. Add in Group 2.
  3. Mix the Group 3 together & pour the above mixture into it. Cook till mixture is sticky.
  4. Pour into baking tin & steam for 20mins at high heat.
  5. Egg wash & bake at 190C for 40mins till brown.

    Tips:

  6. You can bake Pandan flavoured Tapioca Cake by adding 50gm freshly squeezed pandan juice into the coconut milk. Reduce the coconut milk by 50gm.

  7. It is strongly advisable to buy ready grated Tapioca at some traditional market where the stalls have coconut shredding machine.

  8. You can store the grated tapioca frozen for about 3months and use them anytime you want to bake it.

Posted in

Orange Infused Chicken Chop

< Back to Recipe Listings

Orange Infused Chicken Chop

This recipe for Orange Infused Chicken Chop is as easy as it gets. Perfect for weekday dinners!

Cuisine : Asian Course : Main Skill Level : Novice
Prep : 60 mins Cook : 45 mins Ready in : 105 mins Serves : 2


INGREDIENTS:

  • 2 Boneless chicken thighs (Halved)
  • ½ cup Lee Kum Kee Chicken Marinade
  • 1 Lee Kum Kee Chicken Marinade
  • ¼ teaspoon Orange (zest the orange and put aside)
  • 2 tablespoon Pepper
  • Honey
OLYMPUS DIGITAL CAMERA

DIRECTIONS:

  1. Pre-heat oven grill to 180ºC.
  2. Place the chicken thighs in a bowl and add the chicken marinade, pepper, honey, orange zest, and squeeze the juice of the orange. Toss to combine well.
  3. Allow this to stand for at least one hour (Preferably overnight).
  4. Heat a non-stick pan on high heat, sear the chicken skin side down till the skin has colour. About 5 minutes. (Add a touch of oil before searing).
  5. Flip the thighs and continue searing for another 3 minutes.
  6. Place the chicken thighs into the grill for 25-35 minutes till the juices run clear. (the timing depends on the thickness of the chicken).
Posted in

Yorkshire Pudding

< Back to Recipe Listings

Yorkshire Pudding

by Julie Yee

Enjoy this light-as-air and crispy Yorkshire Pudding with jam and whipped cream for a perfect dessert or pair it with meat gravy for a classical savoury Yorkshire Pudding.

Cuisine : Baking Course : Dessert Skill Level : Novice
Prep : 40 mins Cook : 25 mins Ready in : 65 mins Serves : 6


INGREDIENTS:

  • 3 no. Eggs
  • 1 no. Egg white
  • 380ml Full cream UHT milk
  • 220g Plain flour
  • ¼ tsp Salt
  • ½ tsp Cinnamon powder
  • 2 tsp Raw sugar
  • Pepper (optional)
  • Cheese/bacon bits (optional)

DIRECTIONS:

  1. Whisk egg and egg white in a big mixing bowl for 5 mins.
  2. Pour in the milk.
  3. Add in the sifted flour and the rest.
  4. Rest for 30 mins in fridge.
  5. Brush tray generally with olive oil / any poultry fats. Base with 3mm oil.
  6. Bake empty tray at 220°C till very, very hot.
  7. Pour in mixture till almost full, you should hear the sizzling sound.
  8. Bake at 220°C for 25mins till golden brown. Cover with paper if top is too brown after 15mins. Do not open oven too early.
  9. Serve immediately with jam & whipped cream or pair with the meat gravy.
Posted in

Banoffee Pie

< Back to Recipe Listings

Banoffee Pie

by Jehanne Ali

This heavenly version of Banoffee Pie with a crumbly discuit dase filled with rich, sweet caramel sauce is the perfect showstopper dessert!

Cuisine : Baking Course : Dessert Skill Level : Novice
Prep : 20 mins Cook : 70 mins Ready in : 90 mins Serves : 12


INGREDIENTS:

  • Base
  • 100 g Butter
  • 250 g Digestive Biscuits
  • 100 g Melted Bitter Chocolate
  • Caramel
  • 100 g Butter
  • 2 tbsp Brown Sugar
  • 1 tin Condensed Milk
  • 4 tbsp Whipping Cream
  • 1/2 cup Chopped Walnut [Optional]
  • Toppings
  • 4 no Banana
  • 200 g Whipping Cream
  • Sprinkling of Grated Dark Chocolate
  • Dusting of Cocoa Powder
  • Dusting of Cinnamon Powder

DIRECTIONS:

  1. Melt the butter and add into the crushed biscuits and mix well.
  2. Make a pie shell with the side 1.5cm up.
  3. Spread a thin layer of melted chocolate at the base. Chill in the fridge.
  4. Melt butter and sugar under low heat till sugar has dissolve.
  5. Add in condensed milk and bring to a boil. Simmer for another 5mins till you get a lovely caramel. Add in the whipping cream and simmer for another 5mins.
  6. Pour in the caramel into the biscuit base and chill for 1hr or till set.
  7. Remove pie from tin to serving tray.
  8. Arrange banana slices on caramel and spread some whipped cream on top.
  9. Dust with cocoa powder, cinnamon powder and Sprinkle with grated chocolate. Decorate with extra banana.
Posted in