Herbed Garlic Bread

< Back to Recipe Listings

Herbed Garlic Bread

by Jehanne Ali

This homemade garlic bread recipe by Chef Jehanne Ali is a real treat! It’s simple to make and tastes amazingly good!

Cuisine : Baking Course : Appetizer Skill Level : Novice
Prep : 30 mins Cook : 40 mins Ready in : 75 mins Serves : 6


INGREDIENTS:

  • Brioche Dough
    • 500g Bread Flour
    • 50g Sugar
    • 60g Unsalted Butter
    • 1 no. Egg
    • 1 tsp Salt
    • 1 tsp Yeast
    • 125ml Water
    • 125ml Milk
    • Garlic Herb Butter
    • 125g Butter
    • 2-3 cloves Garlic
    • 1 tbsp Dried Herbs

DIRECTIONS:

         For the Brioche Dough

  1. Use the oil to grease the bowl.
  2. Knead all the ingredients using stand mixer for around 10 minutes. Let it rise in the bowl. Punch down the air and shape into desired size and buns.
  3. Preheat oven to 400°C on a convection oven and 425°C on a conventional oven.
  4. Transfer pans to oven and bake until brioche just begins to turn golden, about 15 minutes. Reduce temperature to 350°C on a convection oven and 375°C conventional oven and continue baking until deep golden brown and internal temperature reaches 205°C on an instant-read thermometer, 20 to 25 minutes more.
  5. Remove from oven and let brioche cool in pans for 5 minutes. Unmould onto a wire rack and let cool completely.

    For the Herbed Butter

  6. Mix all the ingredients together to form garlic herb butter, ideal as a spread.
Posted in

Raw Salmon with Micro Herbs

< Back to Recipe Listings

Raw Salmon with Micro Herbs

by Audra Morrice

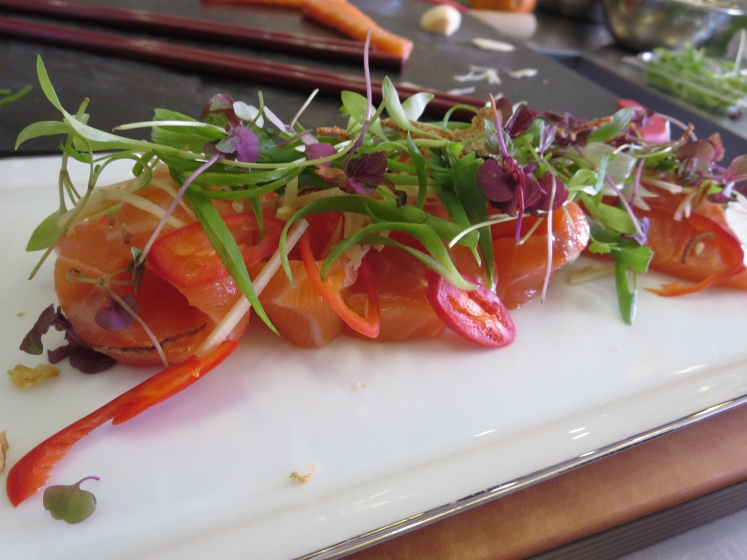
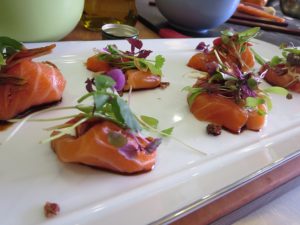
Chef Audra Morrice adds a twist of flavour to an Aussie favourite using the freshest salmon and a tangy, tasty Szechuan dressing! This serves 4 perfectly as a starter or part of a shared meal. Enjoy! 

Cuisine : Fusion Course : Appetizer Skill Level : Novice
Prep : 15 mins Cook : 0 mins Ready in : 15 mins Serves : 4


INGREDIENTS:

    • 600g Fresh atlantic/Tasmanian salmon fillet (skin on) (sashimi grade or good quality fresh salmon)
    • 2 tbsp Micro herbs (shiso, coriander, watercress)
    • 1 Large red chili, de-seeded, finely julienned
    • 1 Knob young ginger, skinned, finely julienned
    • 1 sprig Spring onion, washed, root discarded and finely sliced on the diagonal
    • Crispy shallots

    Szechuan Dressing

    • 1 tsp Dou ban jiang (Chilli broad bean paste)
    • 1 tbsp Black vinegar
    • 1 tbsp Dark soy
    • ¼ tsp Sugar

DIRECTIONS:

  1. Using a sharp knife, barrel out the fish from the middle around towards the skin, ensuring the blood lines are left on the skin. Repeat on the belly side of the salmon.
  2. Slice each piece of fish about ½ cm thick, place on a serving plate.
  3. Mix the dressing ingredients together in a small bowl, taste and adjust accordingly.
  4. Just before serving, sprinkle the dressing over the fish slices and top with the herbs, chili, ginger and spring onion.
Posted in

Spicy Roast Chicken

< Back to Recipe Listings

Spicy Roast Chicken

by Mimi Wahadi

Spice up your Roast Chicken recipe with candlenut powder, dried chilli paste and lemongrass!

Cuisine : Fusion Course : Main Skill Level : Novice
Prep : 30 mins Cook : 30 mins Ready in : 60 mins Serves : 4


INGREDIENTS:

  • 1/2 no of 2 pieces of Chicken (Group 1)
  • 200 ml Coconut cream (Group 1)
  • 2 tbsp Roasted Coconut (Kerisik) (Group 1)
  • 1 tbsp Coriander Powder (Group 1)
  • 1 tbsp Fennel Powder (Group 1)
  • 1 stalk Lemongrass – crushed (Group 1)
  • 2 tbsp Lime Juice (Group 1)
  • 1 tsp Salt (Group 1)
  • 50 gm Gula Melaka – chop finely (Group 1)
  • 4 tbsp Dried Chili Paste (Group 2)
  • 2 Red Chili (Group 2)
  • 1 tbsp Candlenut Powder (Group 2)
  • 5 Shallots (Group 2)
  • 4 Whole almond (Group 2)

DIRECTIONS:

  1. Preheat oven to 200°C.
  2. Rub the chicken parts with Group 1 (roasted coconut, coriander powder, fennel powder, salt, gula melaka) and Group 2
  3. Heat up the oil and saute crushed lemongrass
  4. Add coconut milk and simmer till gravy is thick.
  5. Remove chicken and place it onto a baking tray lined with aluminium foil
  6. Roast chicken for approximately 20-30 mins
  7. Pour in the lime juice and garnish with coriander leaves when serving. 
Posted in

Green Tea Swiss Roll with Red Bean Paste Cream

< Back to Recipe Listings

Green Tea Swiss Roll with Red Bean Paste Cream

This refreshing matcha sponge cake is layered with creamy red bean filling, perfect for when you’re craving a Japanese dessert! 

Cuisine : Baking Course : Dessert Skill Level : Novice
Prep : 45 mins Cook : 10 mins Ready in : 55 mins Serves : 2-4


INGREDIENTS:

  • 4 Egg Whites
  • 4 Egg Yolks
  • 60g Caster Sugar
  • 40g Top Flour
  • 5g Matcha (Green Tea) Powder
  • 1/8 tsp Salt
  • 1 tsp Vanilla Extract
  • 60g Oil
  • Butter for greasing pan

DIRECTIONS:

  1. Preheat oven to 200°C. Grease 28cm x 35cm pan with butter. Line pan with parchment paper.
  2. Whisk the egg whites on medium speed till thick and foamy. Gradually add caster sugar and keep whisking till egg whites are at firm peak stage
  3. Add yolks to whites, one at a time. Whisk gently until evenly mixed after each addition. Sift half the flour and matcha powder as well as the salt into the mixture. Mix with a whisk and when there are no more traces of flour, sift in remaining flour and mix again. Fold in vanilla extract and oil with a rubber spatula until just combined.
  4. Pour batter into cake pan. The batter will be quite thick so spread with spatula as evenly as possible, working it into the corners of pan. Twirl the pan until batter is level and tap the pan against the worktop a few times to get rid of air bubbles. Bake on middle shelf until the middle of the cake is springs back to the touch, 10-12 minutes. Remove from oven and unmould the cake onto a wire rack. Peel parchment paper from the sides of the cake. Leave until completely cool.
  5. To assemble, flip the cake onto a new sheet of parchment paper, face down. Peel the parchment paper off the bottom of the cake. Spread evenly with the red bean whipped cream or any other desired filling and roll the cake up, using the parchment paper to help. The cake would benefit from being wrapped in plastic then refrigerated for an hour or two to help it set before serving.
Posted in

Chocolate Easter Nest

< Back to Recipe Listings

Chocolate Easter Nest

by ToTT

Brilliant to make with little children over the holidays, these pretty little easter nests are great fun to make with the kids and decorated with mini chocolate eggs. Make them this Easter! 

Cuisine : Baking Course : Dessert Skill Level : Novice
Prep : 20 mins Cook : 15 mins Ready in : 35 mins Serves : 12


INGREDIENTS:

  • Chocolate Biscuit
    • 110g Dark chocolate Coverture, 65% cocoa
    • 50g Butter
    • 40g Almond powder
    • 40g Rice flour
    • 2 Egg yolks
    • 2 Egg whites
    • Salt

    Decoration

    • 100g Dark or milk chocolate coverture
    • Sprinkles & Mini-sugar eggs

DIRECTIONS:

  1. Prepare chocolate biscuit: In a bowl on a double boiler, melt chocolate coverture drops with butter, stirring gently with a rubber spatula from time to time. Remove from heat when melted.
  2. Add egg yolks and stir.
  3. In a stand mixer or with an electric hand mixer, whisk egg white until foamy, add slowly sugar until you get stiff peaks.
  4. In a bowl, mix almonds, rice flour and a pinch of salt.
  5. Add ½ of the flour/almond mix to the chocolate batter and fold in gently.
  6. Add ½ of the stiff egg white into the chocolate batter, then the rest of the flour/almond and finish with the remaining egg white – fold in everything carefully, make sure that the ingredients are well mixed.
  7. Fill 12 donut silicon moulds with the batter, using a piping bag with round tip (10mm).
  8. Place in preheated oven at 180° C, fan forced. Bake 12-14 minutes, until the cake fills the mould and a toothpick comes out clean.
  9. Take out of the oven, remove the nests carefully from the rings and let cool out.
  10. Melt chocolate coverture on a double boiler, glaze nests with molten chocolate and sprinkle with edible pearls or grated coconut. Place some small sugar eggs in the middle of the nest.
Posted in

Soupe à L’oignon et Crouton

< Back to Recipe Listings

Soupe à L’oignon et Crouton

by Susanne Despature

Try Chef Susanne Despature’s version of a classic French Onion Soup with croutons – the sweet caramelised onions go perfectly with the melted Gruyère & Mozzarella cheese! This is bound to be a hit among children and adults alike! 

Cuisine : European Course : Appetizer Skill Level : Novice
Prep : 10 mins Cook : 60 mins Ready in : 70 mins Serves : 4


INGREDIENTS:

    • 4 Large yellow onions, peeled and thinly sliced
    • 80g Butter
    • 20g Brown sugar
    • 1L Chicken stock (fresh or cubes)
    • 5 c White wine (optional)
    • Sherry or balsamic vinegar, salt, pepper

    Bread Crouton

    • 200g French baguette or ciabatta in slices
    • 2 tsp Virgin olive oil
    • 150g Grated cheese (mix of Gruyère & Mozzarella)
    • Paprika

DIRECTIONS:

  1. Melt butter in a large pot or dutch oven over medium-high heat. Stir onion slices, add brown sugar and cook 35 minutes, stirring frequently, until onions are caramelized and almost syrupy.
  2. Add chicken broth and wine into pot. Simmer over medium heat for 20 minutes, stirring occasionally. Reduce the heat to low, mix in some drops of vinegar and season with salt and pepper. Cover and keep over low heat to stay hot while you prepare the bread.
  3. Preheat oven broiler. Arrange bread slices on a baking sheet and brush with olive oil on both sides. Broil 3 minutes, turning once, until well toasted on both sides. Remove from heat; do not turn off broiler.
  4. Arrange 4 large oven safe bowls or crocks on a rimmed baking sheet. Fill each bowl 2/3 full with hot soup. Top each bowl with grated cheese (roughly 40 g/ bowl). Sprinkle a little bit of paprika over the top of each one.
  5. Broil 5 minutes, or until bubbly and golden brown. As it softens, the cheese will cascade over the sides of the crock and form a beautifully melted crusty seal. Serve immediately.
Posted in

Lemon Blueberry Cream Scones

< Back to Recipe Listings

Lemon Blueberry Cream Scones

by Claire Marie Chang

These Lemon Blueberry Cream scones are tangy and loaded with fresh blueberries are soft and fluffy!

Cuisine : Baking Course : Dessert Skill Level : Novice
Prep : 20 mins Cook : 15 mins Ready in : 35 mins Serves : 6-8


INGREDIENTS:

  • 280 g Cake Flour
  • 1 tbsp / 15 g Baking Powder
  • 40 g White Caster Sugar
  • 1/4 tsp Sea Salt/Fine Salt
  • 70 g Unsalted Butter, Cold & Cubed
  • 80 g Fresh Blueberries
  • 215 g Whipping Cream, Cold
  • 15 g Lemon Juice
  • Zest of a lemon

DIRECTIONS:

  1. Preheat oven to 220°C / 200°C Fan
  2. Combine dry ingredients in a large mixing bowl.
  3. Rub butter into dry ingredients till it forms fine crumbs.
  4. Slowly add cream to form dough.
  5. Knead very lightly. Add blueberries into the dough. Do not over mix the dough.
  6. Flour your worktop.
  7. Roll the dough to 3cm thickness. Cut the dough into 2-3” rounds.
  8. Re roll remaining dough *Do note these won’t be as fluffy.
  9. Place them on baking paper lined trays. About 2” apart.
  10. Brush tops with egg wash.
  11. Bake for 12-15mins till the tops are golden brown.
  12. * Keep at room temperature for up to 3 days.
Posted in

Mini Chocolate Cupcakes with Marshmallow Frosting

< Back to Recipe Listings

Mini Chocolate Cupcakes with Marshmallow Frosting

This decadent Chocolate Marshmallow Cupcake pairs a rich, moist and buttery chocolate flavored cupcake with a soft and fluffy Marshmallow Frosting. Make these for the kids as a treat! 

Cuisine : Baking Course : Dessert Skill Level : Novice
Prep : 30 mins Cook : 30 mins Ready in : 60 mins Serves : 48 mini cupcakes


INGREDIENTS:

    For the Chocolate Cupcakes

    • 3 cups Sugar
    • 3 cups Cake flour
    • 1½ cup Cocoa powder
    • 1 tbsp Baking soda
    • 1½ tsp Baking powder
    • 1½ tsp Salt
    • 1½ cup Buttermilk
    • ¾ cup Vegetable oil
    • 1½ cup Warm water
    • 3 Large eggs
    • 1½ Vanilla extract

    For the Marshmallow Frosting

    • 8 Large egg whites at room temperature
    • 2 cups Granulated sugar
    • ½ tsp Cream of tartar
    • 1/8 tsp Fine salt
    • 2 tsp Vanilla extract

DIRECTIONS:

          For the Chocolate Cupcakes

  1. Preheat oven to 160ºC. Place cupcake holders in mini cupcake trays.
  2. Place all dry ingredients in the mixing bowl and mix on very low to combine. Add buttermilk, oil and water and mix on medium until combined; add eggs and vanilla and mix on medium again until just combined.
  3. Fill each cupcake holder 2/3 with batter and bake for 10-20 minutes until firm. Cool in pan for 5 minutes before removing onto a wire rack to cool completely before icing.

    For the Marshmallow Frosting

  4. Pour water 1 inch deep into a small pot and place over medium heat to bring to a simmer. Place all ingredients except vanilla in a glass bowl and place over simmering water. Whisk by hand for about 6 minutes until sugar is dissolved and mixture is hot.

  5. Pour hot mixture into Kenwood mixing bowl and whisk on medium for 1 minute. Increase to high and keep whisking until stiff, glossy peaks form – this should take about 5 minutes. Add the vanilla and whisk 1 more minute.

Posted in

Stuffed Portobello Mushrooms

< Back to Recipe Listings

Stuffed Portobello Mushrooms

by Felix Chong

This stuffed portobello mushrooms are a delight for any dinner table! Stuffed with creamy cheese flavourful bacon, you’ll be left wanting seconds! 

Cuisine : European Course : Appetizer Skill Level : Novice
Prep : 15 mins Cook : 20 mins Ready in : 35 mins Serves : 2


INGREDIENTS:

  • 2pcs Portobello Mushroom
  • 1 tbsp Bacon
  • 1 tbsp Pistachio Kernel
  • 2 tbsp Japanese Breadcrumbs
  • 1 Egg
  • 2 tbsp Cream
  • 50g Cheddar Cheese
  • 50g Mozzarella Cheese
  • 1 tbsp Flour
  • 200ml Beer
  • 1 tsp Dijon Mustard
  • Pinch of Horseradish
  • Dash of Tabasco

DIRECTIONS:

  1. Gently twist off or cut off the stem of each mushroom. Holding a mushroom in one hand, use a spoon to gently scrape out all of the gills from the underside of the Portobello mushroom cap and discard.
  2. Chop the bacon and pistachio into tiny bits and mix them well with the breadcrumbs, eggs and cream. Season with salt and pepper and set aside.
  3. Spoon the fillings generously onto the underside of the mushroom cap. Sprinkle over with some mozzarella cheese and oven bake at 190 degrees for approximately 8 to 12 minutes.
  4. Preparing the fondue: mix the shredded mozzarella cheese and cheddar cheese in a mixing bowl with a pinch of flour.
  5. Heat up a pot with beer, mustard, horseradish, tobasco and pinch of chopped garlic.
  6. Add in half of the cheese mixture and stir it constantly till the cheese is melted evenly before adding the rest of the cheese into it.
  7. Keep the fondue warm and spoon it over the gratinated mushroom and sprinkle with paprika powder.
Posted in

Hainanese Steamed Chicken

< Back to Recipe Listings

Hainanese Steamed Chicken

by Julie Yee

Ever tried a moist and flavourful Hainanese Steamed Chicken You can now make this popular dish at home with Chef Julie’s recipe! 

Cuisine : Asian Course : Main Skill Level : Novice
Prep : 5 mins Cook : 40 mins Ready in : 65 mins Serves : 4


INGREDIENTS:

  • 1 no. Chicken
  • Few slices of Ginger
  • Few cloves of Garlic
  • 2 pcs Pandan Leaf
  • 1 tsp Salt
  • 1 tsp Sugar/MSG

DIRECTIONS:

  1. Wash chicken and stuff all ingredients in the stomach. Rub salt evenly.

    Steaming Instructions

  2. Whole Chicken XL size – Estimate 45mins steaming and off fire covered for 15mins.

  3. Whole Chicken M size – Estimate 35mins steaming and off fire covered 15mins.

  4. Use the chopstick to test the thigh & drum area to check- if liquid is clear means chicken is cooked.

  5. Rub a bit of sesame oil and Soya Sauce while chicken is hot. Serve chicken rice with chilli sauce and premium thick chicken rice dark sauce.

Posted in