Healthy Chawanmushi with Shimeiji Mushroom

< Back to Recipe Listings

Healthy Chawanmushi with Shimeiji Mushroom

by Michele Ow

This gorgeous Red Velvet Molten Lava Cake topped with a delightful Vanilla Ice cream for the ultimate indulgence!

This simple Chawanmushi with Shimeiji mushroom recipe is packed with goodness, perfect for a healthy heart.

Cuisine : Asian Course : Appetizer Skill Level : Novice
Prep : 20 mins Cook : 20 mins Ready in : 40 mins Serves : 2


INGREDIENTS:

  • 1/2 cup Dashi
  • 1/2 tbsp Sake
  • 1 Large egg
  • 2 Ginkgo nuts
  • 4 Slices of kamaboko (Japanese fish cake)
  • 1/2 tsp Mirin
  • 1/2 tsp Salt
  • 1/2 tsp Light soya

DIRECTIONS:

  1. Make dashi stock.
  2. Whisk the egg in a medium bowl, but do not create air pockets. Add dashi stock and Seasonings. Then strain the mixture through a sieve into another bowl.
  3. Start boiling water. The amount of water should cover ½ of chawanmushi cup. When boiling, reduce the heat to the lowest heat.
  4. Divide all the ingredients into 2 cups. Add ginkgo nuts and mushroom. Then put the kamaboko on top.
  5. Gently pour the egg mixture into the cups without creating bubbles. Instead of covering the ingredients completely with the egg mixture, leave some ingredients exposed.
  6. Place gently inside the hot water (it should NOT be “boiling”) and cover the pot’s lid. Cook for 15-20 minutes on the lowest heat.


Posted in

Strawberry Mille-Feuille

< Back to Recipe Listings

Strawberry Mille-Feuille

by Thripti Hinduja

This dish, ‘Strawberry Mille-Feuille’ literally translates to a thousand layers. This refers to the paper-thin layers of the delicate puff pastry. Using puff pastry that is readily available in local stores, you will create a feather-light dessert with a vanilla-infused custard cream, and complemented with fresh strawberry slices.

Cuisine : Baking Course : Dessert Skill Level : Novice
Prep : 75  mins Cook : 30 mins Ready in : 105 mins Serves : 6


INGREDIENTS:

  • 375g Milk
  • 75g Sugar
  • 25g Corn Flour
  • 1 tbsp Vanilla Bean Paste
  • 35g Butter
  • 5 Egg Yolks
  • 12 Strawberries (each sliced into 4)

DIRECTIONS:

         For Puff Pastry

  1. Cut each sheet into 8 equal pieces.

  2. Lay them on a greased baking sheet. Dock them with a fork. Place another baking sheet over them and bake at 190°C for 10 minutes.

  3. Remove the top baking sheet, reduce the heat to 180°C and bake until golden brown (about 5 to 10 minutes). Allow to cool.

    For Custard Filling

  4. Heat the milk in a sauce pan.

  5. At the same time, whisk the egg yolks and sugar together till creamy. Whisk in the corn flour and the vanilla bean paste.

  6. Drizzle in the warm milk, whisking all the time.

  7. Pour it back into the sauce pan and cook until the custard bubbles and thickens.

  8. Take it off the heat and add in the butter.

  9. Cool completely. Refrigerate for an hour.

    For Assembly

  10. Pipe the custard on a piece of puff pastry (with a star shaped nozzle if desired).

  11. Place sliced strawberries over.

  12. Put another puff pastry layer on top and repeat the layering.

  13. Place the third puff pastry over and refrigerate for one hour.

  14. Dust with icing sugar before serving.


Posted in

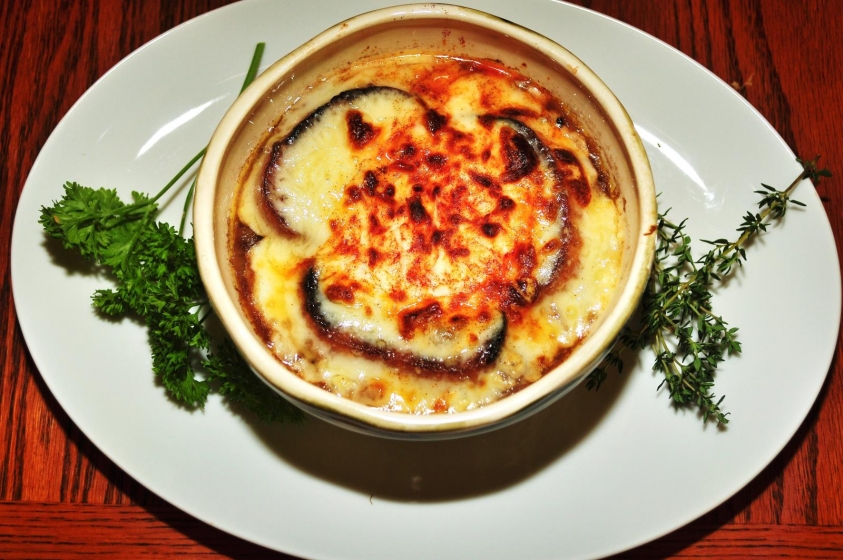
French Onion Soup

< Back to Recipe Listings

French Onion Soup

by Michele Ow

The perfect dish for a chilly day – French Onion Soup! A deeply savoury soup with rich flavours from caramelized onions topped with cheese of your choice and a side of toasted French bread slice!

Cuisine : European Course : Appetizer Skill Level : Novice
Prep : 20 mins Cook : 65 mins Ready in : 85 mins Serves : 1-2


INGREDIENTS:

  • 4 Yellow Onions, sliced thin
  • Olive Oil
  • Butter
  • 8 slices of French Bread
  • 2-3 tbsp Cognac (optional)
  • 4 ounces Emmental Cheese
  • Salt and Pepper
  • 1 leaf Bay Leaf
  • 1 cup White Wine (optional*** add with stock)
  • 4 cups Beef Stock
  • 3 tbsp Flour
  • 1/2 tsp Sugar

DIRECTIONS:

  1. Heat a heavy, oven-safe, stock pot over medium-low heat and add butter and olive oil.
  2. Stir the sliced onions into the oil/butter mix, ensuring they are evenly coated. Add a pinch of salt and a little sugar to help onions to caramelised.
  3. Reduce heat to medium-low and stir in 3 tbsp flour. Cook 2-3 minutes until flour forms a thick paste (add more butter if needed).
  4. Stir in beef stock, white wine (if using) and incorporate.
  5. Add the bay leaf and allow to simmer for 20-30 minutes.
  6. Pre-heat oven to grill.
  7. Drizzle both sides of French bread slices with olive oil, and place on a baking sheet. Cook the bread in the oven for 15 minutes on each side.
  8. Add cognac, and cover the soup mixture with the bread, forming a single layer bread top. Sprinkle the rest of the Swiss cheese over the top of the bread, forming a thick layer. Drizzle melted butter or oil over the cheese, and place the pot into the oven uncovered and bake for around 20 minutes at 180’c. Turn the broiler on and brown the cheese.
  9. Serve hot, direct from oven.
Posted in

Cappuccino Brownie Cake Slice

< Back to Recipe Listings

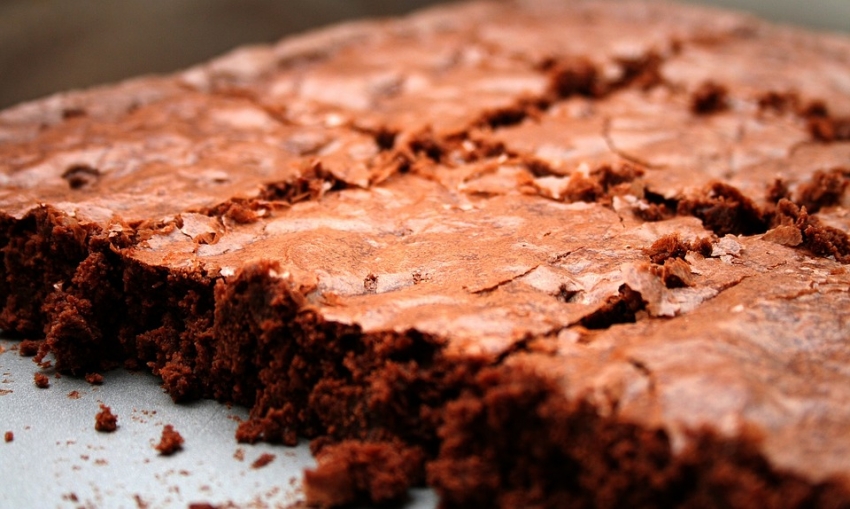
Cappuccino Brownie Cake Slice

by Julie Yee

Tempt your taste buds with this deliciously rich and fudgy Cappuccino Brownie Cake Slice by Chef Julie Yee!

Cuisine : Baking Course : Dessert Skill Level : Novice
Prep : 15 mins Cook : 30 mins Ready in : 105 mins Serves : 10-12


INGREDIENTS:

  • 120 gm Pure Salted Butter (Group 1)
  • 90 gm Dark Chocolate (Group 1)
  • 250 gm Fine Sugar (Group 1)
  • 3 Eggs (Group 1)
  • 1 teasp Vanilla Paste (Group 1)
  • 120 gm Plain Flour (Group 2)
  • 1 tbsp Nescafe Coffee Powder (Group 2)

DIRECTIONS:

  1. Tray Preparation: 8inch square tray – Lined with Parchment paper with side 5cm paper.
  2. Oven Preparation: Preheat top & Bottom heat 170C for 20mins.
  3. Melt Group 1 butter and chocolate.
  4. Whisk in the sugar.
  5. Add in the eggs one at a time.
  6. Followed by flour and coffee powder in Group 2.
  7. Pour batter into the pan.
  8. Bake at 170C for about 30mins till top is set and the toothpick comes out with a few moist crumbs attached. Rest in the pan for 1hr.
  9. Optional – Pour ganache on top is desired or Drizzle 1tbsp of rum on top if you like.
Posted in

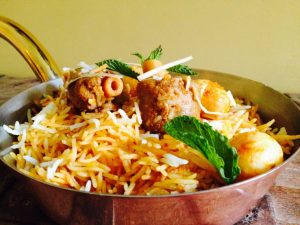
Dum Truffle Biryani

< Back to Recipe Listings

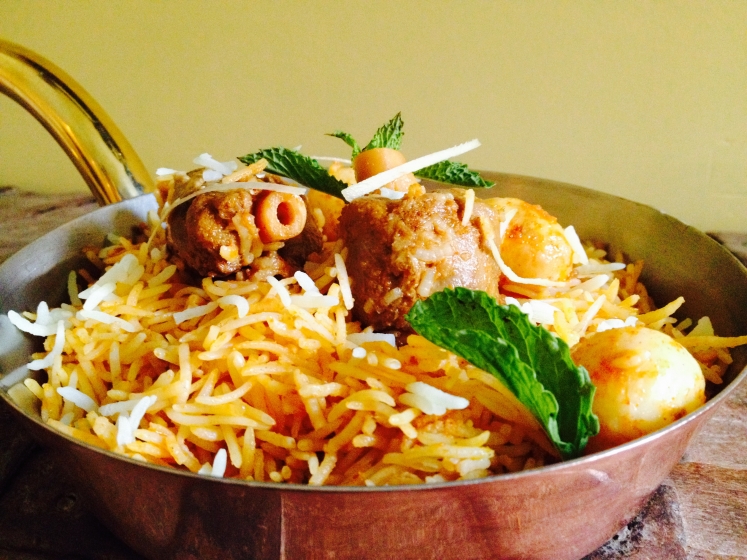
Dum Truffle Biryani

by Sarab Kapoor

This gorgeous Red Velvet Molten Lava Cake topped with a delightful Vanilla Ice cream for the ultimate indulgence!

Cuisine : Asian Course : Main Skill Level : Novice
Prep : 30 mins Cook : 40 mins Ready in : 70 mins Serves : 2-4


INGREDIENTS:

  • 1 1/4 cup Basmati Rice
  • 1 inch Cinnamon stick- broken into half
  • 2 no Bay leaves
  • 3 no Green cardamoms
  • Salt to taste
  • 300 g Button Mushrooms
  • 1 tbsp Ginger- chopped
  • 2 tbsp Garlic- chopped
  • 2 no Green Chilies-chopped
  • 1 no Onion- sliced
  • 2 no Tomatoes- sliced
  • 3 tbsp Coriander leaves-chopped
  • 4 tbsp Fried Onions
  • 1 tbsp Cumin seeds
  • 1/2 tsp Turmeric powder
  • 1/2 tsp Chili powder
  • 1/2 tbsp Garam Masala
  • 1 tbsp Lemon juice
  • 4 tbsp Fresh Cream
  • 1 tbsp Ghee
  • 2 tbsp Truffle Oil
  • 2 tbsp Cooking Oil
  • Salt
  • 240 g Puff Pastry
  • 1 tsp Chaat masala
  • 1 tbsp Butter- melted

DIRECTIONS:

  1. Cook the rice in 2 ½ litres of water along with the Basmati rice, Cinnamon stick, bay leaves, green cardamoms, salt till three quarters done. Keep aside.
  2. Heat cooking oil and add the cumin seeds. When they begin to crackle add ginger, garlic, green chili and sauté for a minute. Add sliced onions and fry till translucent. Add tomatoes and cook till they are mushy.
  3. Add turmeric and red chili powder followed by mushrooms and (200ml) water. Cook for about 3-4 minutes and add the cream, salt and bring to a boil.
  4. Remove from heat and mix in garam masala and lemon juice.
  5. Mix in the cooked rice and half of the chopped coriander leaves.
  6. Transfer into a copper pot or casserole and sprinkle with remaining Coriander leaves, truffle oil, ghee and fried onions on top.
  7. Cover with puff pastry and bake.
  8. Puff Pastry: A) Roll out the puff pastry slightly larger than the diameter of the pot. Cover pot with pastry, seal edges with water. B) Brush with melted butter and sprinkle chaat masala, onion seeds, and sesame seeds. C) Place in a preheated oven and bake for 20 minutes till the pastry is crispy and golden.
Posted in

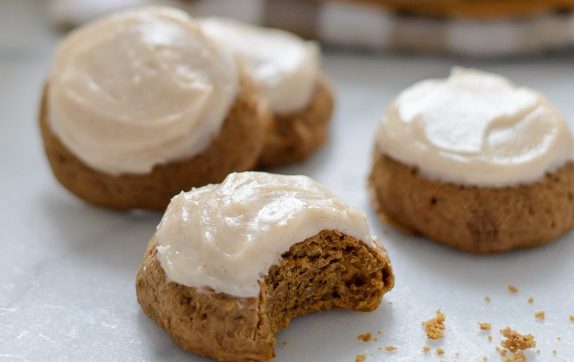
Cinnamon Spiced Cookies

< Back to Recipe Listings

Cinnamon Spiced Cookies

by Thripti Hinduja

Enjoy the pleasure of a subtle cinnamon flavour in your cookies. These cookies are easy to prepare and are best served with a glass of milk while having afternoon tea with your friends!

Cuisine : Baking Course : Dessert Skill Level : Novice
Prep : 30 mins Cook : 15 mins Ready in : 45 mins Serves : 3


INGREDIENTS:

    • 115g Flour
    • 20g Cinnamon Sugar
    • 1 tsp Vanilla
    • ½ tsp Grated Lemon Zest
    • 80g Cold Butter (chopped)

    Sugar Glaze

    • 100g Icing Sugar
    • ½ tsp Lemon Juice
    • Water
    • Food Paste Colours
    • 2 tsp Cinnamon

DIRECTIONS:

  1. Put all the ingredients into a bowl and rub in the butter. Make a dough. Cover it in plastic wrap and refrigerate for about 20 minutes.
  2. Dust your work surface with flour and roll out the cookie dough.
  3. Cut out the dough with cookie cutters of your choice.
  4. Place them on a baking tray lined with baking paper and bake them at 180°C for 12 minutes or unit evenly browned.
  5. Slide the cookies on a cooling rack and cool completely.

    For Icing

  6. Put the icing sugar in a bowl.

  7. Stir in the lemon juice and some water a few drops at a time until you get a spreadable consistency. If the mixture becomes too thin simply add in a little icing sugar until it thickens.

  8. Color the icing if desired, spread or pipe it over the cookies and allow to set for about 15 minutes.

Posted in

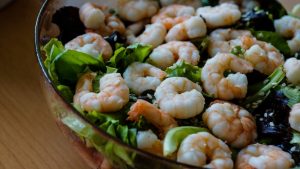
Warm Shrimp Salad with Balsamic Dressing

< Back to Recipe Listings

Warm Shrimp Salad with Balsamic Dressing

by Eric Low

Bursting with vibrant flavours, this salad makes a fantastic meal, light yet still satisfying!

Cuisine : European Course : Appetizer Skill Level : Novice
Prep : 10 mins Cook : 5 mins Ready in : 15 mins Serves : 1


INGREDIENTS:

  • 2 tbsp Balsamic Vinegar
  • 6 tbsp Extra Virgin Olive Oil
  • 1/2 tsp Sugar
  • 1/4 tsp Coarse Ground Black Pepper
  • 15 pcs Prawns
  • Salt
  • 1 tbsp Butter
  • 1 tsp Garlic
  • 1/2 tsp Coarse Ground Black Pepper
  • 1/4 tsp Paprika Powder
  • 200 g Mixed Salad Leaves
  • 8 nos Cherry Tomatoes, cut into half
  • 4 tbsp Shaved Parmesan Cheese

DIRECTIONS:

  1. Place all ingredients for salad dressing together in a bowl and mix well with a whisk.
  2. Season prawns with salt. Melt butter in a frying pan and sauté garlic till fragrant. Add prawns and cook for two minutes. Sprinkle on coarse ground pepper and paprika powder. Remove prawns from pan and set aside.
  3. Toss the salad leaves with balsamic dressing. Arrange prawns on salad and sprinkle on parmesan cheese before serving.
Posted in

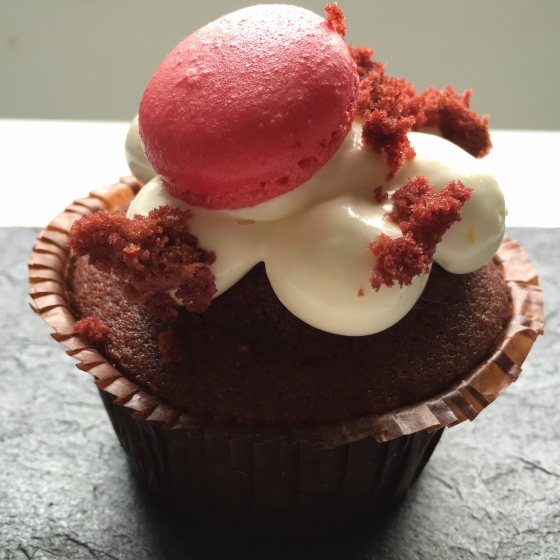
Red Velvet Cupcake with Cream Cheese Frosting

< Back to Recipe Listings

Red Velvet Cupcake with Cream Cheese Frosting

by Mimi Wahadi

Fluffy and moist, this buttery red velvet cupcake topped with tangy cream cheese frosting is simply magical.

Cuisine : Baking Course : Dessert Skill Level : Novice
Prep : 20  mins Cook : 45 mins Ready in : 65 mins Serves : 4-6


INGREDIENTS:

  • 45 g Cake flour
  • 1 g Baking soda
  • 45 g Caster sugar
  • 2 g Cocoa powder
  • 5 g Salt
  • 50 g Melted Butter
  • 35 g Buttermilk
  • 20 g Egg
  • 5 g Red food coloring
  • 5 g White vinegar
  • 125 g Cream Cheese
  • 35 g Icing Sugar (Sifted)
  • 25 g Whipping Cream

DIRECTIONS:

  1. Pre heat the oven to 175°C.
  2. Combine all dry ingredients (Cake flour, Baking Soda, Caster Sugar, Cocoa Powder, Salt) .
  3. Combine buttermilk egg, red food coloring and white vinegar in a bowl.
  4. Add the wet ingredients into the dry ingredients, followed by melted butter.
  5. Stir and till combine.DO NOT OVERMIX!
  6. Line the cupcake mould and fill each with 50gm of batter.
  7. Bake for 15-20 mins depending on oven.
  8. To make the Cream Cheese Frosting, combine Cream Cheese, Icing Sugar (Sifted) and Whipping Cream and whisk till light and fluffy.
Posted in

Vacherin Glacé With Exotic Fruit Salad and Raspberry Coulis


< Back to Recipe Listings

Vacherin Glacé With Exotic Fruit Salad and Raspberry Coulis

by Susanne Despature


This heavenly dessert will surely thrill your sweet tooth! A cake made with meringue and whipped cream with exotic fruit salad and raspberry coulis; looks good, tastes even better!

Cuisine : European Course : Dessert Skill Level : Novice
Prep : 20 mins Cook : 60 mins Ready in : 80 mins Serves : 4


INGREDIENTS:

  • Meringue Shells
    • 100g Egg White
    • 1 pinch of Cream of Tartar
    • 100g Caster Sugar
    • 100g Icing Sugar
    • 20g Almonds (finely sliced)

    Garniture

    • 100g Frozen Raspberry Puree
    • 2-3 tbsp of Sugar Syrup
    • 150ml Whipped Cream (35% fat)
    • Fresh Fruits: Mango, Starfruit, Strawberry, Raspberry, Blueberry
    • Mint Leaves
    • 250g Vanilla Ice Cream (for homemade icecream: see recipe below)

    Homemade Vanilla Ice Cream

    • 40 cl of Milk
    • 20 cl of Cream (35%)
    • 2 tbsp Milk Powder
    • 1 pod of Vanilla
    • 120g Sugar
    • 6 Egg Yolks


DIRECTIONS:

          For Meringue Shells

  1. Preheat the oven to 120°C. Put two baking trays together and line with baking paper.

  2. Place egg whites and cream of tartar into a large bowl of a stand mixer. Begin beating the eggs on low speed. What you’re doing here is unraveling the egg white’s proteins (these are what will capture the air bubbles you whisk in), they’re bundled up and you need to gently unwind them. A light touch does this far better than scrambling them on high speed.

  3. Once the egg whites are very foamy, begin sprinkling in the caster sugar as you beat. Increase the speed to medium, then high, and beat the meringue to stiff glossy peaks – it’s firm to the touch (takes about 5 min). Add the sieved icing sugar and fold in carefully by hand, with a rubber spatula.

  4. Transfer the meringue (which has a firm texture and shouldn’t be runny!) into a large piping bag with a round tip (10-15 mm) and pipe round shapes, the size of a mandarin. Garnish the domes with some almond slices and bake in the fan forced oven on the double tray for about 60 minutes.

  5. Take tray out from the oven and remove meringue shells from baking paper – with a spoon, empty the shells from the bottom (because of the double tray, the bottom is not very dry and easily removable!)

  6. Place shells again on the tray, so it can dry out completely for another 10-20 minutes. Allow to cool on a wire rack and store in an airtight box when cool (you can preserve them for 1-2 weeks!)

  7. Mix unfrozen raspberry puree with some sugar syrup and some drops of lemon juice.

  8. Wash and cut the fruits in order to prepare a fruit salad.

  9. Fill the meringue shells with vanilla ice cream (you can prepare this in advance and store in the freezer, in an airtight box)

  10. To serve, put a little bit of raspberry coulis on each plate. Fill some ice cream in each meringue shell and place on plate. Garnish with some fruits and whipped cream, decorate with mint leaves.

    For Homemade Vanilla Ice Cream

  11. In a pan, bring the milk and cream to a boil, add the milk powder and mix well, remove the pan from the fire. Open the vanilla pod and add the seeds & pod – cover the pan and let the vanilla infuse for 15 minutes or more.

  12. In a bowl, combine sugar and egg yolks and whisk until the mixture is light and foamy.

  13. Bring the vanilla milk to a boil, remove the pod and pour it over the egg mixture, stirring constantly. Pour everything back into the pan and cook the cream until it reaches 82°C.

  14. As you whisk — you must whisk constantly to keep the eggs from scrambling — you’ll see that the cream will start out light and foamy, then the bubbles will get bigger, and then, as it gets closer to 82°C, it will start to thicken and the whisk will leave tracks. Heads up at this point — the tracks mean the cream is almost ready. Don’t stop whisking or checking the temperature, and have patience — depending on how much heat you’re giving the cream, getting to temp can take as long as 10 minutes.

  15. As soon as it reaches 82°C, remove the cream from the heat and strain it into a bowl. Let the cream stand, stirring occasionally, until it cools to 40°C, about 10 minutes (it will thicken even more). You can put the bowl on an ice bath to drop the temperature faster. Cover with cling wrap and let maturate for one night, than put it into the ice machine.

Posted in

Filled Chicken Breast with Asian Pesto and Oven-Dried Cocktail Tomatoes, Quinoa and Parmesan Foam

< Back to Recipe Listings

Filled Chicken Breast with Asian Pesto and Oven-Dried Cocktail Tomatoes, Quinoa and Parmesan Foam

by Susanne Despature

Stuffed chicken breast with pesto with a twist using typical Asian ingredients and cherry tomatoes. Also learn the tricks behind a posh Parmesan Foam! The formal-looking vegetable cuts, Brunoise will enhance the quinoa’s (a grain-like crop) appearance and add flavour to this healthy and tasty side dish served with the succulent chicken breast.

Cuisine : Fusion Course : Main Skill Level : Novice
Prep : 15 mins Cook : 110 mins Ready in : 125 mins Serves : 4


INGREDIENTS:

  • Stuffed Chicken Breasts
    • Italian Basil (leaves coarsely chopped)
    • 50g Coriander (leaves coarsely chopped)
    • 20g-30g White Almonds (or pin nuts), chopped
    • 2 cloves of Garlic (chopped)
    • 5cm Young Ginger (peeled and chopped)
    • ½ tsp Coarse Salt
    • 2-3 tbsp Olive Oil
    • 50g Freshly Grated Parmesan Cheese

    Semi-Dried Cherry Tomatoes

    • 3 x 4 Cherry Tomatoes (on vine)
    • 2 tbsp Olive Oil
    • Salt, Pepper, Thyme, Icing Sugar

    Quinoa

    • 120g Quinoa
    • 250ml Chicken Stock
    • 50g Pitted and Diced Black Olives
    • 50g Diced Sundried Tomatoes

    Parmesan Foam

    • 70g Freshly Grated Parmesan
    • 40g Unsalted Butter
    • 200ml Milk
    • 15 cl Chicken Stock
    • Salt and Pepper
    • White Truffle Oil

DIRECTIONS:

          For Stuffed Chicken Breast

  1. Slice the chicken breast open, in order to get a bigger surface – cover it with cling wrap and pound it until very thin (take a heavy pan to flatten it).

  2. Spread 1 tablespoon of Asian Pesto on the chicken breast; add sundried tomatoes.

  3. Roll up and secure with slices of raw ham (if you don’t intend to cook the chicken rolls at this moment, refrigerate until use. Take them out at least 30 minutes before frying them in the pan!)

  4. Preheat the oven at 80°C – put a plate on the griddle.

  5. Heat butter in a heavy bottomed frying pan – when it’s hot, sear the chicken rolls all over until it has a golden brown crust (takes about 5 minutes).

  6. Put them in the oven on the plate and control the core temperature with a oven-proof thermometer: it has to reach 70°C (about 30 – 40 minutes, which leaves enough time to prepare the quinoa!)

    For Cherry Tomatoes

  7. Place the cherry tomatoes on their vine(always 3 together) in a ovenproof dish.

  8. Drizzle some olive oil over the tomatoes, sprinkle with salt, pepper & thyme, then dust with icing sugar.

  9. Dry out in the oven for 1 hour at about 100°C.

  10. To serve, slice the chicken rolls in 5-6 pieces and serve with semi-dried Cherry tomatoes, Quinoa and Parmesan foam.

    For Quinoa   

  11. Pour the quinoa in a bowl and add water.

  12. Rinse it (it comes naturally with a bitter coating called saponin, which must be rinsed off) by stirring the quinoa with your hand – pour off the rinsing water using a fine mesh strainer. Place it in a cooking pot and add the chicken stock.

  13. Bring to a boil, cover with a lid and turn the heat down to simmer for about 15 minutes. Check if the quinoa is cooked – fluff it gently with a fork and add diced black olives and sun dried tomatoes (with some of its oil).

    For Parmesan Foam

  14. In a small sauce pan, combine milk and chicken stock and bring to a boil.

  15. Remove from heat, than add grated parmesan and butter (cut in small pieces).

  16. Use a hand mixer and froth to create some foam – season to taste with salt and pepper, add some drops of white truffle oil. Serve immediately.

Posted in