Hello Kitty Pan with Red Bean Filling

< Back to Recipe Listings

Hello Kitty Pan with Red Bean Filling

by Trish Yee

This Hello Kitty-inspired Pan with Red Bean Filling is a great way to get the kids baking! These buns are soft, fluffy and the Azuki Bean Paste adds a sweet flavour. If you prefer a smoother Azuki filling, try mashing it with a fork before adding it into the buns!

Cuisine : Baking Course : Dessert Skill Level : Novice
Prep : 95 mins Cook : 8 mins Ready in : 103 mins Serves : 2-4


INGREDIENTS:

  • Basic Bread Dough
    • 200g Bread flour
    • 50g Cake flour
    • 110g Milk
    • 45g Sugar
    • 8g Milk powder
    • 7g Yeast
    • 1 Egg
    • 30g Olive oil
    • ¼ tsp Salt
    • 5g Bread improver

    Azuki Bean Paste

    • 1 cup Azuki beans
    • 5 cups Water
    • ¼ tsp Salt
    • ¼ tsp Sugar

DIRECTIONS:

          For the Basic Bread Dough

  1. Mix yeast and egg in a separate bowl. In a mixing bowl, add bread flour, sugar, milk powder, bread improver and salt. Add in eggs and yeast at the side.

  2. Using a kitchen machine, insert the dough attachment. Mix the mixture using low speed. Pour in milk and oil and beat for 6 mins till it forms into a ball.

  3. Cling wrap and set aside for 45 mins to proof.

  4. Divide the dough into 10 pieces and shape dough into balls. Slightly flatten and wrap it with fillings.

  5. Leave it aside to proof for 30 mins and bake for 8 mins at 200°C.

  6. Remove from oven and let it cool before decorating.

    For the Azuki Bean Paste

  7. Soak azuki beans overnight (8-12 hours). Rinse azuki beans and drain excess water in colander.

  8. Put washed azuki beans in the pot and pour water till 1-2 inch above azuki beans. Turn the heat on high.

  9. When boiling, turn off heat and cover with lid. Let it stand for 5 mins. Throw away water and put the azuki beans into a sieve.

  10. Put the azuki beans back in the pot. Add enough water just to cover the beans and turn the heat on high. Once boiling, turn down the heat to medium-low and keep it simmering.

  11. Once in a while push the azuki beans under the water with a slotted spoon. Water will evaporate – keep adding water to cover just above the beans. If you put too much water, the beans will move and break.

  12. Turn up the heat to high and add sugar in 3 separate times. Stir constantly.

  13. Pour into a container to cool down. Do not leave it in the pot. Cover with plastic wrap and keep in the fridge to store after it cools.


Posted in

Hokkaido Cake with Lemon Cream

< Back to Recipe Listings

Hokkaido Cake with Lemon Cream

by Philia Ng

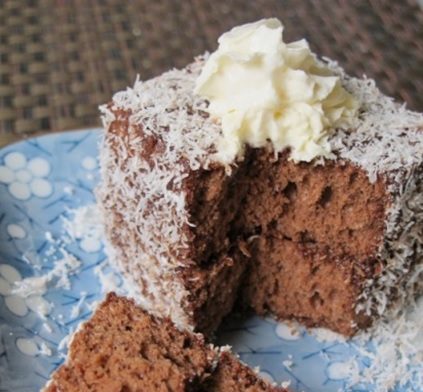
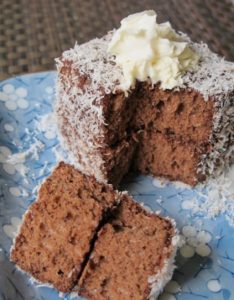
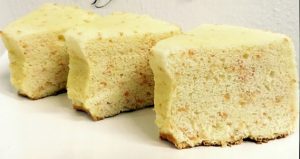
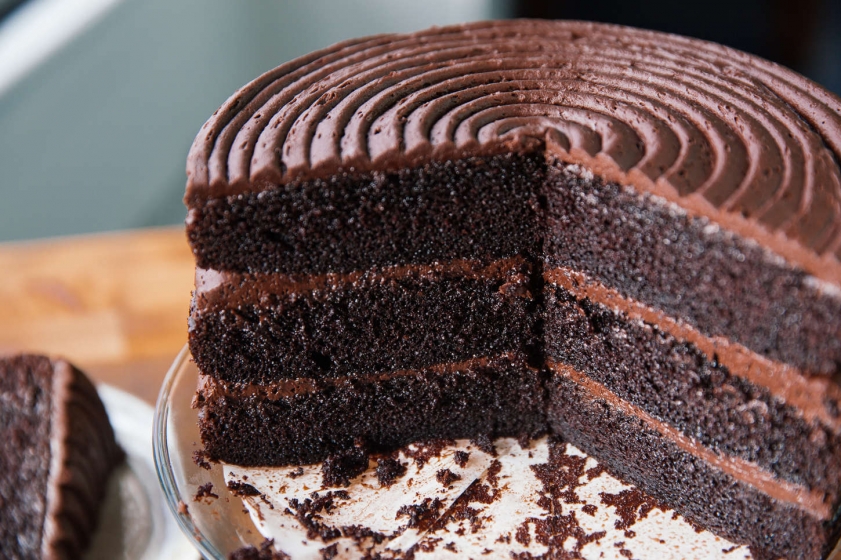
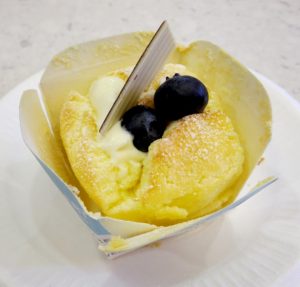
These Hokkaido Cakes with Lemon Cream are light and fluffy – the lemon cream cheese filling adds a nice surprise when you bite into the centre of the cake! 

Cuisine : Baking Course : Dessert Skill Level : Novice
Prep : 45 mins Cook : 15 mins Ready in : 60 mins Serves : 12


INGREDIENTS:

  • Batter A
    • 90g Full cream milk
    • 80g Sunflower oil
    • 25g Castor sugar
    • 100g Cake flour
    • 80g Egg yolks
    • 2 tbsp Freshly grated lemon zest

    Batter B

    • 180g Egg whites
    • 55g Castor sugar

    For the Lemon Crème

    • 300g Dairy whipping cream
    • 35g Icing sugar
    • 2 tbsp Freshly grated lemon zest

    For the Lemon Crème Cheese Filling Batter A 

    • 125g Cream cheese
    • 25g Icing sugar
    • ½ tbsp Lemon juice
    • ½ tbsp Freshly grated Lemon Zest

    Batter B

    • 130g Dairy whipping cream

DIRECTIONS:

  1. Mix Batter A together and well combined.
  2. Whip Batter B and add in sugar gradually, continue whisking it until stiff stage.
  3. Fold in Batter B into Batter A gently and well combined.
  4. Scoop the batter into individual square case.
  5. Bake at 180ºC for 15mins, non-fan oven mode.

    For the Lemon Crème

  6. Whip dairy cream and icing sugar until soft peak.

  7. Add in lemon zest and whip it until stiff peak.

  8. Storage: This cream can be kept in air tight container in the fridge for 3 days.

    For the Lemon Crème Cheese Filling

  9. Whip cream cheese until soft, add in the icing sugar.


  10. Add in the lemon zest and juice and mix well.
  11. Whip Batter B until soft peak forms.


  12. Fold in together with Batter A.
  13. Pipe into the Hokkaido sponge.


Posted in

Lemon Butter Cookies

< Back to Recipe Listings

Lemon Butter Cookies

by Philia Ng

These lemon butter cookies are perfect as a mid-day snack! The tangy lemon flavour cuts through the butter nicely. They are also a cinch to make! 

Cuisine : Baking Course : Dessert Skill Level : Novice
Prep : 30 mins Cook : 15 mins Ready in : 45 mins Serves : 10-12


INGREDIENTS:

  • 330g Plain flour
  • 2 tsp Baking powder
  • 240g Unsalted butter
  • 180g Castor sugar
  • 1 tbsp Freshly grated lemon zest
  • 20g Egg yolk (around 1 egg)

DIRECTIONS:

  1. Cream the softened butter and sugar until light yellowish and fluffy.
  2. Add in the lemon zest and egg yolk and whip until combined.
  3. Add in the plain flour and baking powder into the mixture and mix well.
  4. Shape dough into small balls and place on the tray. Alternatively, you can roll out the dough and cut the shapes out accordingly.
  5. Bake for 180ºC, fan oven for 15 mins or until golden brown.
Posted in

Chocolate and Coconut Cake

< Back to Recipe Listings

Chocolate and Coconut Cake

by Trish Yee

Try this impeccable combination of chocolate and coconut cake which is perfect for any time and occasion!

Cuisine : Baking Course : Dessert Skill Level : Novice
Prep : 15 mins Cook : 45 mins Ready in : 60 mins Serves : 12


INGREDIENTS:

  • 3 Eggs
  • 100g Butter
  • ¾ cup Sugar
  • 2 tsp Chocolate emulco
  • 1 tsp Vanilla extract
  • ¼ cup Unsweetened cocoa powder
  • ¼ tsp Salt
  • 1 tsp Baking powder
  • ¾ cup Flour
  • ¼ cup Desiccated coconut

DIRECTIONS:

  1. Preheat oven to 180°C.
  2. In a separate bowl, combine the flour, baking powder, cocoa powder and salt. Sieve well.
  3. In a mixing bowl, beat butter and sugar till fluffy for about 5-7 mins.
  4. Add in eggs gradually one by one.
  5. Add in the chocolate emulco. Pour in all the flour mixture and continue to beat till you get a smooth mixture.
  6. Pour in the desiccated coconut and stir well.
  7. Pour the cake batter in a baking pan lined with parchment paper.
  8. Put inside oven and bake for 45 mins or till cake is ready.
  9. Leave to cool completely before cutting into two layers.
Posted in

Rainbow Chiffon Cake

< Back to Recipe Listings

Rainbow Chiffon Cake

by Philia Ng

Brighten up your day with this colourful Rainbow Chiffon Cake by Chef Philia Ng! This recipe is light, fluffy and simple-to-make!

Cuisine : Baking Course : Dessert Skill Level : Novice
Prep : 35 mins Cook : 45 mins Ready in : 80 mins Serves : 6-8


INGREDIENTS:

  • Group A
  • 85g Egg Yolks
  • 30g Castor Sugar
  • Group B
  • 65g Sunflower Oil
  • 72g Water/ Full Cream Milk
  • 1 tsp Vanilla Paste
  • Group C
  • 102g Cake Flour
  • Group D
  • 285g Egg Whites
  • 78g Castor Sugar

DIRECTIONS:

  1. Whisk group A (Egg Yolks, Castor Sugar) until whitish and fluffy.
  2. Add in group B (Sunflower Oil, Water/full cream milk, Vanilla Paste) and mix well.
  3. Sift in group C (Cake Flour) and fold well. Divide into 5 portions of 69g into pink, yellow, green, blue and purple.
  4. Whisk group D (Egg whites, Castor Sugar) until stiff and glossy looking.
  5. Whisk group D until stiff and glossy looking. Divide into 5 portions at 71g to the divided coloured portions.
  6. Ladle pink, yellow, green, blue and purple batter gently into the chiffon tin.
  7. Bake at 160 degree Celsius non fan for 45 mins.
  8. Invert the cake immediately on a height of 8cm until cooled.
Posted in

Yuzu with Grapefruit Pulp Chiffon Cake

< Back to Recipe Listings

Yuzu with Grapefruit Pulp Chiffon Cake

by Julie Yee

Getting bored of plain chiffon cakes? Than you got to try out this Yuzu with Grapefruit Pulp chiffon cake recipe by Chef Julie Yee!

Cuisine : Baking Course : Dessert Skill Level : Novice
Prep : 15 mins Cook : 50 mins Ready in : 125 mins Serves : 12


INGREDIENTS:

  • Egg Yolk Batter
    • 70g Egg yolk
    • 60g Corn oil
    • 60g Water
    • 180g Caramelized yuzu / Grapefruit
    • 80g Top flour (sifted)

    Meringue Batter

    • 180g Egg whites
    • 90g Castor sugar
    • 10g Corn flour

DIRECTIONS:

        Yolk Mixture

  1. Use a hand whisk to combine egg yolks, corn oil & sugar together

  2. Pour the liquid mixture & mix well.

  3. Add in sifted flour & mix till smooth. Leave aside.

    Meringue Batter

  4. Whisk the egg white lightly.

  5. Add in the cream of tartar & sugar gently & whisk till stiff.

  6. Fold the Yolk mixture into it. Use a spatula to air out bubbles at side.

  7. Bake at low shelf – 165°C for 45mins – 50mins till golden brown.

  8. Turn cake tin upside down & cool for 1hr.

Posted in

Chocolate Cake

< Back to Recipe Listings

Chocolate Cake

by Thripti Hinduja

Indulge yourself in Chef Thripti Hinduja moist and delicious chocolate cake recipe!

Cuisine : Baking Course : Dessert Skill Level : Novice
Prep : 15 mins Cook : 20 mins Ready in : 35 mins Serves : 6-8


INGREDIENTS:

  • 40g Cocoa powder
  • 95g Flour
  • 140g Sugar
  • 1/2 tsp Baking Soda
  • 1/4 tsp Baking Powder
  • 1/4 tsp Salt
  • 1 Egg
  • 85g Buttermilk
  • 85g Water
  • 2 tsp Oil
  • 1 tsp Vanilla

DIRECTIONS:

  1. Preheat the oven to 180 C.
  2. Grease and line 2 – 7″ baking tins with parchment paper.
  3. Sift the flour, cocoa powder, baking powder and baking soda together. Then add in the sugar and stir well.
  4. In another bowl stir the buttermilk, water, vanilla , egg and salt together.
  5. Pour the wet ingredients into the dry ingredients and whisk until combined smoothly.
  6. Pour the batter into the prepared baking trays and bake for 20 minutes or until a skewer inserted comes out clean.
  7. Demould and cool to room temperature.
Posted in

Lemon Blueberry Yogurt Cake

< Back to Recipe Listings

Lemon Blueberry Yogurt Cake

by Claire Marie Chang

Relish every spoonful of this delicious, lemony yogurt cake studded with blueberries recipe by Chef Claire!

Cuisine : Baking Course : Dessert Skill Level : Novice
Prep : 20 mins Cook : 40 mins Ready in : 540 mins Serves : 12


INGREDIENTS:

  • 100g Unsalted Butter
  • 20g Vegetable Oil
  • 180g White Sugar, Fine or Caster
  • 2 Eggs, 60-65g
  • 185g Plain Yogurt, Unsweetened*Pot Set or Greek
  • 15g Lemon Juice
  • Zest of ½ lemon
  • 1/2 tsp Lemon Extract (Optional)
  • 1/2 tsp Vanilla Bean Paste/Extract (Optional)
  • 225g Cake Flour
  • 2 tsp Baking Powder
  • 3/4 tsp Baking Soda
  • 1/2 tsp Sea salt, Fine
  • 50g Frozen Blueberries

DIRECTIONS:

  1. Preheat oven to 180°C without fan.
  2. Combine butter, oil and sugar in a mixing bowl.
  3. Using the paddle attachment, cream the butter till light and fluffy. Start on slow till combined. Increase to medium high speed for 3-5mins
  4. Combine yogurt, lemon juice, zest and flavourings and set aside.
  5. Sift all the dry ingredients together and set aside.
  6. Once the butter is well creamed, on medium high speed, add one egg at a time.
  7. In alternate batches, add the sifted flour and yogurt mixture on slow speed.
  8. Once well combined, fold in the frozen blueberries.
  9. Divide the batter into 420-430g portions into 2 lined 6” cake tins.
  10. Tap to remove air bubbles. Level the cake using a spatula.
  11. Bake for 30-40mins till a skewer comes out clean.
  12. Cool until room temperature and chill the cake overnight.
  13. * This cake keeps up to 3 days at room temperature. To use as a layered cake, it is best baked a day before and kept chilled or frozen for neat cake layers.
  14. Variations:Orange scented – Add ½ tsp Orange extract + Zest of 1 Orange Instead of blueberries, use raspberries or strawberries.
Posted in

Moist Chocolate Brownies

< Back to Recipe Listings

Moist Chocolate Brownies

by Philia Ng

Our Moist Chocolate Brownie recipe shared by Chef Philia Ng will astonish the die-hard chocolate lovers!

Cuisine : Baking Course : Dessert Skill Level : Novice
Prep : 20 mins Cook : 20 mins Ready in : 40 mins Serves : 4-6


INGREDIENTS:

Group A

  • 140g Unsalted butter
  • 138g Dark chocolates (preferably 55%)

Group B

  • 120g Light corn syrup
  • 200g Castor sugar
  • 1tbsp Vanilla essence

Group C

  • 4 Eggs

Group D

  • 115g Plain flour
  • t tsp Baking power

DIRECTIONS:

  1. Melt butter and chocolates.
  2. Add in Group B (Light Corn Syrup, Castor Sugar, Vanilla Essence) and stir well.
  3. Add in Group C (Eggs) gradually and mix well.
  4. Lastly add in Group D (Plain Flour, Baking Power) and mix well.
  5. Pour the batter into a brownies tray and bake at 180 degree Celsius, fan mode for 15 – 20 minutes.
Posted in

Vanilla Waffle

< Back to Recipe Listings

Vanilla Waffle

by Philia Ng

These light and fluffy waffles are crisp on the outside and moist on the inside is the perfect addition to your morning coffee.

Cuisine : Baking Course : Dessert Skill Level : Novice
Prep : 40 mins Cook : 10 mins Ready in : 50 mins Serves : 2-3 pieces


INGREDIENTS:

  • 160g Flour
  • 3 Eggs
  • 100g Full cream milk
  • 60g Castor sugar
  • 40g Corn flour
  • 60g Melted butter
  • Fresh fruit puree and dairy cream (Optional)

DIRECTIONS:

  1. Mix all together and add in the melted butter.
  2. Let it sit for 30 minutes.
  3. Ladle the batter into the waffle maker and cook until golden brown.
Posted in