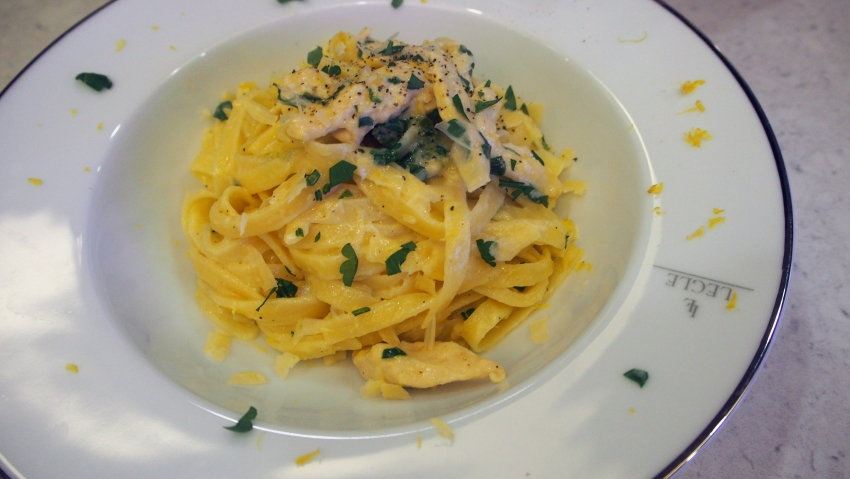
Lemon Chicken Pasta

< Back to Recipe Listings

Lemon Chicken Pasta

This lovely Lemon Chicken Pasta is perfect for summer! The creamy sauce is has a decadent butter and light lemon flavor. Add as much parmesan as you’d like! 

Cuisine : European Course : Main Skill Level : Novice
Prep : 10 mins Cook : 10 mins Ready in : 20 mins Serves : 4-6


INGREDIENTS:

  • 500g Pasta of your choice
  • 4 Boneless, skinless chicken breast, about 750g, cut into bite-sized pieces
  • 1 tbsp Olive Oil
  • 4 tbsp/55g Butter
  • 4 cloves Garlic, finely minced
  • 4 Green Onions, thinly sliced
  • 125ml Chicken Broth
  • 125ml Heavy Cream
  • Zest and juice of 1 lemon, more as needed
  • Salt & Pepper, to taste
  • Freshly grated Parmesan to finish

DIRECTIONS:

  1. Bring a large pot of salted water to the boil. Add pasta and cook according to package directions or until al dente; drain, reserving some of the cooking water.
  2. Meanwhile, heat the oil and 2 tablespoons of butter in a large frying pan over medium heat; add the chicken and brown for about 5 mins until lightly browned.
  3. Add garlic to the pan with the chicken with the remaining 2 tablespoons of butter, and stir till fragrant then add the green onions. Pour in the broth, cream, lemon zest and lemon juice. Mix until the sauce thickents. Season with salt and pepper, to taste.
  4. Add to the hot cooked pasta to the pan and stir around so the pasta absorbs the sauce. Add a little of the cooking water if need be to loosen the sauce.
  5. Serve with Parmesan cheese, as much as you like!
Posted in

Stuffed SousVide Boneless Chicken Leg

< Back to Recipe Listings

Stuffed SousVide Boneless Chicken Leg

by Felix Chong

Try this Stuffed SousVide Boneless Chicken Leg from Chef Felix Chong for a unique and luxurios main dish! Stuffed with foie gras and caramelized apples, it goes perfectly with the tender chicken. The bacon cuts through the sweetness of the caramelized apples, adding another layer of flavour and complexity to the dish.

Cuisine : European Course : Main Skill Level : Novice
Prep : 30 mins Cook : 45 mins Ready in : 75 mins Serves : 1


INGREDIENTS:

  • 1pc Boneless Chicken Leg
  • 50 – 60g Foie Gras
  • 6cs Bacon Strips
  • 1pc Apple
  • 50g Caster Sugar
  • 1 tbsp Unsalted Butter
  • 500g Carrots
  • 300ml Veal Jus
  • 1 tsp Truffle Oil

DIRECTIONS:

  1. Prepare a pot of boiling water and place the carrots in it till fully cooked for about 15 min.
  2. Remove from the pot and pass through a fine strainer.
  3. Transfer to a small pot and butter monte it till a light and fluffy texture is obtained.
  4. Remove the skin from the chicken.
  5. Lay out the chicken in between 2 pcs of cling film and use a kitchen pounder to flatten it and season well with salt and pepper and set aside in the fridge.
  6. Peel off the apple skin and dice it into small cubes.
  7. Heat up a pan with caster sugar. Once it starts to caramelize, place the apple cubes in it and steer for about 30 seconds. Lastly, add in unsalted butter to it and simmer for another 2 mins.
  8. Remove the apple and cool it down.
  9. Place the foie gras on the chicken in a straight roll together with the caramelized apple and roll it up tight.
  10. Roll up the stuffed chicken with the bacon strips and vacuum pack tight to remove excess air in the bag.
  11. Sousvide the chicken in the water bath and pan fry it over a non-stick pan – ensure the bacon is nice and crispy.
  12. Portion into 5-6 pcs and palce it on top of the carrot mash and drizzle over with truffle veal jus! 
Posted in

Seafood Spaghetti in Squid Tomato Sauce

< Back to Recipe Listings

Seafood Spaghetti in Squid Tomato Sauce

by Michele Ow

Enjoy the true taste of seafood with this flavourful Seafood Spaghetti in Squid Tomato Sauce which will leave you wanting more!

Cuisine : European Course : Main Skill Level : Novice
Prep : 15 mins Cook : 20 mins Ready in : 35 mins Serves : 2


INGREDIENTS:

  • Olive Oil
  • 1 Anchovies
  • 1/2 pieces Calamari
  • 4 Prawns
  • 8 Mussels
  • 2 garlic cloves, minced
  • 1/2 Onion, finely chopped
  • 1/4 cup White Wine
  • 1 cup Tomato crushed/ Tomato puree
  • 1 cup Water
  • 1 cup Sugar
  • 2 tbsp Finely chopped fresh parsley

DIRECTIONS:

  1. Heat butter with olive oil in a large skillet over high heat. Add seafood and cook. Take the calamari out at 1 minute, prawns at 1½ minutes. Transfer into a bowl.
  2. Reduce heat to medium high. Heat remaining 1 tbsp oil, then add garlic, anchovies and onion. Cook for 3 minutes until onion is translucent.
  3. Add wine and bring to simmer, scraping the bottom of the skillet to mix the brown bits into the liquid. Simmer for 1 minute or until alcohol smell has evaporated.
  4. Add tomato mix, sugar, salt & pepper. Low heat to medium high, bring to simmer and cook for 2 minutes. Adjust salt and pepper to taste.
  5. Boil the pasta and add it into the sauce to mix.
  6. Serve, drizzle with olive oil and garnish.
Posted in

Tomato/Watermelon Gazpacho with Greek Yoghurt & Asian Herbs

< Back to Recipe Listings

Tomato/Watermelon Gazpacho with Greek Yoghurt & Asian Herbs

by Susanne Despature

Make this fuss-free, no-cooking-required gazpacho for an impressive starter to your meal! 

Cuisine : European Course : Appetizer Skill Level : Novice
Prep : 40 mins Cook : 0 mins Ready in : 40 mins Serves : 6


INGREDIENTS:

  • 200g Chopped Tomatoes (Can)
  • 1 tbsp Tomato Puree
  • 1 small Red Bell Pepper
  • ½ – 1 medium Red Chili, without seeds
  • 250g Watermelon
  • 1 stalk Lemongrass, finely chopped
  • 10cl Chicken stock
  • White or Red Wine Vinegar, Tabasco, Salt, Pepper
  • Herb Sour Cream
    • 200g Sour Cream
    • 50g Herbs (e.g. Thai Basil, Coriander, Sweet Basil, Flat Parsley..) finely chopped
    • Salt & Pepper


DIRECTIONS:

  1. Remove the skin and dice watermelon flesh.
  2. Wash bell pepper and remove stem. Dice them in 2×2 cubes and combine with chopped tomatoes, watermelon, chicken stock, tomato puree, chili and chopped lemongrass in a blender. Blend for 2 mins of position 3 of Cuisinart Blender or until very smooth, then strain through a sieve, pressing with a soup ladle. Season to taste with salt, pepper, some white vinegar and Tabasco, and then keep refregerated until you serve.

    Chilled Herb Sour Cream:

  3. Combine all ingredients and palce in the freezer for 30 mins, mix from time to time with a fork to prevent crystals from forming – don’t freeze completely!

    To Serve: 

  4. Mix well gazpacho before serving – then ladle into 6 soup dishes. Add a splash of chilled herb sour cream in the middle, and drizzle some oilive oil on top. Garnish with herbs and serve with olive oil crostini.

Posted in

Tenderloin with Red Wine Sauce

< Back to Recipe Listings

Tenderloin with Red Wine Sauce

by Eric Low

Indulge in this juicy, seasoned to perfection Tenderloin with Red Wine Sauce that will leave you wanting more!

Cuisine : European Course : Main Skill Level : Novice
Prep : 20 mins Cook : 30 mins Ready in : 50 mins Serves : 8


INGREDIENTS:

  • Basic Brown Sauce
  • 4 tbsp Oil
  • 1 kg Beef Bones / Oxtail
  • 1 White Onion, rough cut
  • 1 extra White Onion, cut into half, grill cut side on pan until charred
  • 1 small Carrot, rough cut
  • 1 stalk Celery, rough cut
  • 1 tsp Chopped Garlic
  • 1 tbsp Tomato Paste
  • 200 ml Port/ Red Wine
  • 3 L Water
  • Mushroom Sauce
  • 50 g Butter
  • 1/2 tsp Garlic
  • 40 g Chopped Onions
  • 250 g Mushroom [any kind]
  • 500 ml Basic Brown Sauce
  • 2 sprigs Fresh Thyme
  • 40 ml Whipping Cream [35% Fat]
  • Salt to Taste
  • 8 pcs of 80-100 g Tenderloin Steak
  • 1 tsp Dijon Mustard
  • Salt
  • Coarse Ground Black Pepper

DIRECTIONS:

  1. To make the Basic Brown Sauce, kindly follow Step 2 – 6.
  2. In a saucepan, heat the oil and brown the bones and tendon.
  3. Add the vegetables and garlic, sauté until they are slightly brown.
  4. Add the tomato paste and deglaze with the red wine.
  5. Pour in the water and bring the mixture to boil. Simmer until ¼ (about 500 – 600 ml) of it is left.
  6. Strain and discard the solids. Reserve.
  7. To make the Basic Brown Sauce, kindly follow Step 8 – 10.
  8. In a saucepan, melt the butter and sauté the garlic, onions and mushrooms for 2 minutes.
  9. Add in the brown sauce, bring to boil, stirring constantly.
  10. Pour in the cream and mix well. Reserve.
  11. To make the Steak, kindly follow Step 12-13.
  12. In a non-stick frying pan, grill the steaks for about 2 – 3 minutes over high heat on each side to get a medium doneness.
  13. Serve with the mushroom sauce.
Posted in

Roast Pork Loin with Apple Chutney

< Back to Recipe Listings

Roast Pork Loin with Apple Chutney

by Eric Low

Put a twist to your pork loin with this recipe by Chef Eric Low – roasted in the oven till the meat is tender and succulent, the pork loin goes well with the Apple Chutney and creates a unique blend of flavours!

Cuisine : European Course : Main Skill Level : Novice
Prep : 30 mins Cook : 45 mins Ready in : 75 mins Serves : 10-12


INGREDIENTS:


For the Pork Loin

  • 2kg Pork Loin, 7-8cm thick
  • 1 tbsp Chopped Garlic
  • 1 tbsp Paprika
  • 2 tsp Salt
  • 1 tsp Coarse Ground Black Pepper
  • 4 stalks Fresh Rosemary, chopped
  • 1 tbsp Dijon Mustard
  • 6 tbsp Olive Oil

Roasting Vegetables

  • 4 large Onions, cut into wedges
  • 4 tbsp Olive Oil
  • 1 tsp Salt
  • 1 tsp Coarse Ground Black Pepper

For the Apple and Raisin Chutney

  • 100g Sugar
  • 4 tbsp Water
  • 1pc Cinnamon Stick
  • 300ml Apple Juice
  • 30g Raisins, diced
  • 4 Medium Green Apples, diced
  • Cornstarch for thickening
  • 2 tbsp Cider Vinegar
  • 1 tsp Lemon Zest

DIRECTIONS:

          For the Pork Loin

  1. Mix the spices, seasonings, mustard and olive oil together. Rub all over the pork loin.

  2. Preheat oven to 180°C. Line baking tray with foil. Toss roasting onions with olive oil with salt and pepper.

  3. Spread onions on baking tray and place the pork loin on top. Roast in the oven for 40-45 minutes.

  4. Allow to rest for 20 minutes before slicing. Puree the roasted onions and dilute with some water to a sauce consistency. Season to taste. Serve roasted onion sauce with sliced pork loin.

    For the Apple and Raisin Chutney

  5. Caramelize sugar with cinnamon stick. Pour in apple juice. Add the raisins and cook for 2 minutes.

  6. Add in the diced apples and cook for another 5 minutes. Thicken chutney with cornstarch. Add in the lemon juice and zest. Remove from heat and keep warm.

Posted in

German Potato Salad with Crispy Bacon and Whole Grain Mustard

< Back to Recipe Listings

German Potato Salad with Crispy Bacon and Whole Grain Mustard

by Eric Low

Gaga over matcha? Try these No Bake Mini Matcha Oreo Cheesecakes – creamy and sweet, mini Matcha cheesecakes with an Oreo cookie base! #QuickBites

This tasty potato salad is studded with pieces of bacon for that extra flavour – try this for a quick and handy starter to your dinner table, or even better, a picnic with friends!

Cuisine : European Course : Appetizer Skill Level : Novice
Prep : 15 mins Cook : 20 mins Ready in : 35  mins Serves : 2


INGREDIENTS:

  • 50g Streaky Bacon
  • 2-3 Amercan/Dutch Potatoes, cut into 2cm cubes
  • 50g White/Red Onion, finely chopped
  • 2pcs Gherkins, finely chopped
  • 1 tbsp Dijon Mustard/Whole Grain Mustard
  • 50g Mayonnaise
  • Finely Chopped Spring Onions

DIRECTIONS:

  1. Preheat oven to 180°C. Lay the bacon on a foil lined baking tray. Bake the bacon for 15 mins. Pour out the extracted fat and transfer to a microwave proof dish. Microwave on high for 2-3 mins. Again pour out the excess fat and all the bacon to crisp by cooling. Coarsely chop the bacon.
  2. Cook the potatoes from cold with a large pot of water until tender. Rinse under cold water and allow it to cool completely.
  3. Mix all ingredients for the dressing. Toss the potatoes with the dressing and set aside to chill. Sprinkle bacon and spring onions over the potato salad just before serving.
Posted in

French Onion Soup

< Back to Recipe Listings

French Onion Soup

by Michele Ow

The perfect dish for a chilly day – French Onion Soup! A deeply savoury soup with rich flavours from caramelized onions topped with cheese of your choice and a side of toasted French bread slice!

Cuisine : European Course : Appetizer Skill Level : Novice
Prep : 20 mins Cook : 65 mins Ready in : 85 mins Serves : 1-2


INGREDIENTS:

  • 4 Yellow Onions, sliced thin
  • Olive Oil
  • Butter
  • 8 slices of French Bread
  • 2-3 tbsp Cognac (optional)
  • 4 ounces Emmental Cheese
  • Salt and Pepper
  • 1 leaf Bay Leaf
  • 1 cup White Wine (optional*** add with stock)
  • 4 cups Beef Stock
  • 3 tbsp Flour
  • 1/2 tsp Sugar

DIRECTIONS:

  1. Heat a heavy, oven-safe, stock pot over medium-low heat and add butter and olive oil.
  2. Stir the sliced onions into the oil/butter mix, ensuring they are evenly coated. Add a pinch of salt and a little sugar to help onions to caramelised.
  3. Reduce heat to medium-low and stir in 3 tbsp flour. Cook 2-3 minutes until flour forms a thick paste (add more butter if needed).
  4. Stir in beef stock, white wine (if using) and incorporate.
  5. Add the bay leaf and allow to simmer for 20-30 minutes.
  6. Pre-heat oven to grill.
  7. Drizzle both sides of French bread slices with olive oil, and place on a baking sheet. Cook the bread in the oven for 15 minutes on each side.
  8. Add cognac, and cover the soup mixture with the bread, forming a single layer bread top. Sprinkle the rest of the Swiss cheese over the top of the bread, forming a thick layer. Drizzle melted butter or oil over the cheese, and place the pot into the oven uncovered and bake for around 20 minutes at 180’c. Turn the broiler on and brown the cheese.
  9. Serve hot, direct from oven.
Posted in

Warm Shrimp Salad with Balsamic Dressing

< Back to Recipe Listings

Warm Shrimp Salad with Balsamic Dressing

by Eric Low

Bursting with vibrant flavours, this salad makes a fantastic meal, light yet still satisfying!

Cuisine : European Course : Appetizer Skill Level : Novice
Prep : 10 mins Cook : 5 mins Ready in : 15 mins Serves : 1


INGREDIENTS:

  • 2 tbsp Balsamic Vinegar
  • 6 tbsp Extra Virgin Olive Oil
  • 1/2 tsp Sugar
  • 1/4 tsp Coarse Ground Black Pepper
  • 15 pcs Prawns
  • Salt
  • 1 tbsp Butter
  • 1 tsp Garlic
  • 1/2 tsp Coarse Ground Black Pepper
  • 1/4 tsp Paprika Powder
  • 200 g Mixed Salad Leaves
  • 8 nos Cherry Tomatoes, cut into half
  • 4 tbsp Shaved Parmesan Cheese

DIRECTIONS:

  1. Place all ingredients for salad dressing together in a bowl and mix well with a whisk.
  2. Season prawns with salt. Melt butter in a frying pan and sauté garlic till fragrant. Add prawns and cook for two minutes. Sprinkle on coarse ground pepper and paprika powder. Remove prawns from pan and set aside.
  3. Toss the salad leaves with balsamic dressing. Arrange prawns on salad and sprinkle on parmesan cheese before serving.
Posted in

Vacherin Glacé With Exotic Fruit Salad and Raspberry Coulis


< Back to Recipe Listings

Vacherin Glacé With Exotic Fruit Salad and Raspberry Coulis

by Susanne Despature


This heavenly dessert will surely thrill your sweet tooth! A cake made with meringue and whipped cream with exotic fruit salad and raspberry coulis; looks good, tastes even better!

Cuisine : European Course : Dessert Skill Level : Novice
Prep : 20 mins Cook : 60 mins Ready in : 80 mins Serves : 4


INGREDIENTS:

  • Meringue Shells
    • 100g Egg White
    • 1 pinch of Cream of Tartar
    • 100g Caster Sugar
    • 100g Icing Sugar
    • 20g Almonds (finely sliced)

    Garniture

    • 100g Frozen Raspberry Puree
    • 2-3 tbsp of Sugar Syrup
    • 150ml Whipped Cream (35% fat)
    • Fresh Fruits: Mango, Starfruit, Strawberry, Raspberry, Blueberry
    • Mint Leaves
    • 250g Vanilla Ice Cream (for homemade icecream: see recipe below)

    Homemade Vanilla Ice Cream

    • 40 cl of Milk
    • 20 cl of Cream (35%)
    • 2 tbsp Milk Powder
    • 1 pod of Vanilla
    • 120g Sugar
    • 6 Egg Yolks


DIRECTIONS:

          For Meringue Shells

  1. Preheat the oven to 120°C. Put two baking trays together and line with baking paper.

  2. Place egg whites and cream of tartar into a large bowl of a stand mixer. Begin beating the eggs on low speed. What you’re doing here is unraveling the egg white’s proteins (these are what will capture the air bubbles you whisk in), they’re bundled up and you need to gently unwind them. A light touch does this far better than scrambling them on high speed.

  3. Once the egg whites are very foamy, begin sprinkling in the caster sugar as you beat. Increase the speed to medium, then high, and beat the meringue to stiff glossy peaks – it’s firm to the touch (takes about 5 min). Add the sieved icing sugar and fold in carefully by hand, with a rubber spatula.

  4. Transfer the meringue (which has a firm texture and shouldn’t be runny!) into a large piping bag with a round tip (10-15 mm) and pipe round shapes, the size of a mandarin. Garnish the domes with some almond slices and bake in the fan forced oven on the double tray for about 60 minutes.

  5. Take tray out from the oven and remove meringue shells from baking paper – with a spoon, empty the shells from the bottom (because of the double tray, the bottom is not very dry and easily removable!)

  6. Place shells again on the tray, so it can dry out completely for another 10-20 minutes. Allow to cool on a wire rack and store in an airtight box when cool (you can preserve them for 1-2 weeks!)

  7. Mix unfrozen raspberry puree with some sugar syrup and some drops of lemon juice.

  8. Wash and cut the fruits in order to prepare a fruit salad.

  9. Fill the meringue shells with vanilla ice cream (you can prepare this in advance and store in the freezer, in an airtight box)

  10. To serve, put a little bit of raspberry coulis on each plate. Fill some ice cream in each meringue shell and place on plate. Garnish with some fruits and whipped cream, decorate with mint leaves.

    For Homemade Vanilla Ice Cream

  11. In a pan, bring the milk and cream to a boil, add the milk powder and mix well, remove the pan from the fire. Open the vanilla pod and add the seeds & pod – cover the pan and let the vanilla infuse for 15 minutes or more.

  12. In a bowl, combine sugar and egg yolks and whisk until the mixture is light and foamy.

  13. Bring the vanilla milk to a boil, remove the pod and pour it over the egg mixture, stirring constantly. Pour everything back into the pan and cook the cream until it reaches 82°C.

  14. As you whisk — you must whisk constantly to keep the eggs from scrambling — you’ll see that the cream will start out light and foamy, then the bubbles will get bigger, and then, as it gets closer to 82°C, it will start to thicken and the whisk will leave tracks. Heads up at this point — the tracks mean the cream is almost ready. Don’t stop whisking or checking the temperature, and have patience — depending on how much heat you’re giving the cream, getting to temp can take as long as 10 minutes.

  15. As soon as it reaches 82°C, remove the cream from the heat and strain it into a bowl. Let the cream stand, stirring occasionally, until it cools to 40°C, about 10 minutes (it will thicken even more). You can put the bowl on an ice bath to drop the temperature faster. Cover with cling wrap and let maturate for one night, than put it into the ice machine.

Posted in