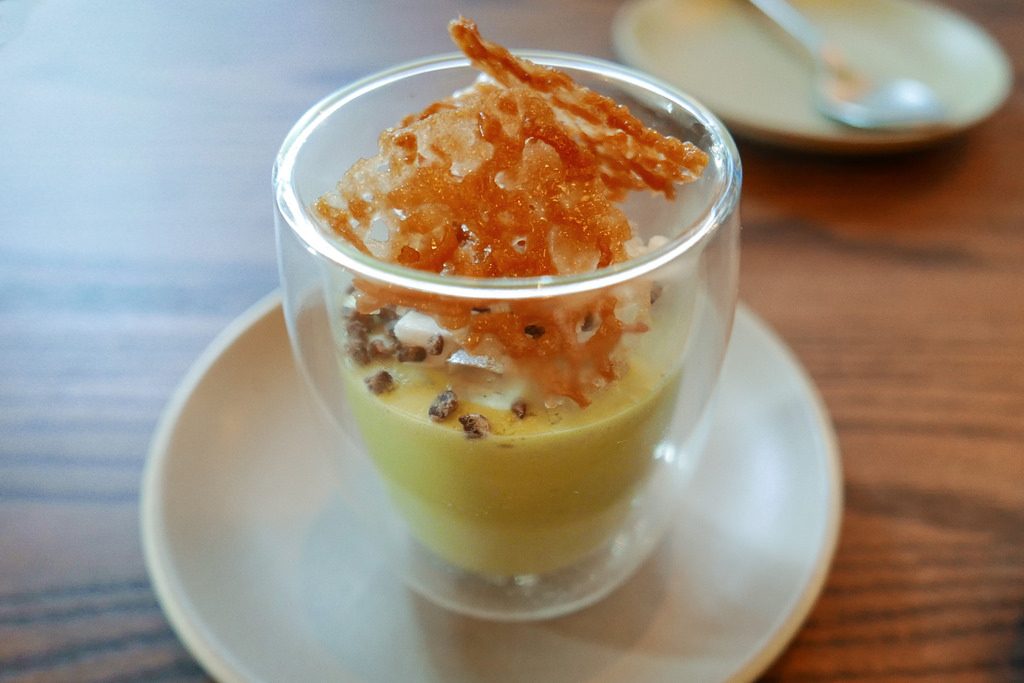
Pandan Coconut Mousse

< Back to Recipe Listings

Pandan Coconut Mousse

by Charlynn Gwee

Airy, fluffy and velvety Pandan Coconut Mousse, a sweet treat to end your tiring week!

Cuisine : Baking Course : Dessert Skill Level : Novice
Prep : 20 mins Cook : 0 mins Ready in : 20 mins Serves : 2 Servings


INGREDIENTS:

  • 6g Gelatine Sheet
  • 2 Egg Yolks
  • 50g Sugar
  • 125g Coconut Milk
  • 5g Pandan Paste
  • 200g Whipping Cream

DIRECTIONS 

  1. Bloom gelatine sheet.
  2. Whisk egg yolks and sugar together.
  3. Add coconut milk and pandan paste.
  4. Heat mixture till 83C.
  5. Add in bloomed gelatine and cool to 35C.
  6. Whisk cream to soft peaks.
  7. Fold in whipped cream in creme anglaise.
Posted in

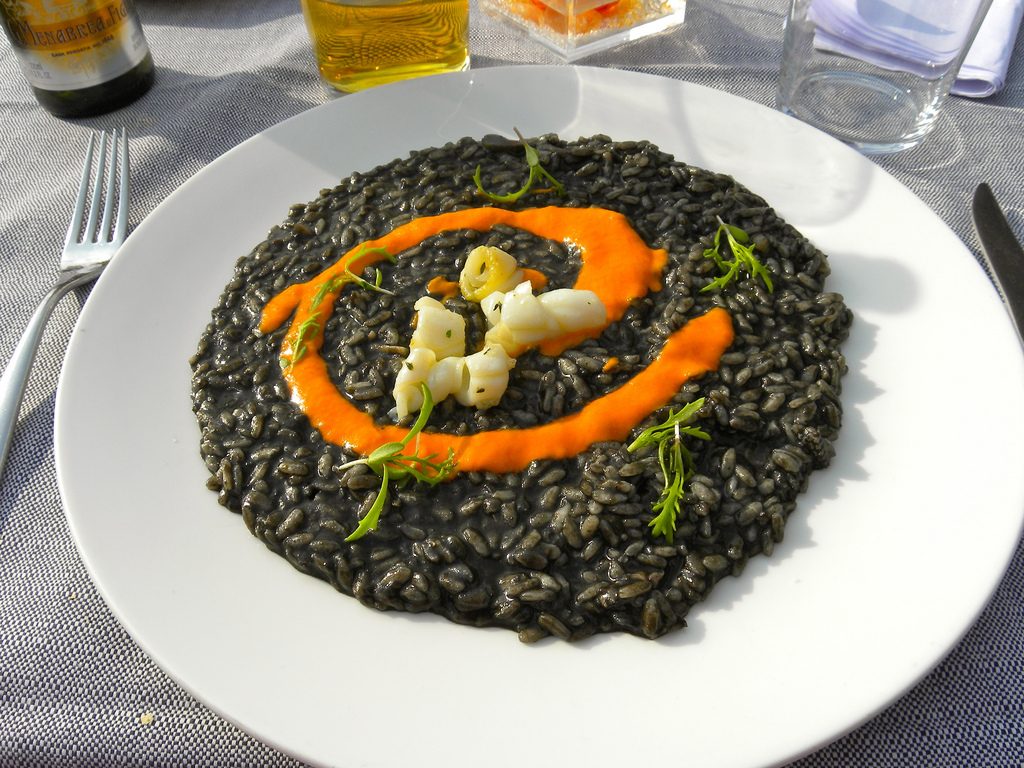
Squid Ink Risotto, Cabbage, Squid and Tomatoes

< Back to Recipe Listings

Squid Ink Risotto, Cabbage, Squid and Tomatoes

by Felix Chong

This stunning Squid Ink Risotto is the combination of two fabulous ingredients; it is thick, creamy and pack with flavors.

Cuisine : European Course : Main Skill Level : Novice
Prep : 10 mins Cook : 50 mins Ready in : 60 mins Serves : 2-4 Servings


INGREDIENTS:

  • RISOTTO
    • 1 cup Carnaroli Risotto
    • 30g Unsalted Butter
    • 1/4 pc Onion – chopped
    • 500ml Lobster/ Prawn Broth
    • 3 pc Baby Squid
    • 1 pc Tomato
    • 1 stalk Basil
    • Garnish
      • Radish – thinly sliced
      • Fried Shallot
      • Basil Leafs
      • Grated Bottarga
  • ROASTED CAPSICUM COULIS
    • 2 pcs Capsicum, yello

DIRECTIONS FOR RISOTTO

  1. Fry the onions, garlic (and any vegetables that need softening) in a little butter.
  2. Add risotto rice – such as arborio,carnaroli or vialone nano – and fry until translucent.
  3. Add wine if using, stirring continuously until absorbed.
  4. Add a ladleful of hot stock, tomatoes, cabbage and cook over a medium heat and keep stirring until all the stock is absorbed.
  5. Repeat this until all the stock has been used, the rice no longer has a chalky core and the risotto is thick and glossy.
  6. Add final the ingredients such as squid, basil and butter. You can leave the risotto to sit for a few minutes so that all the flavours and liquid absorb and settle.
  7. Stir through the fresh herbs before serving.

DIRECTIONS FOR ROASTED CAPSICUM COULIS

  1. Remove the seeds from the capsicum and cut them into small pieces.
  2. Sweat the onion with olive oil (not browning them) then add in the chopped capsicum.
  3. Add enough water to cover the capsicum and simmer it till is fully cooked.
  4. Blend it smooth and pass through a fine sieve.
Posted in

Chocolate Lovers’ Pie

< Back to Recipe Listings

Chocolate Lovers’ Pie

by Thripti Hinduja

Relish every spoonful of this irresistibly decadent Chocolate Lovers’ Pie that is the perfect finish to a meal!

Cuisine : Baking Course : Dessert Skill Level : Novice
Prep : 20 mins Cook : 15 mins Ready in : 215 mins Serves : 6-8 Servings


INGREDIENTS:

  • CRUST
    • 100g Oreos
    • 25g Melted Butter
  • FILLING
    • 1 Whole Egg
    • 1 Egg Yolk
    • 30g Sugar
    • 110g Chocolate
    • 60g Butter
    • 1/8 tsp Salt
    • ½ tsp Vanilla Extract
    • 25g Brown Sugar

DIRECTIONS FOR CRUST

  1. Crush the Oreos in a blender or a food processor.
  2. Stir in the melted butter and press the mixture into a pie mould.

DIRECTIONS FOR FILLING

  1. Whisk the whole egg, yolk, salt and the sugars together until tripled in volume.
  2. Melt the butter and the chocolate together. Stir in the vanilla and pour it into the eggs. Whisk with and electric whisk until well combined and a bit of the volume deflate.
  3. Pour the batter onto the crust from a height in order to deflate any big air bubbles.
  4. Bake the pie at 160C for 15 minutes.
  5. Cool to room temperature and refrigerate for at least three hours before serving.
  6. Serve with slightly whipped cream and berries if desired.
Posted in

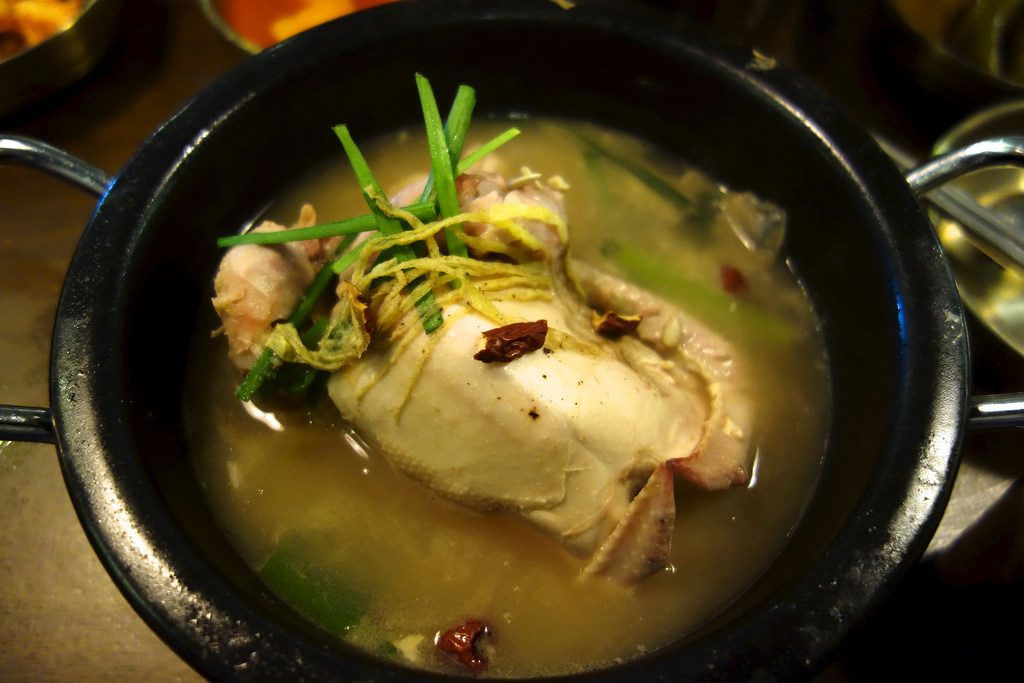
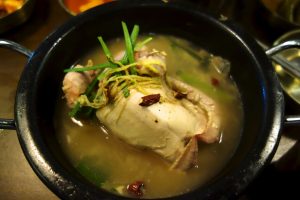
Ginseng Chicken Soup with Glutinous Rice Stuffing

< Back to Recipe Listings

Ginseng Chicken Soup with Glutinous Rice Stuffing

by Philia Ng

This Korean Ginseng Chicken Soup is nourishing, rejuvenating made with ginseng and stuffed with glutinous rice.

Cuisine : Asian Course : Main Skill Level : Novice
Prep : 20 mins Cook : 35 mins Ready in : 55 mins Serves : 2-3 Servings


INGREDIENTS:

  • 1 Chicken Griller (not more than 1 kg)
  • 1/3 cup White Glutinous Rice
  • 1 sprig of Spring Onion
  • 4 Cloves Garlic
  • 1 Whole Fresh Ginseng
  • 3 Red Dates (Jujube)
  • 1-2 cups Waters
  • 4 Peeled Fresh Ginko Nuts
  • Salt and Pepper to taste
  • CHICKEN STOCK
    • 1 Carrot, diced
    • 1 White onion, sliced
    • 2 Chicken Bones
    • 1L Water

DIRECTIONS

  1. Soak the glutinous rice for at least 1 hour before use.
  2. In a pot, put in fresh ginseng and soft boil for 5 minutes.
  3. Wash the chicken griller and stuff in the cavity with red dates, spring onion, garlic, ginko nuts and seal it well.
  4. Place the chicken, breast up and half cover the pot and cook for at least 45 minutes at medium low fire. Remove any scum along the way.
  5. The soup is ready when the rice are transparent and soup are slightly milky. Add in dash of salt and pepper to taste.
  6. Serve the soup hot with a generous sprinkle of scallion.

DIRECTIONS FOR CHICKEN STOCK

  1. Boil all the ingredients together for 2 hours.
  2. Remove any scum and use 1- 2 cups for Ginseng chicken soup base.
Posted in

Mini Croquembouche with Chocolate and Sugar Net

< Back to Recipe Listings

Mini Croquembouche with Chocolate and Sugar Net

by Michele Ow

Learn to make this spectacular Mini Croquembouche made of lovely little cream puffs filled with a rich pastry cream and coated with a sugar net.

Cuisine : European Course : Dessert Skill Level : Novice
Prep : 20 mins Cook : 35 mins Ready in : 55 mins Serves : 1 Mini Croquembouche


INGREDIENTS:

  • Basic Choux Pastry
    • 75g All-Purpose Flour
    • 60g Unsalted Butter
    • 1 tbsp Cream
    • 150ml Cream
    • 1 tsp Caster Sugar
    • ¼ tsp Salt
    • Vanilla Extract
    • 2 Eggs – room temperature
  • Pastry Cream
    • 2 cups Cream
    • Vanilla Extract
    • 6 Egg Yolks
    • 50g Granulated Sugar
    • 25g Corn Starch
    • 1 tbsp Unsalted Butter

DIRECTIONS FOR CHOUX PASTRY

  1. In a medium pot, add in salt, cream, water and sugar.
  2. Add in butter and bring to boil.
  3. Turn off heat and add in sifted flour. Stir quickly with a wooden spoon.
  4. Return to heat and continue mixing until it forms a ball paste.
  5. Add in 1 egg at a time, mixing well until you get a smooth paste.
  6. Use a piping bag and pipe the paste onto a baking tray lined with baking sheet.
  7. Wet your finger tip with some water and gently push down the tip of the pastry.
  8. Bake at 200ºC for 18 – 20 minutes until puffy and golden brown.
  9. Set the pastries on a cooling rack to cool completely before piping in filling.

DIRECTIONS FOR PASTRY CREAM

  1. In a medium saucepan, heat the cream and vanilla to a boil over medium heat. Immediately turn off the heat and set aside for 5 minutes.
  2. In a bowl, whisk the egg yolks and sugar until light and fluffy. Add the corn starch and whisk vigorously until no lumps remain. Whisk in hot cream mixture and pour entire mixture back into the saucepan and whisk until incorporated.
  3. Allow to cool in pastry bag then in the fridge before piping into profiteroles.

Posted in

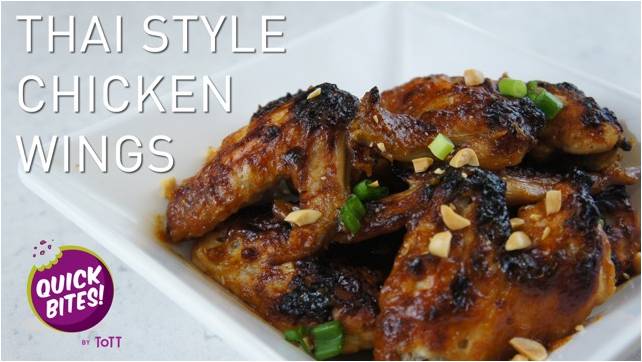
Thai Style Chicken Drumlets

< Back to Recipe Listings

Thai Style Chicken Drumlets

by ToTT

Enjoy the flavours of Thailand with this sweet and spicy Thai Style Chicken Drumlet recipe for the ultimate appetizer! 

Cuisine : Asian Course : Appetizer Skill Level : Novice
Prep : 15 mins Cook : 35 mins Ready in : 50 mins Serves : 2-4


INGREDIENTS:

  • 5 pds / 1.13 kg chicken wings
  • 2-3 tbsp olive oil
  • 1/2 tsp salt
  • 1/2 tsp pepper
  • 1/2 cup sweet chili sauce
  • 1/4 cup rice vinegar
  • 1/4 cup lite canned coconut milk
  • 3 tbsp brown sugar
  • 3 garlic cloves, pressed or finely minced
  • 1 tbsp creamy peanut butter
  • 1 tsp-sized knob of ginger, grated
  • 1 lime, juiced
  • 1/2 tbsp soy sauce
  • 1/4 cup chopped peanuts
  • 1/2 cup fresh cilantro
  • 4 green onions, sliced

DIRECTIONS:

  1. Season chicken wings with salt & pepper.
  2. In a medium-sized bowl, combine chili sauce, vinegar, coconut milk, brown sugar, garlic, ginger, peanut butter, soy sauce and lemon juice. Mix well with a fork.
  3. Heat oil in skillet over medium-high heat. Sear chicken wings, ~4-5 minutes on each side till brown. Remove and set aside.
  4. Add in sauce mixture and bring to simmer, whisking constantly.
  5. Add chicken wings back into skillet, tossing to coat evenly.
  6. Bake in pre-heated oven at 190<C for 25 – 30 minutes, until fully cooked.
  7. Remove from oven and garnish with chopped peanuts and green onions.
  8. Enjoy!
Posted in

Cheesy Potato Pancake

< Back to Recipe Listings

Cheesy Potato Pancake

by ToTT

This is some serious comfort food we’re talking about – cheesy mashed potatoes with ham, all made in one skillet! Perfect to finish up your leftover mashed potatoes! #QuickBites

Cuisine : American Course : Appetizer Skill Level : Novice
Prep : 15 mins Cook : 20 mins Ready in : 35 mins Serves : 4


INGREDIENTS:

  • 500g Mashed Potatoes
  • 1 Cup Plain Flour
  • 1 Egg
  • 1-2 tbsp Olive Oil
  • 1/2 Cup Cooked Ham
  • 1/2 Cup Cheddar & Mozzarella Cheese
  • Salt & Pepper to taste

DIRECTIONS:

  1. Add egg, salt & pepper to mashed potatoes and mix well.
  2. Add in flour and continue mixing dough is smooth and even.
  3. Grease your pan with olive oil.
  4. Spread half of your dough onto the pan evenly.
  5. Add the cheese & ham.
  6. Spread the remaining dough over your ingredients evenly.
  7. Cook over medium-low heat for 15 minutes on each side.
  8. Cut and serve while warm!
Posted in

Red Velvet Whoopie Pies

< Back to Recipe Listings

Red Velvet Whoopie Pies

by Jehanne Ali

Love is in the air! February is synonymous with the love month as Valentine’s Day is on 14th, and this month is extra special with Lunar New Year around. Make these red velvet whoopie pies to celebrate with your loved ones, family gatherings and parties. They are mildly sweet complemented very well with the cream cheese frosting.  These are the ultimate decadence in little packages!

Cuisine : Baking Course : Dessert Skill Level : Novice
Prep : 20 mins Cook : 10 mins Ready in : 30 mins Serves : 12


INGREDIENTS:

  • For the whoopies
    • 120g Unsalted butter
    • 120g Castor sugar
    • 1 tsp Vanilla extract
    • 1 Large egg
    • 240g Plain flour
    • ¼ tsp Baking soda
    • 1 tsp Baking Powder
    • 1 tbsp Cocoa powder
    • ½ tsp Salt
    • 1 tbsp Vinegar
    • ½ cup Buttermilk
    • 1 tsp Red colouring

    For the cream cheese

    • 100g Salted butter
    • 100g Cream cheese
    • 150g Icing sugar
    • 1 tsp Vanilla extract

DIRECTIONS:

  1. Cream the butter and sugar in a stand mixer or using hand mixer, until pale and fluffy
  2. Add the vanilla and egg. Beat for few more minutes
  3. In a separate bowl, sift the flour with cocoa powder, salt, baking soda and baking powde
  4. In a jug, mix the vinegar with red colouring and buttermilk until just combined
  5. Add the buttermilk mix alternating with flour mix into the batter until all is incorporated
  6. Spoon the mix onto a silicone mat or baking paper
  7. Bake the whoopies for 12 minutes at 180°C

For the heart-shaped whoopies

  1. Use the Martellato Heart-shaped plunge cutter to cut out the shape once the whoopies are baked.
  2. Prepare the frosting. Cream the butter and sugar until pale. Add in the vanilla and cream cheese, beat for few more minutes.
  3. Tip: Cream cheese is much softer than butter so should be added last to ensure the frosting is stiff, and not runny.
  4. To assemble: Pipe some icing onto a whoopie and sandwich with another whoopie on top.
Posted in

Chocolate Mocha Bundt Cake

< Back to Recipe Listings

Chocolate Mocha Bundt Cake

by Jehanne Ali

With the Eid festival looming around the corner, there is always a good excuse to bake a cake. But then again, do you really need an occasion to savour a good cake? Baking a cake can be so simple, yet the results can be etched in your family’s memories for years to come, after all they will remember the homemade cake better than shop bought anytime!

This chocolate mocha bundt cake makes use of the gorgeous spiral tin, and you really need very minimal decoration, as the design should be the masterpiece here. Melted chocolate drizzle is after all much healthier than sugary frosting. Bring it up a notch with fresh fruit like strawberries.

Cuisine : Baking Course : Dessert Skill Level : Novice
Prep : 15 mins Cook : 45 mins Ready in : 60 mins Serves : 12 


INGREDIENTS:

  • 200g unsalted butter
  • 180g castor sugar
  • 1 tsp vanilla extract
  • 4 large eggs, separated
  • ¼ tsp cream of tartar
  • ½ tsp baking soda
  • 2 tbsp water
  • ½ cup espresso
  • 3 tbsp whole milk
  • 200g cake flour
  • 50g cocoa powder
  • ½ tsp salt
  • 150g melted dark chocolate
  • Fresh strawberries for garnish

DIRECTIONS:

  1. Preheat the oven to 170°C.
  2. Cream the butter and sugar until pale and fluffy.
  3. Add in the vanilla extract and egg yolks, beat for another minute.
  4. Transfer the batter into a bowl.
  5. In a glass combine the baking soda and water; it will be fizzy.
  6. Add in the espresso, milk into the soda and combine well.
  7. Sift the cake flour, cocoa and salt together, and add into the batter alternating with the espresso mix until all is mixed well.
  8. Beat the egg whites with cream of tartar until stiff peaks are formed.
  9. Fold gently into the cake batter.
  10. Sprinkle some plain flour (or cake flour) onto the cake pan.
  11. Pour the batter into the cake pan and bake for 45 minutes.
  12. Once cake is cool, invert onto a cake stand or platter.
  13. Drizzle the melted chocolate on top and garnish with strawberries.
Posted in

Baked Broccoli & Mushroom Pasta

< Back to Recipe Listings

Baked Broccoli and Mushroom Pasta

by Julie Yee

Baked pasta is a hearty meal that you can prepare in advance. Try this Baked Broccoli and Mushroom Pasta recipe from Chef Julie for a hearty and delicious dinner!

Cuisine : European Course : Main Skill Level : Novice
Prep : 25 mins Cook : 30 mins Ready in : 55 mins Serves : 2


INGREDIENTS:

  • 180 gm Pasta
  • 120 gm Broccoli
  • 5 nos Shitake Mushroom, sliced 2 cloves
  • 25 gm Garlic, chopped
  • 25 gm Plain Flour
  • 330 ml Butter
  • 1 tsp Full Cream Milk
  • ½ tsp Mustard
  • 1 tsp Garlic Powder
  • 1 pinch Nutmeg
  • As desired Black Pepper
  • 80 gm Cheddar Cheese

DIRECTIONS:

  1. Cook the pasta to al dente following pack instructions (if you’re freezing, cook for 1 min less), adding the broccoli for the final 3 minutes. Drain.
  2. Heat the butter in the pan until foaming then stir in the flour for 1 minute.
  3. Pour in the milk a little at a time, stirring or whisking constantly to remove any lumps. Bubble for 1-2 minutes, stirring constantly until you have a thick, lump-free sauce. Remove from the heat and stir in some nutmeg, the mustard powder, and ½ of the cheese and seasoning. Put aside.
  4. Fried chopped garlic for 1minutes. Add in the Shitake mushroom and fry for 2 minutess. Add in sliced meat or seafood if used. Pour in the milk.
  5. Combine with the pasta and broccoli and transfer to one large heatproof dish.
  6. Scatter over the remaining cheese on top and bake for 15 minutes until golden and bubbling.
  7. To freeze, cool pasta before freezing. This can keep up to1 month. If frozen, defrost then bake at 200C for 30 minutes until piping hot.
Posted in