Japanese Strawberry Shortcake

< Back to Recipe Listings

Japanese Strawberry Shortcake

by Julie Yee

Japanese Strawberry Shortcake is made from a light and airy shortcake layered with Chantilly cream and sliced strawberries that are popular in Japan!

Cuisine : Baking  Course : Dessert  Skill Level : Novice
Prep : 45 mins Cook : 15 mins Ready in : 60 mins  Serves : 1×7” Cake


INGREDIENTS                                          

  • Japanese Strawberry Chantilly Shortcake
    • 3 Egg
    • 1 Egg Yolk
    • 80gm Castor Sugar
    • 110gm Cake Flour
    • 20ml UHT Milk
    • 30gm Corn Oil
    • ½ tsp Vanilla
  • Chantilly Cream
    • 200gm Fresh Whipping Cream 35%
    • 150gm Pastry Cream (recipe below)
  • Pastry Cream
    • 250gm Milk
    • 2 Egg Yolk
    • 50gm Sugar
    • 2 tbsp Corn Starch
    • 1 tsp Vanilla Paste
  • Liquor Syrup
    • 50gm Castor Sugar
    • 50gm Hot Water
    • 1 tbsp Liquor
    • 150gm Strawberry Slices
    • Extra Strawberry for Cake Decoration

DIRECTIONS FOR JAPANESE STRAWBERRY CHANTILLY SHORTCAKE

  1. Whisk egg & sugar till ribbon stage over a pot of water.
  2. Fold in sifted flour & vanilla.
  3. Fold in melted butter.
  4. Bake 200C for 12 mins in 3×7” trays.

DIRECTIONS FOR CHANTILLY CREAM

  1. Fold the 2 ingredients together.

DIRECTIONS FOR PASTRY CREAM

  1. Boil the milk.
  2. Mix the yolk, sugar & corn starch together.
  3. Temper the milk with yolk mixture & bring back to boil till thick.
  4. Cool down the mixture.

ASSEMBLY

  1. Level the shortcake and brush it with liquor syrup for the cake to stay moist.
  2. Layer the cake with chantillly cream and sliced strawberries.
  3. Decorate with full strawberries.
Posted in

Baked Creamy Chicken Pasta

< Back to Recipe Listings

Baked Creamy Chicken Pasta

by Mimi Wahadi

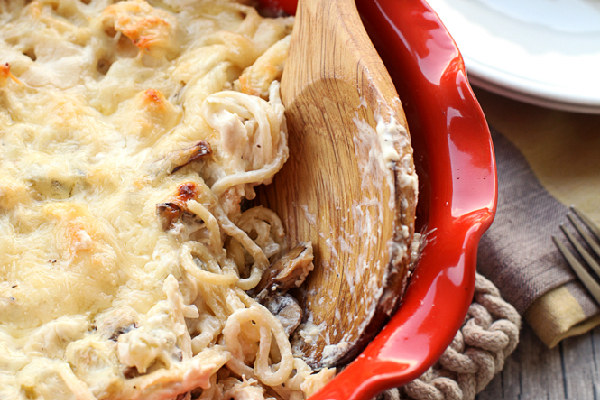
This cheesy Baked Creamy Chicken Pasta is perfect for a cold night in that will be enjoyed by your family!

Cuisine : European  Course : Main  Skill Level : Novice
Prep : 25 mins Cook : 30 mins Ready in : 55 mins  Serves : 1-2 Servings


INGREDIENTS                                          

  • Handmade Pasta
    • 200gm All-Purpose Flour
    • 2 Large Eggs
  • Chicken Cream Sauce
    • 3 tbsp Olive Oil
    • ¼ cup Onions, chopped
    • 1 tsp Garlic, chopped
    • ¼ cup All-Purpose Flour
    • 2 cups Chicken Stock
    • Dried Rosemary & Parsley
    • 250ml Full Cream Milk
    • 200ml Cooking Cream
    • 200gm Boiled Chicken Meat
    • 2 pcs Chicken Sausage
    • 50gm Mushroom (optional), sliced

DIRECTIONS FOR HANDMADE PASTA

  1. In a stand mixer attached with a dough hook, combine all ingredients and mix.
  2. Beat until dough become light yellow, smooth and soft.
  3. Rest the dough for 10 mins.
  4. Roll and cut the pasta dough. Dust with semolina and flour.
  5. Set aside until ready to boil.
  6. In a deep pot, boil water and add salt.
  7. Boil pasta for approximately 3-4 mins. Drain and toss with olive oil.

DIRECTIONS FOR CREAM CHICKEN SAUCE          

  1. Finely chop the onions, garlic, rosemary and gently fry on a medium heat in the olive oil for approx. 3 mins stirring continuously.
  2. Add the flour followed by chicken stock.
  3. Reduce heat to low, add cream and milk, stir gently, add mushrooms, ensuring all ingredients are covered in cream.
  4. Add the roughly chopped chicken meat.
  5. Drain pasta and add to sauce – stir pasta and sauce to ensure all pasta is covered.
  1. Preheat the oven to 200°C.
  2. Add the cooked pasta to the thickened sauce, making sure it’s coated completely.
  3. Toss in the chicken pieces. Pour the pasta mixture into the prepared aluminium casserole dish, and then top with chicken sausages,mozzarella cheese and parmesan powder.
  4. Bake it uncovered for 20 minutes, until the cheese is melty and the edges are bubbly.
  5. Let it rest for 5 minutes before serving.
Posted in

Sweet Corn Empanadas

< Back to Recipe Listings

Sweet Corn Empanadas

by Mimi Wahadi

Relish in these flaky and butter Sweet Corn Empanadas filled with creamy, cheesy corn.  This snack from Argentina will blow your mind away!

Cuisine : Mexican  Course : Appetizer  Skill Level : Novice
Prep : 50 mins Cook : 30 mins Ready in : 1 hr 20 mins  Serves : 2 Servings


INGREDIENTS             

  • Dough
    • 400gm All-Purpose Flour
    • 175gm Unsalted Butter, chilled
    • ¾ tsp Salt
    • 1 no Large Egg
    • ½ cup Cold Water
  • Egg Wash
    • 1 no Large Egg, whisked
    • Sea Salt to taste (For Garnish)
  • Filling
    • 500gm Corn Kernels
    • 3 nos Green Onions, thinly sliced
    • 1 tbsp Olive Oil
    • 2 cloves Garlic, minced
    • 1 tsp Mustard Powder
    • 3 tbsp Milk
    • 1 tsp Lemon Juice
    • ½ tsp Paprika
    • ½ tsp Salt
    • 1 tsp Sugar
    • 80gm Mozzarella Cheese


DIRECTIONS FOR DOUGH

  1. In a food processor, pulses to combine the flour, butter and salt.
  2. Whisk together the egg and the water and add in individual tablespoons until dough forms.
  3. Press into two discs and cover with plastic wrap.
  4. Chill for about 30 minutes to an hour in the fridge.

DIRECTIONS FOR FILLING

  1. In a large skillet on medium heat, cook the corn and green onions in olive oil for about 3 minutes.
  2. Add garlic, mustard, milk, lemon juice, paprika, salt and sugar, and cook for 5 minutes more until the corn is soft and spices have incorporated well.
  3. In a food processor, pulse about 3 or 4 times, until the mixture is homogenous but leaving a few corn kernels whole.
  4. Lay on a flat tray to chill before assembling.

ASSEMBLY:                                                         

  1. Remove dough from fridge, and roll out on a floured surface as thinly possible.
  2. Preheat oven to 190C.
  3. Cut round circles using the round cutter.
  4. Transfer rounds to a parchment-lined baking sheet.
  5. Place 1-2 tbsp of filling followed by a heap of mozzarella cheese into the centre of each round, folding in half and crimping with a fork to enclose the pastry.
  6. Brush the top with egg and sprinkle with a little sea salt.

Bake for about 12-15 minutes, until empanadas are golden brown.

Posted in

Kway Pie Tee

< Back to Recipe Listings

Kway Pie Tee

by Charlynn Gwee

Get your guests to fill in the Kway Pie Tee shells with chicken and pine nuts in a do-it-yourself Kway Pie Tee party!

Cuisine : Asian  Course : Appetizer Skill Level : Novice
Prep : 10 mins Cook : 15 mins Ready in : 25 mins  Serves : 12 Mini Shell


INGREDIENTS                                          

  • 2 tbsp Oil
  • 1 tsp Chopped Garlic
  • ½ tbsp Chopped Ginger
  • ½ Diced Onions
  • 250gm Boneless Chicken Leg/ Breast (Diced)
  • ½ small Red Bell Pepper (Diced)
  • 100gm Zucchini (Seeded, diced)
  • 2 tbsp Oyster Sauce
  • 1 tsp Coarse Ground Black Pepper
  • 30gm Pine Nuts (Toasted)
  • Coriander Leaves for Garnish
  • Pie Tee Shells

DIRECTIONS

  1. Heat oil in pan, sauté garlic, ginger and onions till fragrant. Add the chicken and cook for two minutes.
  2. Toss in the bell peppers and zucchini, pour in oyster sauce and sprinkle black pepper over the chicken. Cook for another two minutes.
  3. Add in the pine nuts to the chicken, mix well and fill into pie tee cups as required. Garnish with some coriander leaves.
Posted in

Sukiyaki

< Back to Recipe Listings

Sukiyaki

by Autumn Brown

Loaded with vegetables, mushrooms and well-marbled beef in a sweet and savoury Kanto-Style soy sauce broth with Kansai-Style condiments! This is the dish to make for a heart-warming family gathering.

Cuisine : Asian  Course : Main  Skill Level : Novice
Prep : 10 mins Cook : 15 mins Ready in : 25 mins  Serves : 1-2 Servings


INGREDIENTS             

  • Well-marbled beef sliced for sukiyaki (3mm thick)
  • Preferably a good quality ribeye , short rib or chuckroll
  • Japanese Leak
  • Napa Cabbage
  • Carrot
  • Enoki Mushrooms
  • Fresh Shiitake Mushrooms
  • Firm Tofu
  • Konnyaku Noodles
  • Udon Noodles
  • Freshest Pasteurised Eggs (Optional)
  • Sukiyaki Sauce Kanto-Style, Eastern Japan
    • 1 part Sake
    • 1 part Mirin
    • 1 part Soy Sauce
    • 1 part Kombu Stock
    • ¼ part Brown Sugar
  • Sukiyaki Condiments Kansai-Style, Western Japan
    • Sake
    • Soy Sauce
    • Brown Sugar

DIRECTIONS

Kanto Style

  1. To make Kanto-style sukiyaki sauce, combine all ingredients inside Bruno Nabe Pot and bring to a boil for around 5 minutes to reduce the mixture slightly.
  2. Arrange Japanese cabbage, leek, tofu, mushrooms and simmer for about 3 minutes, then add the thinly sliced beef and udon. Simmer the ingredients for another 3-5 minutes until all ingredients are well-cooked.
  3. To enjoy Kanto-style sukiyaki, dip cooked vegetables and beef in beaten pasteurized egg.
  4. Add more sukiyaki sauce and repeat step 2 to continue cooking.

Kansai Style     

  1. To make Kansai-Style sukiyaki, preheat Bruno Nabe Pot on high.
  2. Place a piece of beef fat, move it around to render its fat. If you don’t have any beef fat, add 1 tsp of oil and spread it around.
  3. Add some brown sugar, and sear sliced beef in the pot. Drizzle sake and soy sauce. Let it sizzle, then flip the beef to cook the other side briefly. Do enjoy the beef by dripping in pasteurized eggs.
  4. In the same pot, arrange cabbage, leef, tofu, mushrooms, konnyaku noodles and sliced beef. Sprinkle brown sugar, drizzle soy sauce and sake. Allow ingredients to simmer and cook.
  5. To enjoy Kansai-style sukiyaki, dip cooked vegetables and beef in beaten pasteurized egg.
  6. Add the end when all ingredients are taken out of the pot, add cooked udon or rice to soak up the flavourful sauce. Add more brown sugar, soy sauce and sake if mixture is too dry.
Posted in

Salted Egg Yolk Cookies

< Back to Recipe Listings

Salted Egg Yolk Cookies

by Charlynn Gwee

Indulge in this melt-in-your-mouth, buttery and crumbly Salted Egg Cookies during your teatime!

Cuisine : Asian  Course : Dessert Skill Level : Novice
Prep : 15 mins Cook : 13-18 mins Ready in : 28-33 mins  Serves : 1-2 Servings


INGREDIENTS                                          

  • 125gm Plain Flour
  • 10gm Corn Flour
  • ½ gm Baking Powder
  • ½ gm Baking Soda
  • 10gm Milk Powder
  • 4 Salted Egg Yolk
  • 85gm Unsalted Butter
  • 2gm Salt
  • 40gm Caster Sugar
  • 1 Egg Yolk
  • Dash of Oil
  • Pinch of Salt
  • Black & White Sesame Seeds (Optional)


DIRECTIONS

  1. Preheat oven to 170C.
  2. Steam salted egg yolk, roughly chop and set it aside to cool.
  3. Cream butter, sugar and salt together till fluffy.
  4. Add in all sifted dry ingredients gradually.
  5. Gradually incorporate chopped egg yolk.
  6. Roll to 5mm thickness and cut out desired shape.
  7. Brush with egg wash and top with black and white sesame.
  8. Bake for 13-18 minutes.
Posted in

Chicken Kiev

< Back to Recipe Listings

Chicken Kiev

by Vivian Pei

Oozing with tarragon butter, this tasty and crispy Chicken Kiev recipe will leave you wanting more!

Cuisine : European  Course : Main  Skill Level : Novice
Prep : 80 mins Cook : 15 mins Ready in : 1 hr 35 mins  Serves : 2 Servings


INGREDIENTS             

  • 8 tbsp/ 110g Unsalted Butter, softened
  • 1 tsp Dried Parsley
  • 1 tsp Dried Tarragon
  • 1 tsp Kosher Salt, plus extra for seasoning chicken
  • ¼ tsp Freshly ground black pepper, plus extra for chicken
  • 2 large Boneless skinless chicken breast halves
  • 2 cups Whole eggs, beaten with 1 tsp water
  • Japanese bread crumbs (panko), plus ¼ cup for filling
  • Vegetable oil, for frying

DIRECTIONS

  1. Combine butter, parsley, tarragon, 1 teaspoon salt, and 1/4 teaspoon black pepper in a bowl. Mash with a fork to combine. Place mixture on plastic wrap or waxed paper and roll into small log; place in freezer.
  2. Place chicken breasts, 1 at a time, between 2 pieces of plastic wrap. Pound to no less than 3.5mm thickness. Season each piece of chicken with salt and pepper.
  3. Lay 1 chicken breast on a new piece of plastic wrap and place ¼ of the compound butter and 1tablespoon breadcrumbs in the centre of each breast. Using the plastic wrap to assist, fold in ends of breast and roll breast into a log, completely enclosing the butter; roll very tightly. Repeat with each breast. Place chicken in refrigerator for 1-2 hours, or up to overnight.
  4. Place egg and water mixture in a shallow dish and 2 cups bread crumbs in a different shallow dish.
  5. Heat 1/2-inch of vegetable oil in a large frying pan over medium-high heat.
  6. Dip each breast in the egg mixture and then roll in the bread crumbs. Gently place each breast in oil, sealed-side down, and cook until golden brown, approximately 5-6 minutes on each side until the chicken is golden brown. To test for doneness, cut into one of the rolled chicken breasts to make sure it doesn’t have a pink interior. Remove to a cooling rack set in a tray and allow to drain for 5 to 10 minutes before serving.
  7. Alternate method is to finish off in the oven:
  8. To cook, heat oven to 180C. Heat the oil in a large frying pan over a medium-high heat. Fry the Kievs for 2 to 3 mins each side until golden – you may need to do this in batches. Transfer to a baking tray and cook for 20-25 mins until cooked through.
Posted in

Mini French Toast Cups

< Back to Recipe Listings

Mini French Toast Cups

by ToTT

Baked mini French toast cups are the perfect breakfast to try with the kids this school holiday. These are great for picnics, breakfast on-the-go, or to kick-start a fun day out! #QuickBites

Cuisine : European Course : Main Skill Level : Novice
Prep : 20 mins Cook : 30 mins Ready in : 50 mins  Serves : 3 large ramekins


INGREDIENTS             

  • 115g Cream Cheese
  • 4 Eggs
  • 2/3 cup Milk
  • 1/3 cup Orange Juice
  • 1/4 cup Maple-flavored Pancake Syrup
  • 1/2 tsp Freshly Grated Orange Peel
  • 3 cups Baguette (about 4 slices – 1 inch)

DIRECTIONS 

  1. Heat oven to 350F. Whisk cheese in a medium bowl until smooth. Add in 1 egg at a time and whisk each addition until smooth.
  2. Stir in milk, maple syrup, orange juice and orange zest until blended.
  3. Divide the bread among greased ramekins. Slowly pour the mixture over the bread in each cup.
  4. Bake the french toast at 350F for about 30 mins.
Posted in

Easter Carrot Patch Mousse Cups

< Back to Recipe Listings

Easter Carrot Patch Mousse Cups

by ToTT

With Easter around the corner, serve up a carrot patch of chocolate mousse cups on a platter! These cute individual mousse cups are decorated like carrots growing in the ground – fun to eat and even easier to put together with the kids! And best of all, they require no baking at all! #QuickBites

Cuisine : Baking  Course : Dessert  Skill Level : Novice
Prep : 10 mins Cook : 20 mins Ready in : 30 mins  Serves : 1-2 Servings


INGREDIENTS             

  • Chocolate Mousse
    • 100g bar Good Quality Plain Chocolate
    • 50ml Milk
    • 200ml Double Cream
  • Chocolate Coated Strawberries
    • 1 packet Strawberries
    • 1 bar of White Chocolate
    • Orange Food Coloring
  • 1 packet of Oreo

DIRECTIONS FOR CHOCOLATE MOUSSE

  1. Melt the chocolate in a bowl over a pot of simmering water (Double boiling)
  2. Heat the milk until it starts boiling then whisk in melted chocolate. Leave it to cool/
  3. Whip the cream until soft peak, then fold into cooled chocolate.
  4. Pour the chocolate mousse into La Parfait jars and allow it to cool.

DIRECTIONS FOR CHOCOLATE COATED STRAWBERRIES

  1. Melt a bar of white chocolate and add in a drop of orange food coloring.
  2. Dip the strawberries into the melted chocolate.

DIRECTIONS OF ‘DIRT’

  1. Remove the cream filling and blend the oreo biscuit until crumbly.

ASSEMBLY 

  1. Pour the chocolate mousse into Le Parfait jars.
  2. Top oreo as ‘dirt’.
  3. Top chocolate strawberries as ‘carrots’
Posted in

Olive Fried Rice

< Back to Recipe Listings

Olive Fried Rice

by Julie Yee

Savour this tasty Olive Fried Rice as you enjoy the health benefits of olives! It helps to boost your iron intake and is good for your heart.

Cuisine : Asian  Course : Main  Skill Level : Novice
Prep : 15 mins Cook : 20 mins Ready in : 35 mins  Serves : 1-2 Servings


INGREDIENTS             

  • ½ tbsp Chopped Garlic
  • ½ tbsp. Big Onions
  • ½ bowl Black Olive
  • ½ cup Capsicum
  • ½ cup Shitake Mushroom
  • 2 no Egg
  • ¼ cup Crabmeat
  • ¼ cup Minced Chicken
  • 1 no Shredded Eggs
  • 250gm Fried Rice *
  • Fried Rice
    • 250gm Cooked Rice
    • 2 tbsp Oil
    • ¾ tbsp. Fish Sauce
    • ½ tsp Sugar

DIRECTIONS

  1. To make the fried rice, heat the oil and cook the rice with fish sauce, sugar and ground pepper.
  2. Heat oil and add in onions and garlic.
  3. Stir in the pineapple cubes.
  4. Add in the fried rice, meat and vegetables.
  5. Add in the pineapple juice and fry under high fire for 2mins. Test the taste and adjust with fish sauce or soya sauce.
  6. If serving with a pineapple shell, place rice inside and cover with foil.
  7. Bake for 10mins at 160°C until hot and fragrant.
  8. Serve with shredded eggs on top.
Posted in