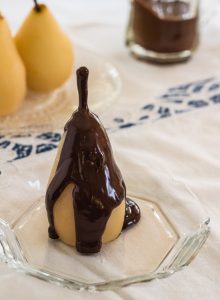
Poached Pears & Rich Valrhona Chocolate Cream with Cocoa Streusel
by Susanne Despature
Here’s how to make gooey, cheesy, garlicky pull-apart bread, one step at a time! Addictively buttery and cheesy with each piece and bursting with fresh herb and garlic flavours!
What is a feast without a gratifying dessert? Learn to create this sensual chocolate delicacy and complete your dessert masterpiece with a few pieces of poached pear.
Cuisine : European Course : Dessert Skill Level : Novice
Prep : 45 mins Cook : 15 mins Ready in : 60 mins Serves : 6
INGREDIENTS:
- 2-3 Poached Pears
- Chocolate Streusel
Chocolate Cream
- 150g Whole Milk
- 100g Cream (35% fat)
- 2 Egg Yolk
- 30g Fine Sugar
- 60g Milk Chocolate Covertures Drops
- 50g Dark Chocolate Covertures (70% cocoa)
Whipping Cream
- 200g Cream (35% fat, very cold)
- Physalis
- Chocolate Streusel
DIRECTIONS:
- Prepare a tray with 12 nicely shaped glasses. Dice pears 2 x 2 cm and place some of it in each glass.
- In a medium bowl, combine sugar and egg yolks and whisk until the mixture is light and foamy.
- Prepare the 2 chocolates in another bowl and set aside.
- In a pan, bring milk and cream to a boil, stirring occasionally to prevent skin to form. Pour over the egg mixture, stirring constantly. Pour everything back into the pan and start to heat the mixture carefully over low to medium heat.
- As you stir with a rubber spatula or wooden spoon — you must stir constantly on the bottom of the pan, to keep the eggs from scrambling — you’ll see that the cream will start out light and foamy, then the bubbles will get bigger, and then, as it gets hotter, it will start to thicken and the stirring will leave tracks Heads up at this point — the tracks mean the cream is almost ready. Never let the cream boil (over 85 degrees or the eggs will scramble!)
- Pour the hot cream over the chocolates, count up to twenty, and then whisk energetically with small movements from the centre to the border until chocolate and cream are thoroughly mixed. Pour into a measuring jug.
- Pour carefully into the glasses, covering the pears, (half full, about 100 g / glass). Refrigerate. Add 1 teaspoon of chocolate streusel when cream is cold. Decorate with whipped cream before serving.
Whipping Cream
-
In a very cold bowl (let it stand for 30 minutes or more in the freezer), add the very cold cream and whip with an electric hand mixer to peaks.
-
Start first on low speed, then, when the cream thickens, whip on high speed – add the vanilla sugar towards the end.
-
Put the whipped cream into a piping bag (with a star tip) and decorate each coffee chocolate cream with a whipped cream rose. Dust slightly with cocoa powder and decorate with chocolate streusel & physalis.