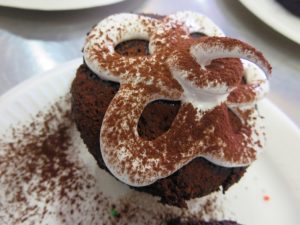
Mini Chocolate Cupcakes with Marshmallow Frosting
This decadent Chocolate Marshmallow Cupcake pairs a rich, moist and buttery chocolate flavored cupcake with a soft and fluffy Marshmallow Frosting. Make these for the kids as a treat!
Cuisine : Baking Course : Dessert Skill Level : Novice
Prep : 30 mins Cook : 30 mins Ready in : 60 mins Serves : 48 mini cupcakes
INGREDIENTS:
For the Chocolate Cupcakes
-
- 3 cups Sugar
- 3 cups Cake flour
- 1½ cup Cocoa powder
- 1 tbsp Baking soda
- 1½ tsp Baking powder
- 1½ tsp Salt
- 1½ cup Buttermilk
- ¾ cup Vegetable oil
- 1½ cup Warm water
- 3 Large eggs
- 1½ Vanilla extract
For the Marshmallow Frosting
- 8 Large egg whites at room temperature
- 2 cups Granulated sugar
- ½ tsp Cream of tartar
- 1/8 tsp Fine salt
- 2 tsp Vanilla extract
DIRECTIONS:
For the Chocolate Cupcakes
- Preheat oven to 160ºC. Place cupcake holders in mini cupcake trays.
- Place all dry ingredients in the mixing bowl and mix on very low to combine. Add buttermilk, oil and water and mix on medium until combined; add eggs and vanilla and mix on medium again until just combined.
- Fill each cupcake holder 2/3 with batter and bake for 10-20 minutes until firm. Cool in pan for 5 minutes before removing onto a wire rack to cool completely before icing.
For the Marshmallow Frosting
-
Pour water 1 inch deep into a small pot and place over medium heat to bring to a simmer. Place all ingredients except vanilla in a glass bowl and place over simmering water. Whisk by hand for about 6 minutes until sugar is dissolved and mixture is hot.
-
Pour hot mixture into Kenwood mixing bowl and whisk on medium for 1 minute. Increase to high and keep whisking until stiff, glossy peaks form – this should take about 5 minutes. Add the vanilla and whisk 1 more minute.