Raspberry Mini-Charlotte

< Back to Recipe Listings

Raspberry Mini-Charlotte

by Susanne Despature

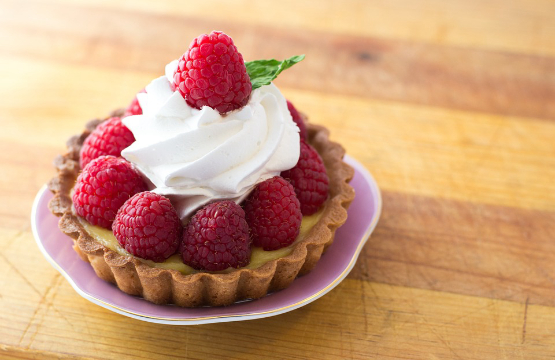
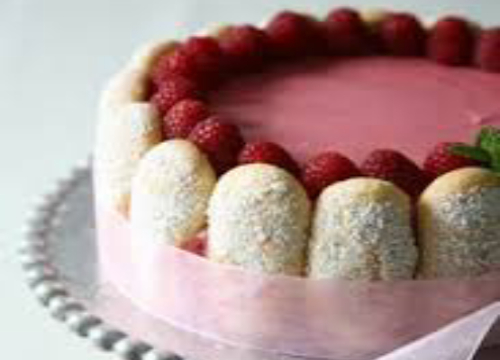
Surround the smooth pudding with crunchy ladyfingers and top with berries. Just like that, you have created a refreshing dessert packed with anti-oxidants and health benefits. Oh, don’t forget that it looks so delicate that your family and friends would be impressed for sure!

Cuisine : Baking Course : Dessert Skill Level : Novice
Prep : 150 mins Cook : 5 mins Ready in : 155 mins Serves : 6


INGREDIENTS:

  • Charlotte
    • 24 Ladyfingers

    Yogurt Cream

    • 100g Mixed Raspberries (frozen puree)
    • 50-60g Icing Sugar
    • 150g Greek Yogurt
    • 150g Mascarpone
    • ½ Lemon (or lime juice)
    • 160g Cream (35% fat)
    • 4 sheets of Gelatine (10g)
    • 125g Berries (raspberries, strawberries, blueberries, mint leaves)

    Raspberry Jelly

    • 125g Mixed Raspberries (frozen puree)
    • 50g Caster Sugar
    • ¼ tsp Agar-Agar

DIRECTIONS:

         Charlotte

  1. Put 6 circles on a tray (covered with baking paper) and line them with 8 ladyfingers (cut in 2 lengthwise), the sugar coated side towards the circle

    Raspberry Jelly

  2. Heat the raspberry puree with sugar and agar-agar in a small pan and let cook for 1 minute.

  3. Let cool out until room temperature (25 – 30°C)

    Yogurt Cream

  4. Whip the very cold whipping cream in a chilled bowl until stiff and refrigerate.

  5. Soak gelatine sheets in cold water for 10 minutes. Heat up raspberry puree and lemon juice in a small pan or in microwave (40°C), then dissolve soaked gelatine in the warm puree, stirring gently with a spoon.

  6. In a bowl, mix soft mascarpone with yogurt and icing sugar. Add raspberry puree and mix thoroughly. Refrigerate.

  7. When raspberry cream starts to gelify on the border, fold in carefully whipped cream with a rubber spatula.

  8. Fill raspberry cream in circles, almost to the top – let some space for raspberry jelly. Refrigerate the Charlottes for 1-2 hours, then pour gently raspberry jelly on top.

  9. Garnish with berries and mint leaves and refrigerate.

    To Serve

  10. Take away circles and present each Charlotte on individual plates.

Posted in

Mince Pies

< Back to Recipe Listings

Mince Pies

by Thripti Hinduja

Mince meat, formerly known as Mincemeat tarts, are small British fruit-based sweet pies traditionally served during the Christmas season. These are made with a buttery short crust pastry and a savoury dried fruits. You may add nuts to add texture to the pie as well.

Cuisine : Baking Course : Appetizer Skill Level : Novice
Prep : 30 mins Cook : 25 mins Ready in : 55 mins Serves : 2


INGREDIENTS:

  • 110g Flour
  • 70g Cold Butter
  • 1 tsp Cinnamon
  • 30g Almond Meal
  • 20g Caster Sugar
  • ⅛ tsp Salt
  • 1 Egg
  • 100g Christmas Mince or Mincemeat

DIRECTIONS:

  1. Put the flour, cinnamon, almond meal, salt and cater sugar in a bowl.
  2. Chop the butter and rub it into the flour mixture.
  3. Add in the egg yolk and form a dough. Do not knead this dough.
  4. Cover the dough in plastic wrap and refrigerate it for 20 minutes.
  5. Sprinkle flour over the table and roll out the dough about 1/4 inch thick.
  6. Cut it out into circles to fit a cupcake mould.
  7. Place the disks in slightly greased moulds. Spoon in some of the mince filling.
  8. Cut out star shaped pieces of the dough and place it on the top.
  9. Bake them at 180°C for about 20 minutes or until the crust turns brown.
  10. Allow them to cool for 5 minutes in their moulds, then carefully take them out to cool. Sprinkle them with icing sugar and serve with some pouring cream or custard if desired
Posted in

Chicken Breast in Herb & Parmesan Crust with Provence Style Tomato and Zucchini Gratin

< Back to Recipe Listings

Chicken Breast in Herb & Parmesan Crust with Provence Style Tomato and Zucchini Gratin

by Susanne Despature

Turn your meal into a true French feast with a baking main stay, Southern Tomato and Zucchini Gratin. You will be making an extremely gratifying version spreading the aroma of herbed chicken and Parmesan cheese. Enjoy the amazing match of flavored chicken bits with the rich gratin mesh.

Cuisine : Mediterranean Course : Main Skill Level : Novice
Prep : 10 mins Cook : 15 mins Ready in : 25 mins Serves : 4


INGREDIENTS:

  • Chicken Breast in Herb and Parmesan Crust
    • 4 pcs of Chicken Breast
    • 3 tbsp of Clarified Butter
    • 50g Unsalted Butter
    • 2 tbsp of Olive Oil
    • 2 cloves of Garlic (finely chopped)
    • 100g Parmesan Cheese (grated)
    • 100g Japanese Breadcrumbs
    • 50g Parsley (finely chopped)
    • 50g Italian Basil (finely chopped)
    • 10g Thym & Rosemary (finely chopped)
    • Salt, Pepper

    Southern Tomato and Zucchini Gratin

    • 4 Big Onions (finely sliced)
    • 6 tbsp of Olive Oil
    • 1 tbsp of White Balsamic Vinegar
    • 2-3 cloves of Garlic (finely chopped)
    • 6 Ripe Tomatoes (5mm slices)
    • 2 Green Zucchini (2mm slices)
    • 1 Yellow Zucchini (2mm slices)
    • 50g Basil (chopped)
    • 10g Thym
    • 50ml Chicken Stock
    • 50g Parmesan Cheese (grated)
    • Salt, Pepper, Brown Sugar

DIRECTIONS:

        Chicken Breast in Herb and Parmesan Crust

  1. Preheat oven to 250°C, grill position.

  2. Melt butter and mix into breadcrumbs with olive oil. Add all remaining ingredients and mix together.

  3. Season chicken breast with salt and pepper to taste. Heat butter in a pan and sear chicken over medium heat on both sides. Lower heat and continue to fry gently, for 5 minutes, spooning butter from the pan over it from time to time on both sides.

  4. Remove chicken breast from pan and place on a baking tray. Press breadcrumbs on topside of breast. Place breast under a grill until golden brown (takes only 2-3 minutes!), then take them out of the oven and keep warm under aluminium foil (temperature at core: 70°C)

    Southern Tomato and Zucchini Gratin (Tian de légumes)

  5. Preheat the oven to 200°C. Oil a 15 x 20 rectangular or oval baking dish (= Tian in South of France).

  6. In a frying pan, heat olive oil, then sweat sliced onions and chopped garlic for 10 minutes or until translucent – season to taste with salt, pepper and brown sugar. Place on bottom of tian.

  7. Arrange the vegetables in rows in the baking dish in this order : tomato slice, green zucchini, yellow zucchini, tomato slice, green zucchini.The vegetables should not lying flat, they should be arranged in the dish as if you had stacked them, then lay the whole stack in the dish, all of the rounds slanting to one side.

  8. Sprinkle with herbs, season to taste with salt and pepper, then pour chicken stock on bottom of tian and sprinkle with parmesan cheese and some olive oil.

  9. Place in oven and bake 30 minutes or until the tian get’s a golden crust. Reduce heat to 160° C and continue to bake for another 40 minutes or until vegetables are tender.

  10. You can prepare the tian in advance and serve it cold or slightly reheated

    To Serve

  11. Arrange some vegetable gratin on serving plates, then top with diagonally sliced chicken, garnish with fresh basil. Serve with confit truffle potatoes

Posted in

Lemongrass and Lime Madeleines

< Back to Recipe Listings

Lemongrass and Lime Madeleines

by President

Add an Asian twist to this traditional French cake. Savour the fragrant aroma of the lemongrass as you bake and bite into a refreshingly light sponge that is sure to delight your palate.

Cuisine : Baking Course : Dessert Skill Level : Novice
Prep : 30 mins Cook : 15 mins Ready in : 45 mins Serves : 12


INGREDIENTS:

  • 135g All-Purpose Flour
  • 4g Baking Powder
  • 100g Unsalted Président Butter (softened)
  • 135g Caster Sugar
  • 2 Large Limes (zested and juiced)
  • 4 Eggs
  • 2 stalks of Lemongrass (finely grated)

DIRECTIONS:

  1. Preheat the oven to 190°C.
  2. Sift the flour and baking powder together.
  3. Whisk the butter until creamy. Add sugar and lime zest, and whisk again until well combined. Whisk in eggs one by one. Add flour and lemongrass, and mix well.
  4. Cast into madeleine moulds (either silicon or black steel; avoid aluminium).
  5. Bake for 10 to 15 minutes, or until golden brown. Remove from the oven and drizzle with lime juice. Turn out onto a wire rack to cool.
Posted in

Fresh Raspberry Tart

< Back to Recipe Listings

Fresh Raspberry Tart

by Thripti Hinduja

This classic is made with fresh raspberries, pastry cream and tart dough. Satisfy your sweet tooth and make your own version of a fresh fruit tart at home!

Cuisine : Baking Course : Dessert Skill Level : Novice
Prep : 105 mins Cook : 20 mins Ready in : 125 mins Serves : 6


INGREDIENTS:

  • Crust
    • 250g Flour
    • 125g Cold Butter
    • 60g Sugar
    • 1 Egg

    Filling

    • 100g Raspberry Jam
    • 375g Milk
    • 75g Sugar
    • 25g Corn Flour
    • 1 tbsp Vanilla Bean Paste
    • 35g Butter
    • 5 Egg Yolks
    • 200g Raspberries

DIRECTIONS:

        Crust

  1. Line a pie mould with parchment paper.

  2. Cut the cold butter into small cubes. Crumble it into the flour and sugar.

  3. Add in the egg and form the mixture into a dough. Do not knead or overwork the dough. Cover it in cling film and let it sit in the refrigerator for 20 minutes.

  4. Roll out the dough in between two sheets of baking paper.

  5. Invert into a greased and lined pie mould. Let sit in the refrigerator for another 20 minutes.

  6. Dock the pie crust and blind bake in a preheated oven at 180°C for 15 minutes or until light brown.

  7. Brush with slightly beaten egg and place it back in the oven for 1 minute.

  8. Allow to cool 5 minutes before filling.

    Filling          

  9. Heat the milk in a sauce pan.

  10. At the same time, whisk the egg yolks and sugar together till creamy. Whisk in the corn flour and the vanilla bean paste.

  11. Drizzle in the warm milk, whisking all the time.

  12. Pour it back into the sauce pan and cook until the custard bubbles and thickens.

  13. Take it off the heat and add in the butter. Cool completely

    Assembling Tart

  14. Brush the base of the tart with the jam, reserving 2 tbsp for the topping.

  15. Pipe over the cold custard and arrange fresh raspberries over it.

  16. Warm the remaining jam with 1 tbsp of water and brush the raspberries with the jam.

  17. Refrigerate for at least an hour before serving.

Posted in

Brown Butter Madeleine

< Back to Recipe Listings

Brown Butter Madeleine

by Thripti Hinduja

Madeleines are also known as traditional French small cakes. These are traditional tea cakes with a crispy exterior and moist tender interior similar of a sponge cake. This recipe might look intimidating at first glance, but it’s definitely fool-proof!

Cuisine : Baking Course : Dessert Skill Level : Novice
Prep : 15 mins Cook : 10 mins Ready in : 25 mins Serves : 4


INGREDIENTS:

  • 2 Eggs
  • 110g Sugar
  • 50g Milk
  • 125g Flour
  • 5g Baking Powder
  • 1 tsp Vanilla
  • 50g Butter

DIRECTIONS:

  1. Beat the eggs and sugar with an electric whisk until foamy and a little pale.
  2. Sift the flour and baking powder together, and fold it into the egg mixture.
  3. Stir in the milk and vanilla.
  4. Melt butter over medium heat. Let it bubble away, stirring it frequently until the bubbles die down and the butter is browned.
  5. Take it off the heat and let it cool for a minute before adding it to the batter.
  6. Pipe the mixture into Madeleine moulds and bake at 190°C for 8 – 10 minutes
Posted in

Mascarpone Creme Brûlée


< Back to Recipe Listings

Mascarpone Creme Brûlée

by Thripti Hinduja


Crème Brulee means “burned cream” in French. To replicate this classic, the batter mixture and timing control is important to achieve successful ramekins of heavenly crème brulee – a must try dessert!

Cuisine : Baking Course : Dessert Skill Level : Novice
Prep : 70 mins Cook : 30 mins Ready in : 100 mins Serves : 4


INGREDIENTS:

  • 225g Whipping Cream
  • 50g Mascarpone
  • 1½ tsp Vanilla Bean Paste
  • 3 Eggs
  • 60g Caster Sugar
  • 4 tbsp Caster Sugar (optional: for topping)


DIRECTIONS:

  1. Preheat the oven to 150°C.
  2. Put the cream, mascarpone and vanilla in a pan. Heat mixture until almost boiling.
  3. In the meanwhile, whisk the egg yolks with sugar till creamy and pale. Slowly whisk into the hot cream mixture, whisking all the time.
  4. Strain the mixture and pour into ramekins.
  5. Place the ramekins in a roasting tin, along with hot water coming half way up the ramekins.
  6. Bake for about 20-30 minutes, depending on the size of your ramekins. The custards should be just set around the side and have a slight wobble in the centre.
  7. Refrigerate the ramekins for at least an hour.
  8. When ready to serve, sprinkle the tops with caster sugar and caramelize it with a blowtorch. A very hot grill works well too.
Posted in

Multigrain Sandwich Loaf

< Back to Recipe Listings

Multigrain Sandwich Loaf

by Jehanne Ali

Start your day right with homemade Mulitgrain Sandwich Loaf for a hearty breakfast sandwich!

Cuisine : Baking Course : Appetizer Skill Level : Novice
Prep : 120 mins Cook : 30 mins Ready in : 150 mins Serves : 6


INGREDIENTS:

  • 3 3/4 cups Multigrain Flour (9 blend variety)
  • 1 1/2 tsp Yeast
  • 1 cup Milk (or water)
  • 1 Large Egg
  • 1 tsp Salt
  • 1 tsp Sugar
  • 1 tbsp Olive Oil for grease

DIRECTIONS:

     Directions using KENWOOD BREAD MAKER:

  1. Add the yeast on the bottom.
  2. Add the multigrain flour.
  3. Tip it in followed by sugar, salt, honey and liquid (water or milk).
  4. Set as ‘basic bread’ as per the bread maker manual.

     Directions using KENWOOD MIXER or Hands Kneading:

  1. Add all the ingredients in a mixer, or knead by hand, adding liquid gradually to achieve soft tacky dough.
  2. Leave to rise for about an hour.
  3. Do not punch down the air, instead roll and shape into a loaf pan.
  4. Leave it to rise for another 30 minutes.
  5. Brush top with milk and sprinkle some grains or seeds.
  6. Bake at preheated oven of 190°C for 30-35 minutes.
Posted in

Chocolate Okara Cake

< Back to Recipe Listings

Chocolate Okara Cake

by Julie Yee

Learn to make full use of okara, which are the remains during the production of soy milk and tofu, to make a delightful dessert! With Chef Julie’s recipe, you can now make healthy Chocolate Okara Cake.

Cuisine : Baking Course : Dessert Skill Level : Novice
Prep : 15 mins Cook : 40 mins Ready in : 55 mins Serves : 6-8


INGREDIENTS:

  • Group 1 
    • 180gm Butter
    • 160gm Fine Sugar
  • Group 2 
    • 4 Eggs
    • 1 teasp Vanilla Paste
    • 150gm Okara
    • 3 tbsp Melted Chocolate
    • 50gm Soya Milk (less sugar)
    • 180gm Self-Raising Glour
    • 1 tbsp Cocoa Powder

DIRECTIONS:

  1. Cream butter and sugar till light.
  2. Add in beaten eggs and vanilla paste gradually.
  3. Add in the okara and melted chocolate.
  4. Add in flour & soya milk alternately.
  5. Bake at 170°C for about 40 minutes.
Posted in

Molten Lava Chocolate Cake

< Back to Recipe Listings

Molten Lava Chocolate Cake

by Eric Low

The famous Molten Lava Chocolate Cake looks intimidating, when in fact it is not difficult to create at all! Serve with a freshly-made berries sauce, this densely rich delicacy will leave you reaching for seconds.

Cuisine : Baking Course : Dessert Skill Level : Novice
Prep : 30 mins Cook : 5 mins Ready in : 35 mins Serves : 6


INGREDIENTS:

  • 125g Semi Sweet/Bitter Sweet Chocolate Chips/Covertures (50% cocoa)
  • 100g Unsalted Butter
  • 50g Plain Flour
  • 3 Eggs
  • 3 Egg Yolks
  • 1 tsp Vanilla Extract
  • 1 tsp Instant Coffee Powder (optional)
  • 50ml Water

DIRECTIONS:

  1. Preheat oven to 180°C. Butter 12 small ramekins (100ml size).
  2. Bring a small pot of water to boil, set up a hot water bath. Place a MUM 8 pastry mixing bowl above the hot water.
  3. Add the chocolate chips and melt together with butter until smooth. Remove from heat and allow cooling for 5-10 minutes.
  4. In the same Mum 8 Pastry mixing bowl, add flour and sugar to chocolate/butter sauce. Beat the mixture at speed 4 and gradually stir in the eggs and yolks until smooth.
  5. Add vanilla and coffee liqueur/instant coffee and mix until combined.
  6. Divide the batter evenly among the each ramekin. Transfer ramekins to a baking tray and bake for 4 minutes.
  7. Serve the cake direct in ramekins or invert to unmold by scrapping the sides with a palette knife. Compliment cake with vanilla ice cream and raspberries.
Posted in