Ipoh Garlic You Tiao

< Back to Recipe Listings

Ipoh Garlic You Tiao

by Julie Yee

This Asian Breakfast delight, You Tiao is crispy on the outside and fluffy inside! It taste perfects by itself and even better when paired with Hot Soya Milk!

Cuisine : Asian Course : Appetizer Skill Level : Novice
Prep : 300 mins Cook : 10 mins Ready in : 310 mins Serves : 6-8


INGREDIENTS:

  • 500 g Plain Flour
  • 1 tsp Double Actions Baking Powder
  • 5 tbsp Caster Sugar
  • 3 tbsp Garlic Oil
  • 1 tbsp Minced Garlic (fried)
  • 350 ml Water
  • 2 tsp Salt
  • 3/4 tsp Ammonia Powder
  • 1/4 tsp Alum

DIRECTIONS:

  1. Mix all ingredients together & rest for about 5hrs.
  2. Take out every 1hr and flip the bottom side up for even relaxation of the gluten.
  3. Roll into 1cm thick rectangle long strip with 6cm width. Cut into strips of 2cm x 6cm long.
  4. Brush water on one pcs and place another piece on top. Use a satay stick to indent in the middle of the dough.
  5. Deep fry in hot oil till crispy brown, tossing the dough frequently.
Posted in

Raspberry Chocolate Tart

< Back to Recipe Listings

Raspberry Chocolate Tart

by Lin Weixian

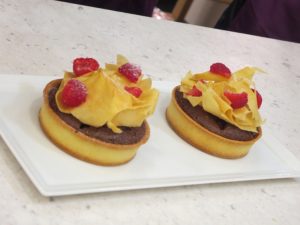
A flaky, golden crust that holds a decadent chocolate filling topped with a glistening tumble of raspberries and hints of phyllo pastry – what’s not to love?

Cuisine : Baking Course : Dessert Skill Level : Novice
Prep : 30 mins Cook : 20 mins Ready in : 50 mins Serves : 2


INGREDIENTS:


  • For the Tart Shell Dough
    • 160g Icing sugar
    • 200g Cake flour
    • 200g Bread flour
    • 160g Unsalted butter, cold
    • 90g Whole egg
    • 5g Vanilla extract (optional)
    • For the Raspberry Chocolate Filling
  • 100g Cacao Barry Peru Dark Chocolate, melted
    • 85g Unsalted Butter, melted
    • 100g Sugar
    • 100g Eggs
    • 60g Unsalted butter, room temp
    • Raspberry jam, as needed
    • Phyllo dough, as needed
    • Fresh raspberries, as needed
    • Clarified butter, as needed
    • Icing sugar, as needed
    • Snow powder, as needed

DIRECTIONS:

         For the Tart Shell Dough

  1. Prepare the workstation.

  2. Scale the ingredients.

  3. Mix well icing sugar, cake flour and bread flour.

  4. Cut in cold butter to form mealy texture.

  5. Finish off by adding eggs to form a dough.

  6. Set aside in the chiller till firm enough to be rolled out.

  7. Par-bake at 180ºC.

    For the Raspberry Chocolate Filling

  8. Prepare the workstation.

  9. Scale the ingredients.

  10. Melt together chocolate and butter.

  11. Add in sugar and egg and blend well.

  12. Coat the bottom of the par-baked tart shell with raspberry jam.

  13. Pour chocolate mixture into tart shell and insert a few fresh raspberries into the filling.

  14. Bake at 160ºC until cooked.

  15. Brush phyllo dough with clarified butter and coat lightly with icing sugar.

  16. Bake at 160ºC until golden brown.

  17. Cool down tart and phyllo dough.

  18. Cover the top of the tart with phyllo dough and decorate with fresh raspberries and decorating sugar.

  19. Serve immediately.


Posted in

Mini Pavlova with Mango Puree and Passionfruit

< Back to Recipe Listings

Mini Pavlova with Mango Puree and Passionfruit

by Julie Yee

Learn how to bake the perfect Pavlova with this recipe by Chef Michele Ow! Top it with Mango Puree and Passionfruit for a taste of summer!

Cuisine : Baking Course : Dessert Skill Level : Novice
Prep : 30 mins Cook : 30 mins Ready in : 60 mins Serves : 6


INGREDIENTS:

  • 2 Large egg whites
  • 1 pinch Salt
  • 125 g Caster sugar
  • 1 tsp Cornflour
  • 1 dash Vanilla extract
  • 1/2 tsp White wine vinegar
  • 200 ml Whipping cream (whipped)
  • 2 heaped tsp Mango purée
  • 1 Passionfruit
  • Nuts and seeds – toasted
  • Sprinkles of Icing sugar (for dusting)

DIRECTIONS:

  1. Preheat the oven to 150ºC.
  2. Whisk the egg whites with the salt until they’re holding firm peaks but are not stiff. Gently add in the sugar, spoonful after spoonful, still beating, until you’ve got a bowl full of gleaming, satiny, snowy meringue. Sprinkle the cornflour, a few drops of vanilla and the vinegar on top and fold in to combine.
  3. Draw 6 circles of approximately 10cm / 4 inch circles (using a pint glass as a guide, if this helps) on each of the parchment-lined sheets.
  4. Spoon the meringue onto the baking parchment into the delineated circles, and spread and smooth to fill. You want to make the meringue slightly higher at the rims, or just use the back of the spoon to make an indentation in the centre to hold the cream and fruit later.
  5. Put into the oven bake for 30 minutes. Turn the oven off and leave them in for another 30 minutes, then take out of the oven to cool. Transfer them, on their baking parchment, to wire racks.
  6. When you want to assemble them, dollop cream into the indentation, and smooth it with the back of a spoon, leaving the odd peak. Place fruit on top. Dust with icing sugar.
Posted in

Homemade Pizza

< Back to Recipe Listings

Homemade Pizza

by Chris Ng

Make your very own homemade pizza in the comfort of your own kitchen with this fuss-free recipe! The dough is a cinch to make and you can add any toppings that you’d like – this is a great one to get the kids involved in too! 

Cuisine : European Course : Main Skill Level : Novice
Prep : 90 mins Cook : 20 mins Ready in : 30 mins Serves : 6


INGREDIENTS:

  • For the Dough
    • 200g Plain Flour
    • 4g Sea Salt
    • 3g Honey
    • 1g Yeast
    • 2g Freshly Ground Black Pepper
    • 100g Semolina (for dusting)

    For the Toppings

    • 4-5 tbsp Tomato
    • 2-3 fillets Anchovies
    • 1 tbsp Olive Oil
    • 3 tbsp Mozzarella Cheese
    • 1g Freshly Ground Black Pepper

DIRECTIONS:

  1. Mix flour, water, salt, honey and yeast in stand mixer (dough hook) until fully incorporated.
  2. Form a ball with the dough, lightly coat with olive oil and cling film.
  3. Rest for an hour to allow flavours to develop.

    Baking the Pizza

  4. Preheat oven to 240°C

  5. Mix semolina with flour (50/50) in a mixing bowl.

  6. Roll out dough onto a well-floured surface.

  7. Transfer the rolled out dough onto a baking tray.

  8. Ladle sufficient tomato sauce to cover the surface of the dough.

  9. Add toppings.

  10. Bake in oven for 4-5 mins until crust is golden brown.


Posted in

Sesame Sandwich Cake

< Back to Recipe Listings

Sesame Sandwich Cake

by Julie Yee

Enjoy this light-as-air Sesame Sandwich Cake paired with an easy-to-prepare Sesame Hokkaido Chantilly Cream by Chef Julie Yee!

Cuisine : Baking Course : Dessert Skill Level : Novice
Prep : 20 mins Cook : 20 mins Ready in : 40 mins Serves : 4-6


INGREDIENTS:

  • Sesame Sandwich Cake
    • Group 1 (Sifted Together)
      • 90 g Cake /Top/HK Flour
      • 1 tsp Baking Powder
      • 1 tbsp Black Sesame Seeds
    • Group 2 (Beat Together)
      • 3 no Egg White
      • 6 no Egg Yolk
      • 1 tsp Fine Sugar
      • 90 g Vanilla Extract
    • Group 3
      • 25 g Hot Corn Oil
      • 50 g Soya Bean Milk
  • Sesame Hokkaido Chantilly Cream
    • 250 g Whipping Cream
    • 1 tbsp Black Sesame Seeds
    • 1 tbsp Condensed Milk

DIRECTIONS:

  1. Sift Group1(Flour, Baking Powder & Black Sesame Seeds) together.
  2. Beat egg white till soft peak with sugar, add in egg yolk & vanilla (Group 2)
  3. Whisk till thick & ribbon stage
  4. Pour in the warm Soya Bean milk & whisk for another few seconds.
  5. Fold sifted flour.
  6. Mix the warm oil with a scoop of batter then pour back into the mixing bowl and fold well.
  7. Bake at 180C for 20mins.
  8. Cover with a clean wet towel till use.

    Sesame Hokkaido Chantilly Cream

  9. Whip cream with condensed milk till soft peak.
  10. Add in Sesame seeds and fold gently.
  11. Sandwich cream between the 2 layers of cake.
Posted in

Durian Lava Cake

< Back to Recipe Listings

Durian Lava Cake

by Julie Yee

Chef Julie puts a creative twist on a local favourite fruit! Each durian lava cake encases a generous serving of durian puree! Truly a durian lover’s dessert!

Cuisine : Baking Course : Dessert Skill Level : Novice
Prep : 20 mins Cook : 10 mins Ready in : 30 mins Serves : 8


INGREDIENTS:

  • 110g Butter
  • 200g Durian puree
  • 4 tbsp Yogurt
  • 65g Plain flour
  • ¼ tsp Salt
  • 4 Eggs
  • 220g Fine sugar
  • 1 tsp Vanilla extract

DIRECTIONS:

  1. Preheat oven at 200ºC.
  2. Brush melted or softened butter on 8 ramekins or individual baking cups then add about a tablespoon of sugar on each and swirl it around to coat the sides and bottom.
  3. Whisk the softened butter and add in the durian puree.
  4. Pour in the yogurt, sifted flour and salt.
  5. Combine egg and sugar in the bowl of your mixer, beat on high speed until ribbon stage.
  6. Gradually fold the durian puree mixture with the egg mixture.
  7. Fill the cups and bake for 8-10mins at 200ºC.
  8. Cool for about 5-10 minutes before inverting each onto a plate.
Posted in

Thai Red Ruby in Coconut Cream

< Back to Recipe Listings

Thai Red Ruby in Coconut Cream

by Trish Yee

Beat the heat with this coconut milk based dessert with water chestnut covered with tapioca flour recipe by Chef Trish!

Cuisine : Asian Course : Dessert Skill Level : Novice
Prep : 15 mins Cook : 20 mins Ready in : 35 mins Serves : 4


INGREDIENTS:

  • 400 ml Coconut milk
  • 120 g Sugar
  • 1 tsp Salt
  • 300 g Chinese Water Chestnut
  • 500 g Tapioca Flour
  • 1/2 tsp Red food colouring. (liquid)
  • 3 Pandan Leaves
  • 1 cup Water
  • 2 tbsp Pearl Sago

DIRECTIONS:

  1. Cut Chinese Water Chestnut into 1 cm. small cube.
  2. Mix the red food colourings with some water, soak the water chestnut in water for 15 mins, drain and coat with tapioca flour. Shake to remove excess flour.
  3. Bring a pot of water to boil, put in the water chestnut and boil until they float to the surface. Remove from water and drop into ice cold water. Drain and set aside.
  4. In another pot, cook sago till translucent. Drain and soak in cold water till ready to serve.
  5. Heat the coconut milk to slow boil, follow with pandan leaves, sugar, salt. Set aside to cool.
  6. Chill in the fridge until you are about to serve, combine the coconut milk mixture with red ruby and sago.
Posted in

Chili Crab Sauce

< Back to Recipe Listings

Chili Crab Sauce

by Eric Low

Here’s how to make gooey, cheesy, garlicky pull-apart bread, one step at a time! Addictively buttery and cheesy with each piece and bursting with fresh herb and garlic flavours!

Potentially the most popular of all local crab dishes, the chili crab is popular for its flavorful sweet, salty, chili-hot tomato sauce. Many like to use the mantous to mop up the gravy! Try this recipe to satisfy that chili crab craving without buying the entire crab! 

Cuisine : Asian Course : Condiment Skill Level : Novice
Prep : 10 mins Cook : 10 mins Ready in : 20 mins Serves : 4


INGREDIENTS:

  • Spice Paste
  • 100g Shallots
  • 20g Garlic
  • 40g Lemongrass
  • 40g Galangal
  • 20g Ginger
  • 2g Turmeric Powder
  • 20g Belachan
  • 30g Buah Keras
  • Sauce
  • 4 tbsp Extra Oil
  • 30g Dried Shrimps (Hay Bee), finely ground
  • 40g Spice Paste
  • 1 tbsp Chili Paste
  • 1 tbsp Fermented Bean Paste
  • 200ml Ketchup
  • 500ml Water
  • 2 tbsp Corn Starch, mixed with 4-5 tbsp water
  • Assembly
  • 8 Eggs
  • 500g Fresh Crabmeat
  • Coriander leaves for garnish
  • 8pcs Mantou

DIRECTIONS:

  1. In a food processor, place all ingredients for spice paste in sequence and blend. Process until you obtain a fine paste.
  2. Place eggs in sous vide machine and cook at 64°C for an hour.
  3. Heat extra oil, saute dried shrimps, fermented bean paste and spice paste together. Add chili paste. Cook briefly.
  4. Pour in ketchup and water. Bring to boil and thicken sauce slightly with corn starch solution.
  5. Add the crabmeat and bring to simmer. Serve hot with sous vide eggs, diced tomatoes, fresh coriander leaves and mantou buns.
Posted in

Salmon en Croute with Cheesy Dill Sauce

< Back to Recipe Listings

Salmon en Croute with Cheesy Dill Sauce

Serve this traditional French dish to your friends and family when you want to pull out all the stops and put something impressive on the table! Use top quality salmon for this – you will be pleased with the results! 

Cuisine : European Course : Main Skill Level : Novice
Prep : 120 mins Cook : 20 mins Ready in : 140 mins Serves : 4


INGREDIENTS:


  • For the Rough-Puff Pastry
    • 250g Flour
    • 1 tsp Salt
    • 250g Butter, cubed and cold
    • 150ml Ice cold water
    • For the Salmon En Croute
    • 40g Plain flour
    • 40g Butter
    • 400ml Full cream milk
    • 50g Grated sharp cheddar
    • Chopped fresh dill, to taste
    • Salt & pepper
    • 1 Recipe rough puff pastry
    • 400g Piece salmon
    • 1 Egg, lightly beaten

DIRECTIONS:

For the Rough-Puff Pastry

  1. Sift flour and salt into a bowl and make a well in the centre. Add the butter and use your fingertips to rub the butter quickly into the flour until the mixture resembles coarse breadcrumbs. Add to the cold water little by little, stirring with fingertips, until the dough just starts to come together. Push together into a ball and empty onto a floured work surface
  2. Roll out into a rectangle, fold the top third down and then fold the bottom third over the top third. Wrap and refrigerate for 15-30 minutes
  3. Roll out again, turning the pastry so that the open edges are facing away from you. Once rolled, fold again as above and refrigerate again. Repeat one to three more times, turning the pastry each time and refrigerating between rolling.

For the Salmon En Croute

  1. Preheat the oven to 200ºC. Lay some greaseproof or baking paper on a baking tray.Melt the butter in a small heavy based saucepan, add the flour and cook over medium heat for a minute. Slowly add the milk in batches, stirring all the while whilst still over medium heat, until all the milk has been incorporated. Continue stirring over medium heat until sauce starts to thicken. Add cheese, dill and seasoning, stir to melt cheese and taste; adjust seasoning if needed. Remove from heat and set aside.
  2. Roll pastry out on a floured surface to form a large rectangle about 2mm thick. The aim is to cut the rectangle into two smaller rectangles, one to place the salmon on with a 1 ½ cm border, and another about 1cm bigger all around to lay on top of the salmon.
  3. If desired, cut out shapes and patterns on the rectangle intended for the top.
  4. Lay the bottom pastry rectangle on the prepared baking tray and place the salmon on top. Spread the cheesy dill sauce over the salmon without going over the salmon edges onto the pastry. Brush a little water onto the pastry’s edges and lay the remaining pastry rectangle on top. Press down on the edges to seal the pastry and brush the top with beaten egg.
  5. Bake at 200ºC for ten minutes before turning the temperature down to 180ºC. Bake for a further 15-20 minutes, until dark golden and puffed. Remove from the oven, cool for 5 minutes and serve.
Posted in

Viennese Fingers

< Back to Recipe Listings

Viennese Fingers

by Audra Morrice

Dipped in a rich dark chocolate, these moreish Viennese Fingers are easy to make and ideal for sharing. Try this recipe from Chef Audra Morrice – they include crumbed pistachios that add extra flavour and texture!

Cuisine : Baking Course : Dessert Skill Level : Novice
Prep : 30 mins Cook : 10 mins Ready in : 40 mins Serves : 2-4


INGREDIENTS:

  • 230g Unsalted Butter, room temperature
  • 60g Icing Sugar
  • 1½ tsp Vanilla Extract
  • 250g Plain Flour, sifted
  • Pinch of Salt
  • 1 tbsp Pistachio Kernels, toasted and coarsely crumbed
  • 100g Dark Chocolate, melted

DIRECTIONS:

  1. Preheat your oven to 180⁰C. Line 2 baking sheets with greaseproof paper.
  2. Cream the butter and sugar until pale and fluffy. Mix in the vanilla. Add the flour and salt, pulse until just combined.
  3. Fill a piping bag fitted with a 1cm star nozzle with the biscuit dough. Pipe out lengths of cookie, spacing them about 2cm apart. Sprinkle over a little pistachio and bake for 10 mins or until very lightly coloured. Remove and cool on a rack.
  4. When the cookies have cooled, dip one or both ends into the melted chocolate and let it set on a rack. Store in an air-tight cookie jar.
  5. Note: in warmer climates, remove the butter from the fridge for about 10 mins before using.
Posted in